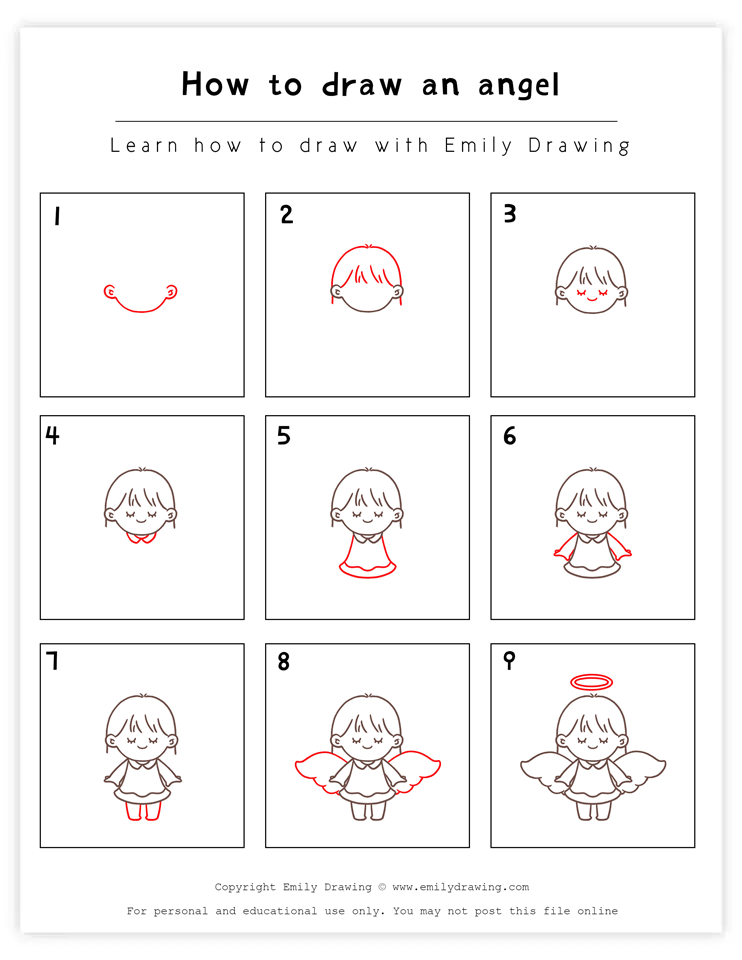
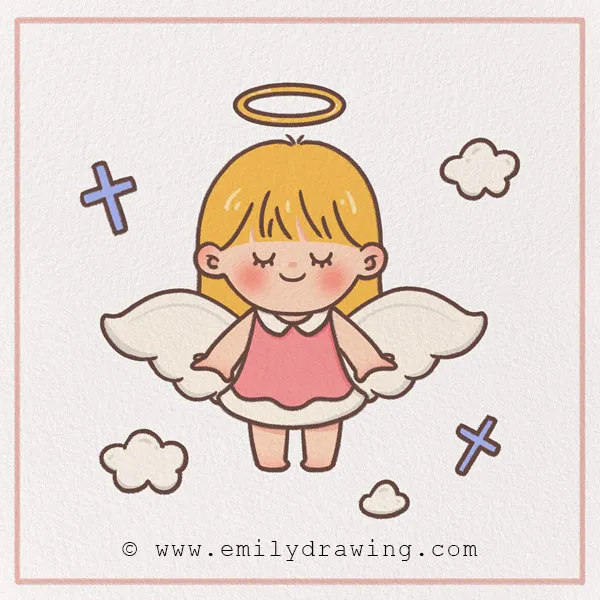
Welcome to our super fun and easy step-by-step angel drawing tutorial! In just 10 steps, you are going to learn how to draw an angel with us.
Angels are an interesting part of our culture. Most often, they are associated with religion, but often people will use the word “angel” outside of religion, too. Angels are seen as nice and graceful beings. They have wings, as well, so they can fly. They also have halos which float above their heads!
Oftentimes, people who celebrate Christmas will have angels around their home during Christmastime. They even sit on top of Christmas trees sometimes, reaching towards the skies. You’ll also see a lot of angels in art going back many centuries.
Whether you know a lot about angels or not, today, you’re going to learn how to draw one! Keep reading below to get started…all you need is some creativity, a comfy spot, and a few drawing utensils! Let’s get started.
If you enjoy drawing celestial or whimsical characters, you might also like How to Draw a Fairy or How to Draw a Unicorn.
Materials:
- a piece of paper
- a pencil for the guiding lines and sketching
- an eraser
- a black sharpie or a pen for the outlines
- markers or colored pencils for coloring
- our printable drawing guide (Join my Email List below to get this Tutorial)
Here are my RECOMMENDED Art Supplies!
- Crayola Coloring Set (140 Pieces – Mega Value!)
- 24 Colored Crayon Set
- A4 Printer Paper
- Crayola Coloring Pencils
- HP Home Printer with Instant Ink!
Time needed:
15 minutes.
How to Draw an Angel — Let’s get started!
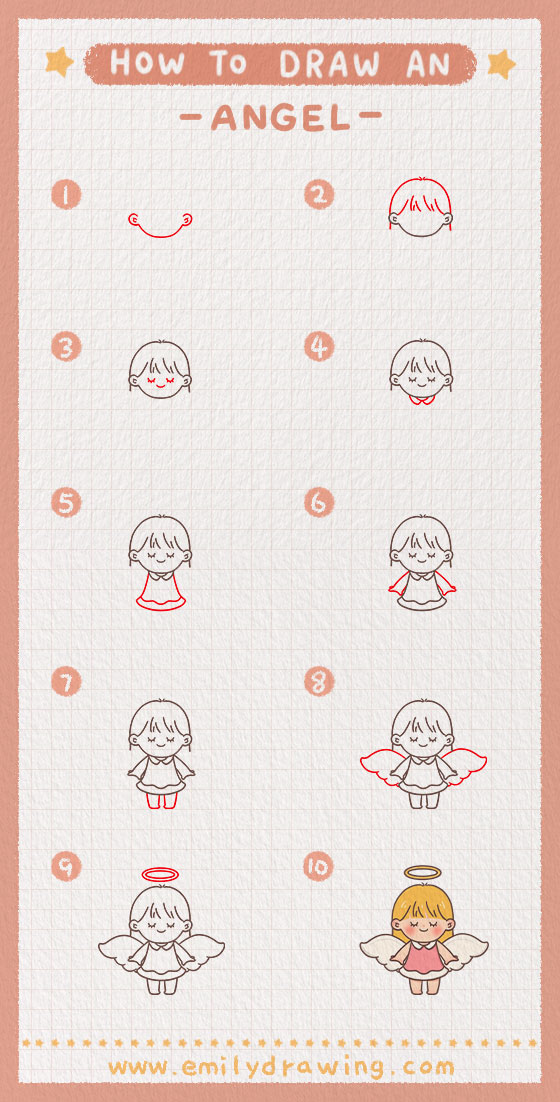
Step 1 – Start drawing the head.
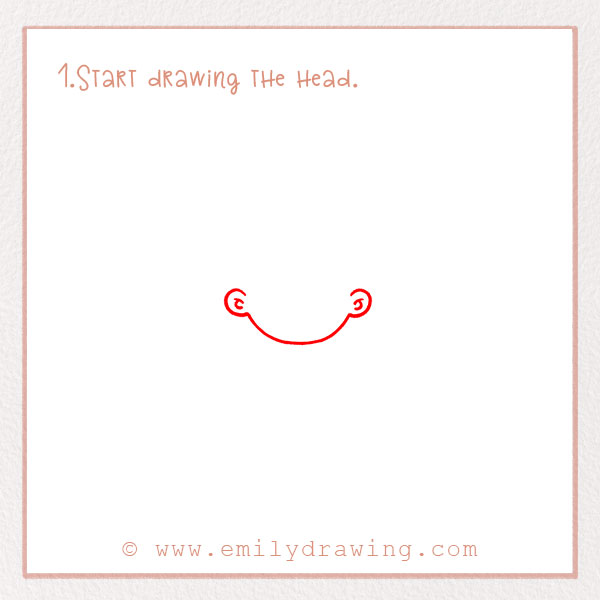
In the middle of the page, draw a wide curve. This is the angel’s chin. On either end, draw two smaller sideways curves for ears. Lastly, inside the ears, draw tiny swirls to show more detail. Good job!
Step 2 – Add the angel’s hair.
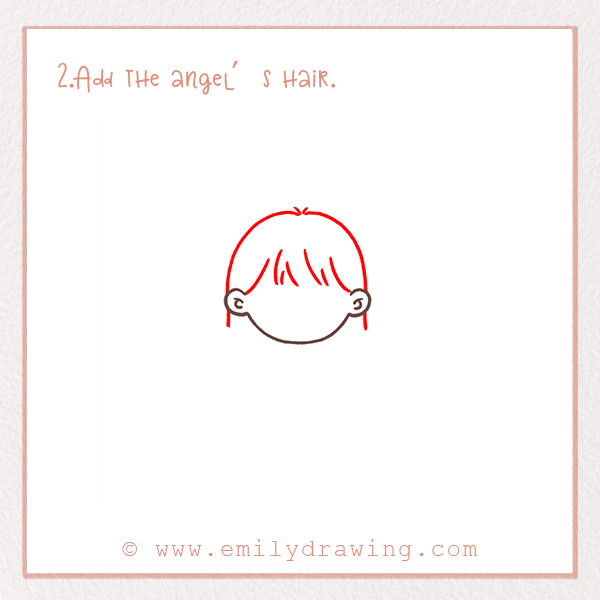
Our angel is going to have some short and pretty hair. Start by drawing the top of the head. Next, draw several slanting vertical lines, spaced a bit apart from each other, to represent her bangs. Draw two small lines extending underneath the ears to show hair tucked behind.
Check out the photo for help if you want! Great job!
Step 3 – Draw the angel’s face!
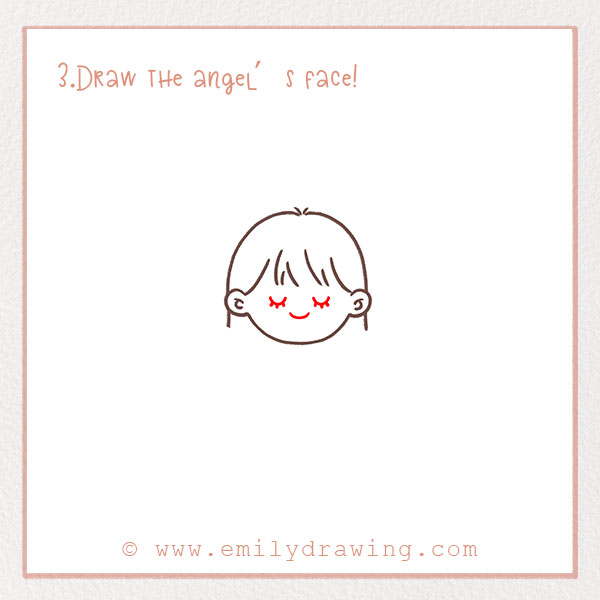
Angels are graceful, peaceful beings, so we want our angel to have a very peaceful expression on her face.
Start by drawing her eyes. Make two small curves — her eyes are going to be closed. Add three eyelashes on each eye. Check out the photo.
Next, draw another small curve centered below the eyes. This is the angel’s small smile. All done? Move on to the next step!
For more practice with drawing wings, try How to Draw a Butterfly or How to Draw a Bird.
Step 4 – Add the angel’s collar!
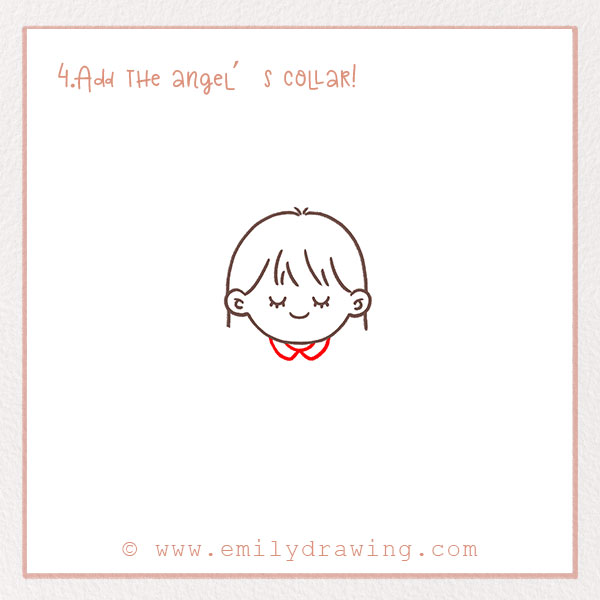
Let’s start drawing the outfit for our cute angel. She’s going to be wearing a dress, but let’s start by drawing the collar at the top of her dress first. Underneath her chin, draw two curves that connect to her chin. Good job!
Step 5 – Draw her dress.
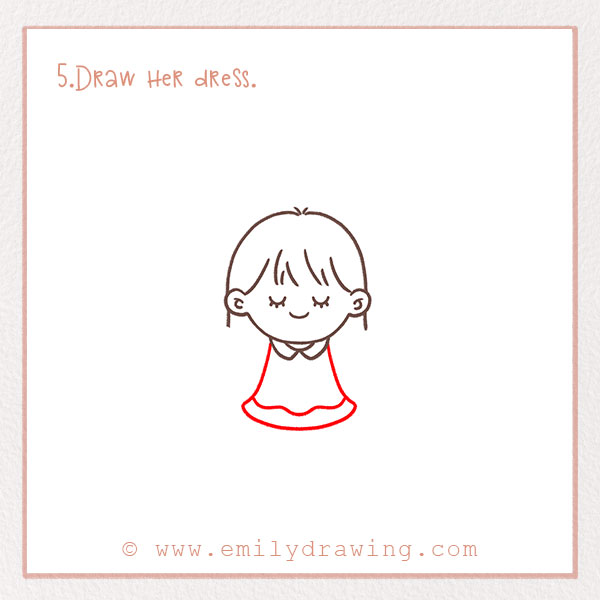
Let’s finish drawing her dress. From the edges of her collar, draw two long slanting lines downwards. They should curve outwards at the end. Then, connect them with another line for the bottom hem. Lastly, draw another slightly wavy line above the hem for a bit more detail.
Awesome. Let’s keep moving!
If you enjoy adding fine details and ornaments, consider exploring How to Draw a Crown or How to Draw a Star.
Step 6 – Draw the angel’s arms.
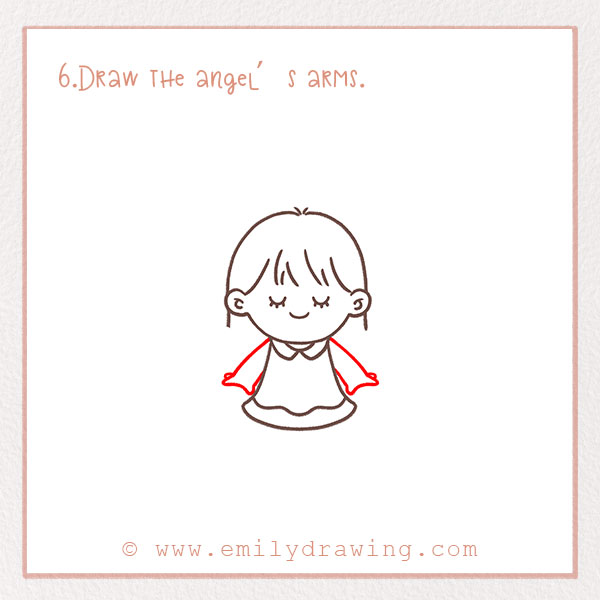
Of course, our angel needs to have arms. On either side of her dress, draw two rectangular shapes extending outwards. Lastly, add tiny bumps to show fingers. Refer to the photo!
Step 7 – Draw the angel’s legs.
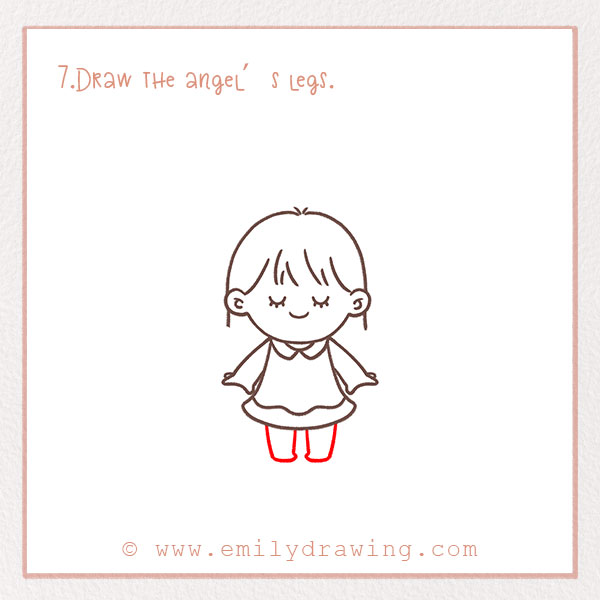
Draw two legs for this step. They should also be rectangular shapes that meet the bottom of her dress. Make the corners a bit rounded so they look a bit more realistic. Perfect!
Step 8 – Add wings to the angel!
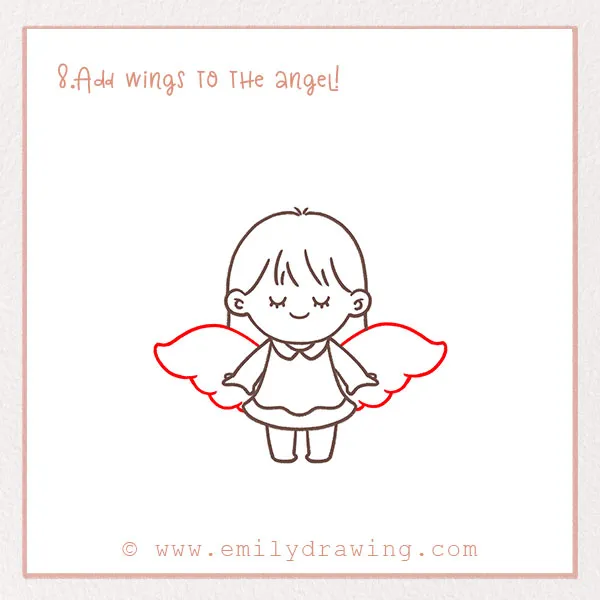
One of the most unique and beautiful parts of an angel wings drawing are their graceful shapes, which allow angels to fly above us. You’ll want to check out the photo for this step. On each shoulder, draw a large curve extending outwards. Then, bring them back to the body by making a scalloped line below. Now our angel can fly!
Step 9 – Add a halo.
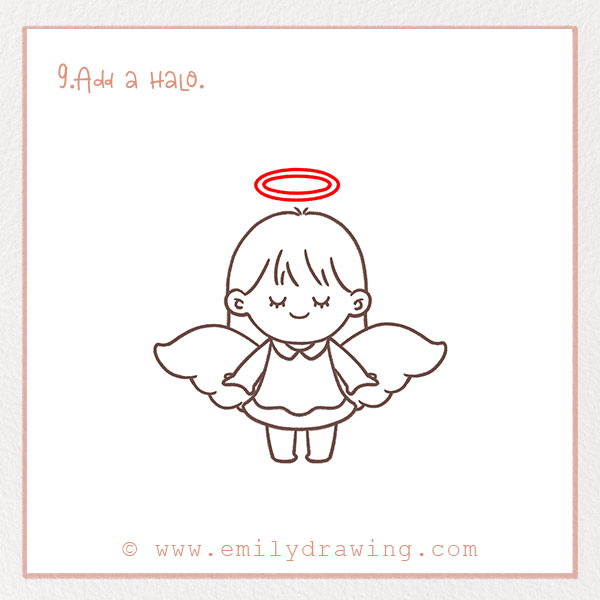
We’re almost done! We definitely cannot forget our angel’s halo. Halos float above angels’ heads—you’ll see this in a lot of art as a very thin gold line.
Above the head, draw an oval. Next, draw a smaller oval inside, so that the halo has some dimension and perspective. Awesome job!
Step 10 – Color in your drawing!
Last but not least, let’s add color. In our opinion, coloring is the most fun part of the process! Find some hues that you like and fill in your newest creation. Don’t forget to color in the background, too…maybe she’s flying in the sky, and you want to fill the background with blue.
There you go! You’re all done — we hope this angel drawing for beginners was tons of fun! Hopefully you also learned some drawing techniques and facts about angels, too.
We have a lot more tutorials to discover, if you like, categorized nicely by people, animals, food, and more, all in a simple but fun ten steps.
If you enjoyed our angel tutorial, feel free to share it with your friends or family! You can do this by showing your drawing or even sending them this page using the social media icons.
Once you’ve mastered your angel, expand your skills with How to Draw a Christmas Tree or How to Draw Princess Peach.
Pin it now, Draw later!
Get the FREE Printable Drawing Guide