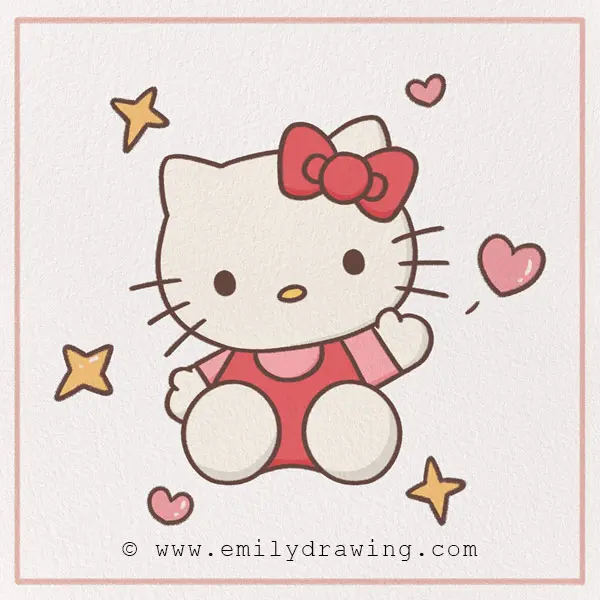
Hello! Today, we are going to draw a pop-culture icon: Hello Kitty! In this tutorial, we’ll learn how to draw a Hello Kitty!
You’ve probably heard of her or seen her on products like backpacks, accessories, school supplies, clothing, and more. Maybe you even have a Hello Kitty on something you own! Let’s learn a bit about her before jumping into our tutorial.
Hello Kitty, the beloved Sanrio character, was created in the late 20th century by a Japanese company. Although she started as a little character named Kitty White with the word “hello” on early products, she has now become a global icon. She technically started as a cartoon character with her twin sister, Mimmy, but now she has a whole media company based on her! Fast forward to the present, she is worth tens of billions of dollars, and even has entire theme parks dedicated to her.
So, let’s learn how to draw this cute little kitty with a fun kawaii drawing tutorial. Get some coloring materials to get started on this easy step-by-step Hello Kitty drawing tutorial.
If you enjoy drawing adorable and popular characters, you might also like How to Draw a My Little Pony or How to Draw Princess Peach.
Materials:
- a piece of paper
- a pencil for the guiding lines and sketching
- an eraser
- a black sharpie or a pen for the outlines
- markers or colored pencils for coloring
- our printable drawing guide (Join my Email List below to get this Tutorial)
Here are my RECOMMENDED Art Supplies!
- Crayola Coloring Set (140 Pieces – Mega Value!)
- 24 Colored Crayon Set
- A4 Printer Paper
- Crayola Coloring Pencils
- HP Home Printer with Instant Ink!
Time needed:
13 minutes.
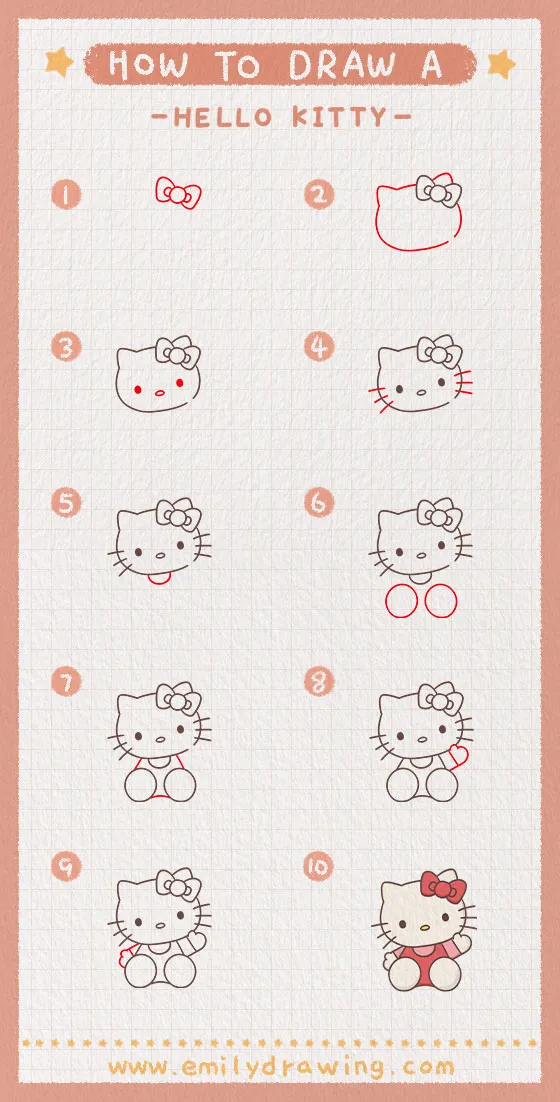
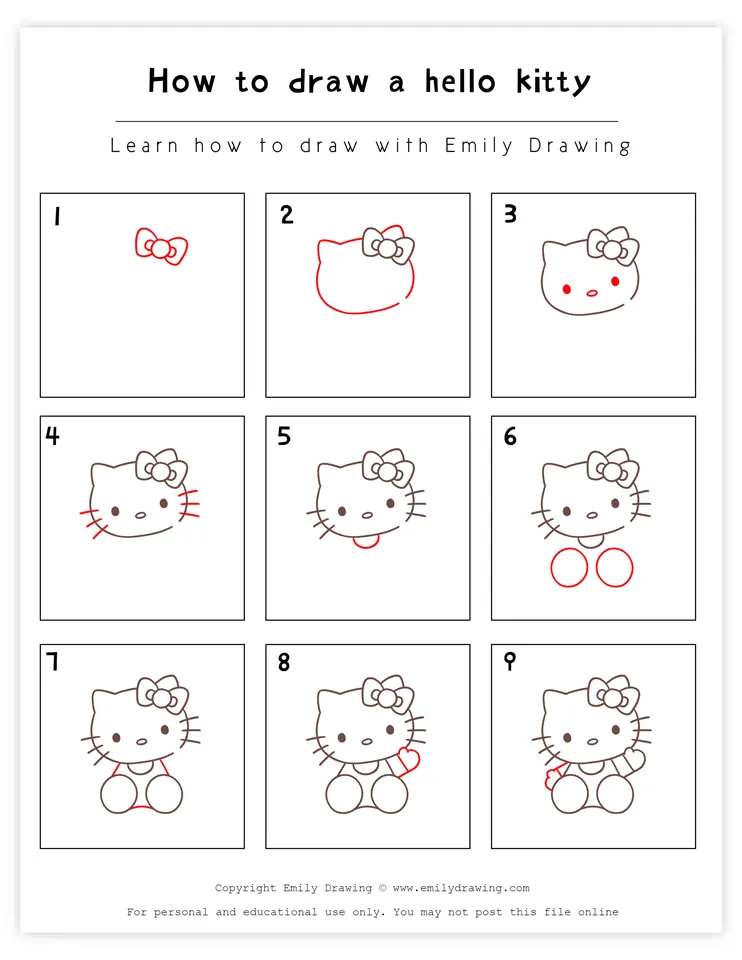
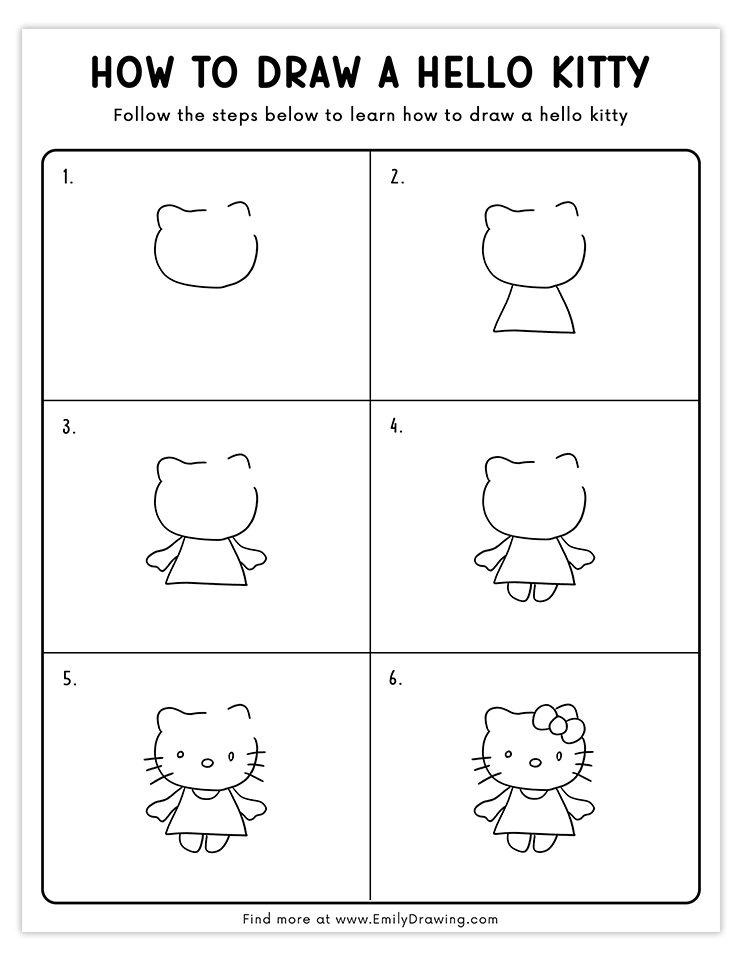
How to Draw a Hello Kitty — Let’s get started!
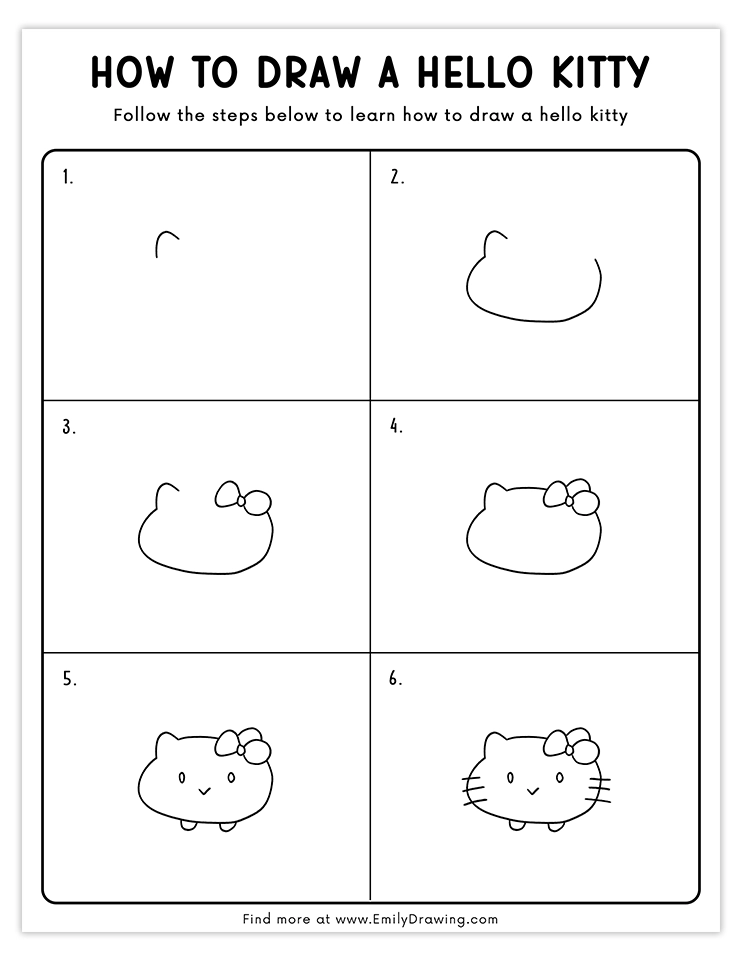
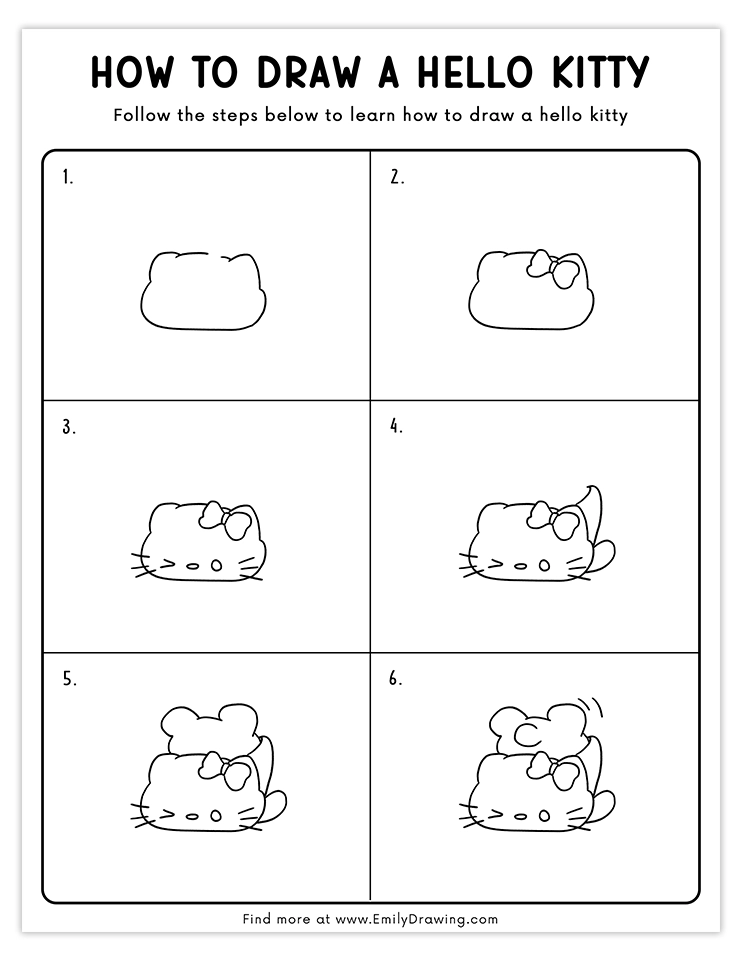
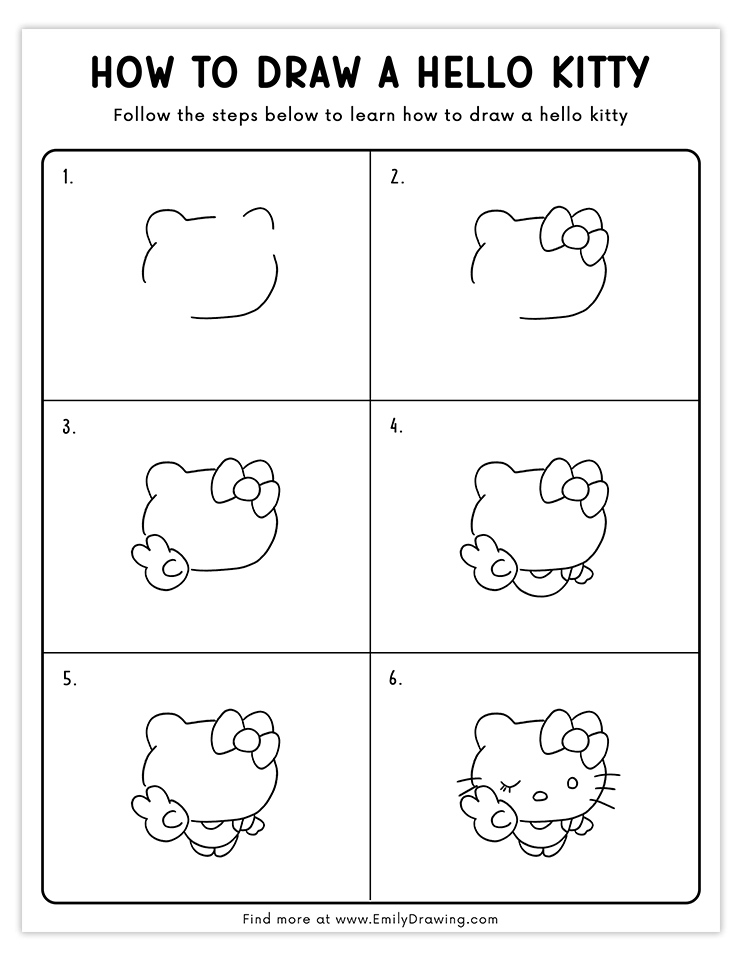
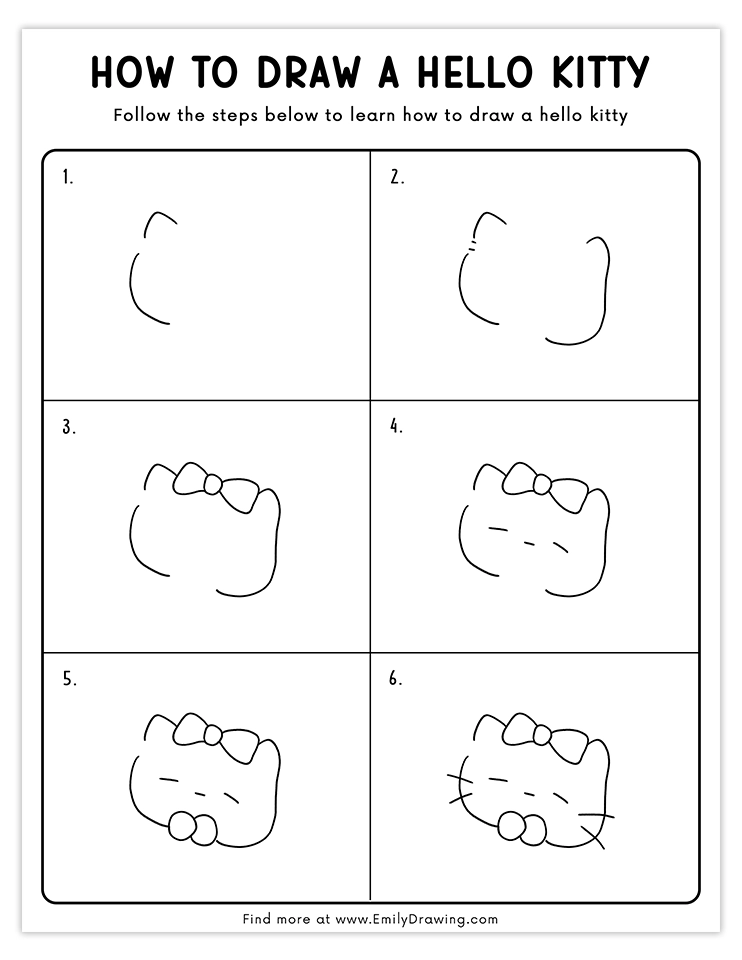
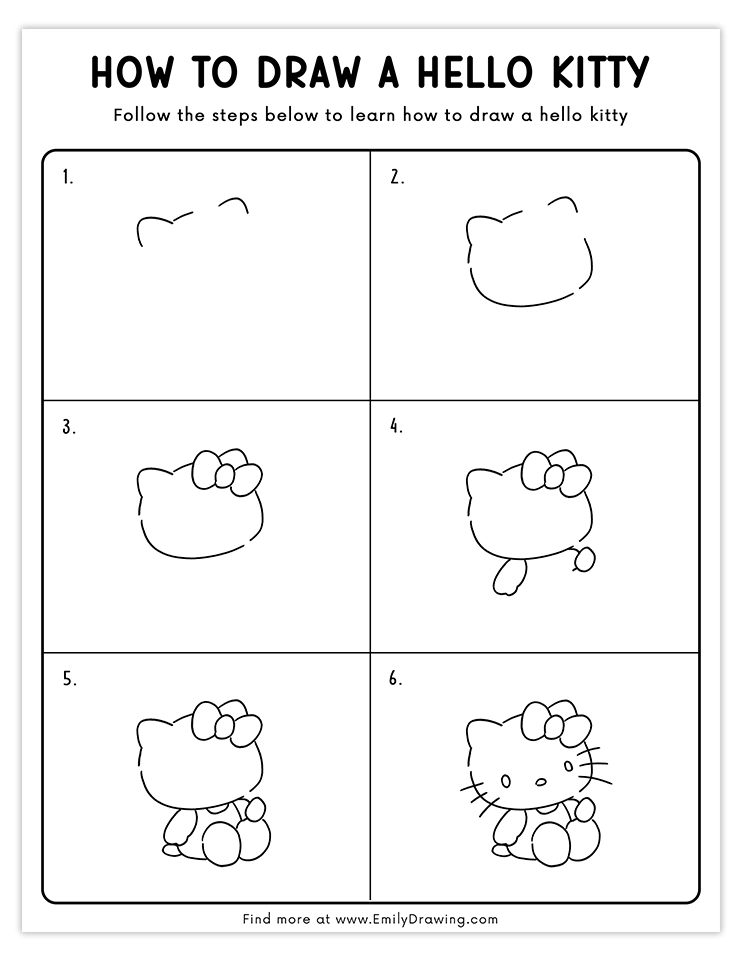
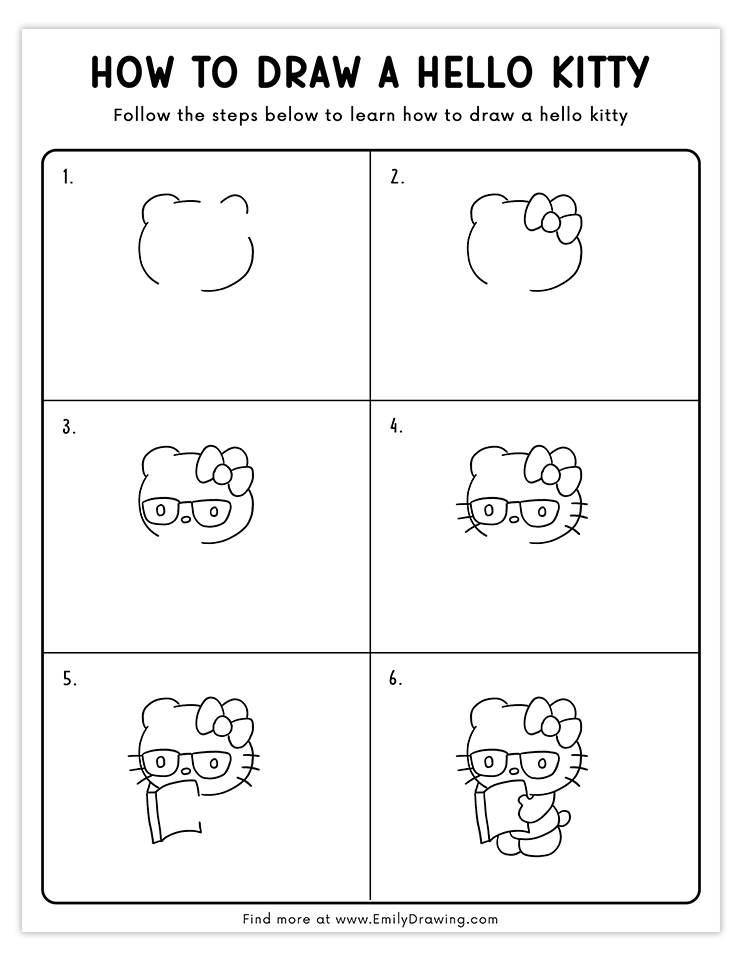
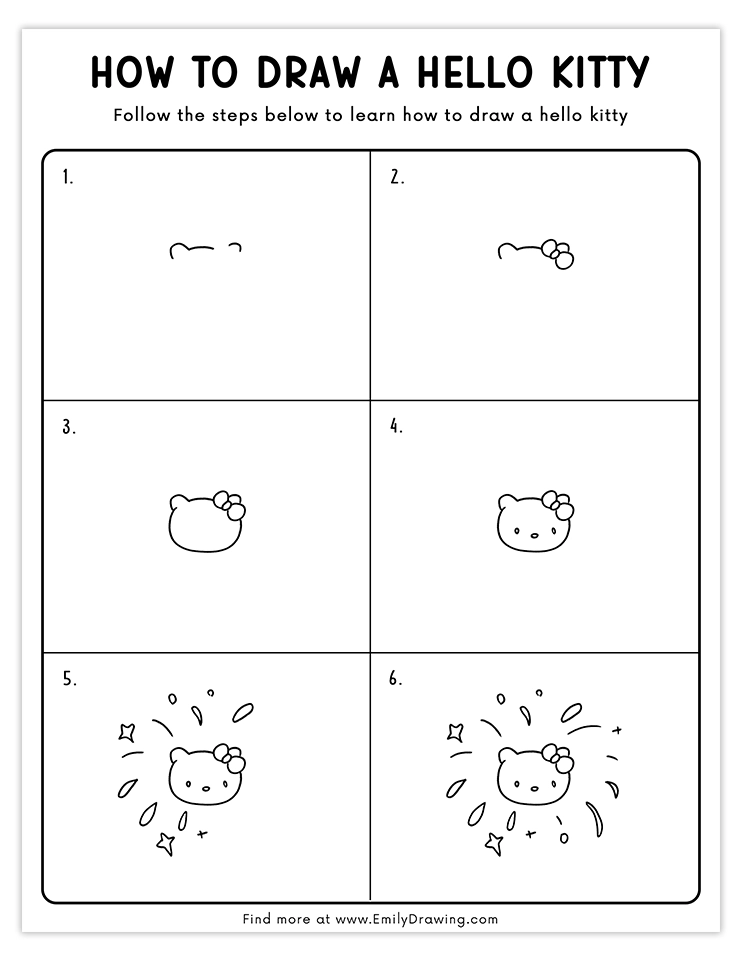
Step 1 – Draw the bow.
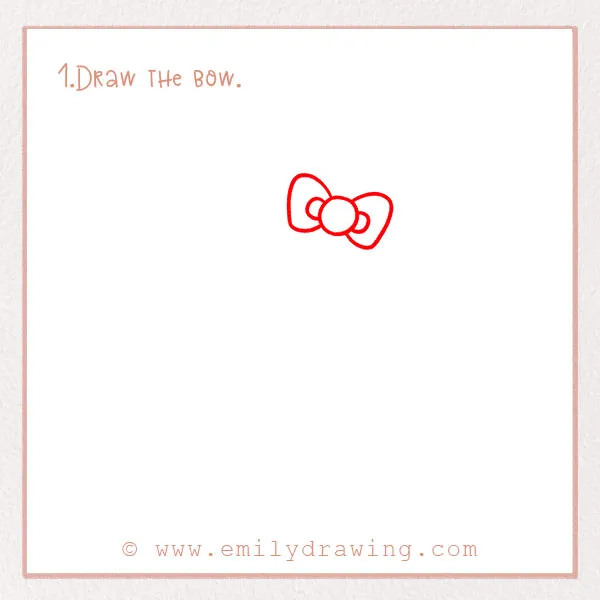
Hello Kitty wears a cute bow on the top of her head. Let’s start with this accessory.
First, draw a circle on the top-right quadrant of the page. Draw two small semi-circles coming out from the other side of the first circle. Add two rounded triangular shapes on the sides to complete the shape of the bow. Refer to the photo!
Step 2 – Create the shape of her head.
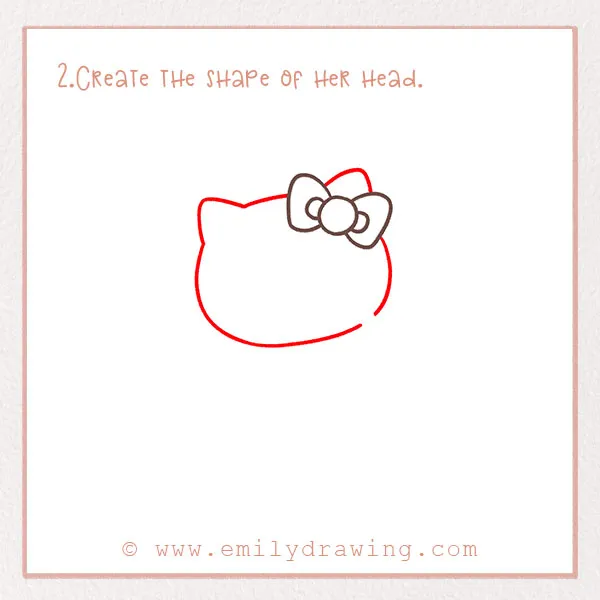
Let’s draw the basic outline of Hello Kitty. Draw a large curve underneath the bow, slanting a little bit to the left. Don’t forget to add the ears! Her head should look like it is slightly tilted to the left.
Step 3 – Draw Hello Kitty’s face.
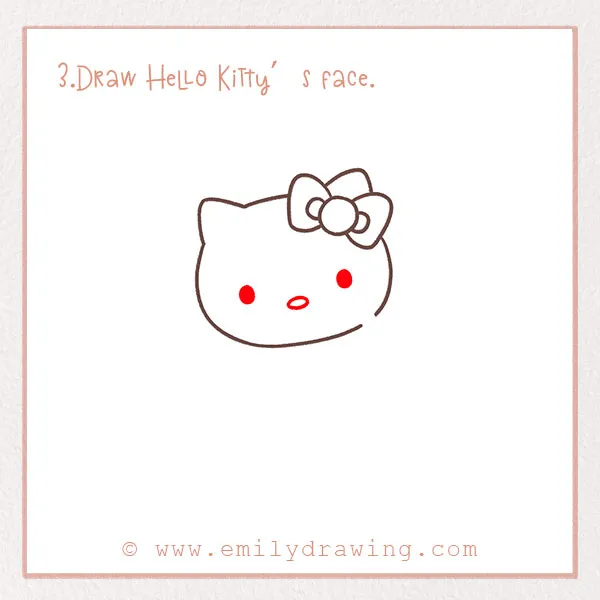
In this step, we’re going to draw her face. Hello Kitty famously doesn’t have a smile, but she still looks super friendly. In fact, the current designer for Hello Kitty says this helps relate our own emotions to her.
Draw two dots a few centimeters apart for her eyes. Next, draw a small oval for her nose! Good job!
For more practice with decorative details, try How to Draw a Crown or How to Draw a Star.
Step 4 – Add her whiskers!
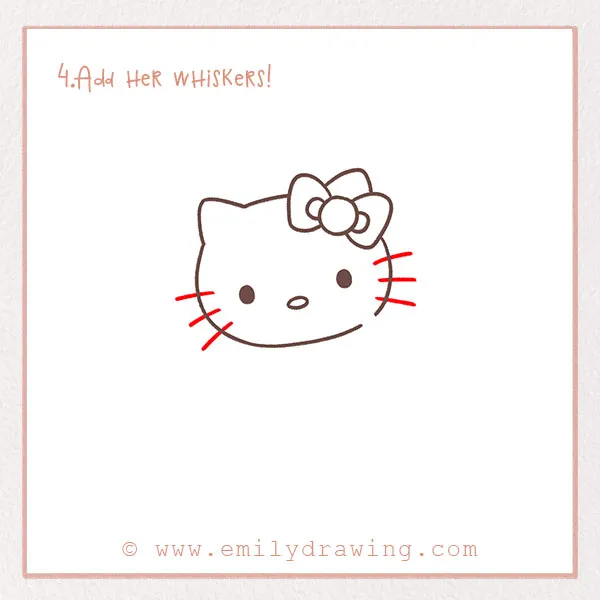
Let’s add some whiskers. In real life, whiskers help kitties to sense the world around them, so of course Hello Kitty has them too.
So, on either side of her face, draw three little lines for whiskers. They should extend a bit inside the outline of her head—check out the photo.
Step 5 – Start drawing Hello Kitty’s body.
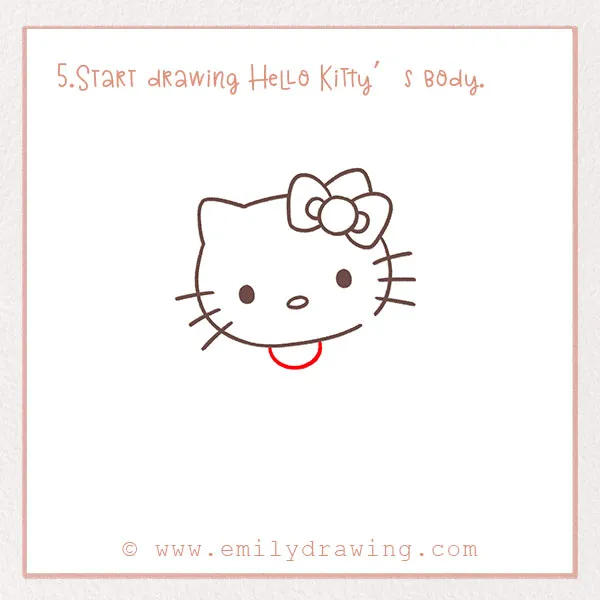
Beneath the head, draw a small semicircle. This will be the top of her shirt which we will complete later. Good job!
If you enjoy working on detailed faces, consider exploring How to Draw a Bunny or How to Draw a Panda.
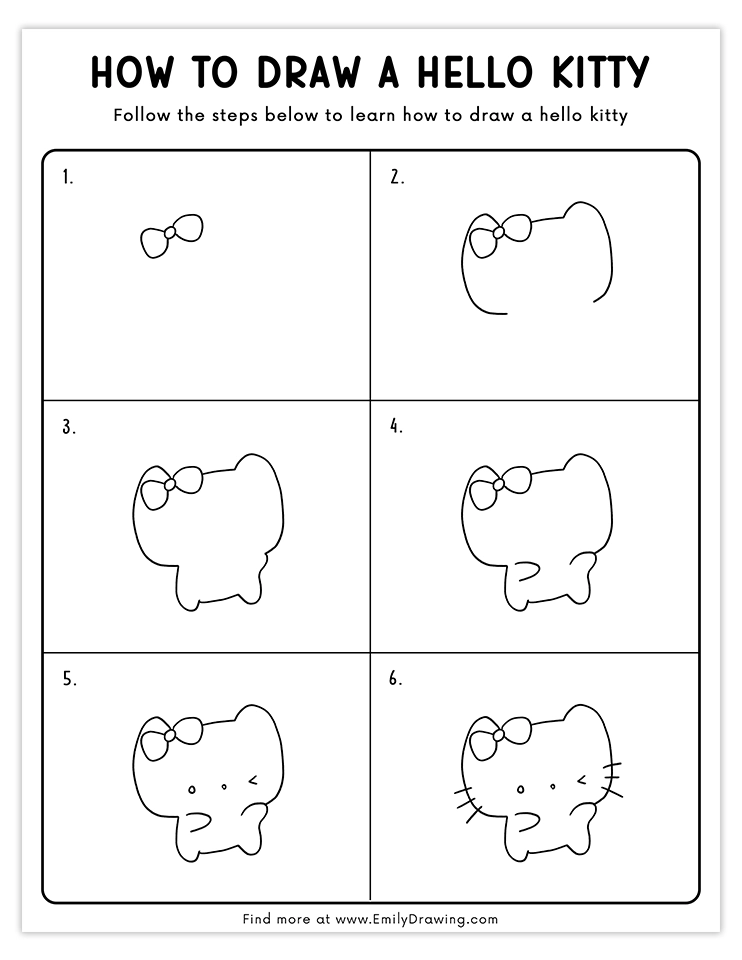
Step 6 – Draw her feet.
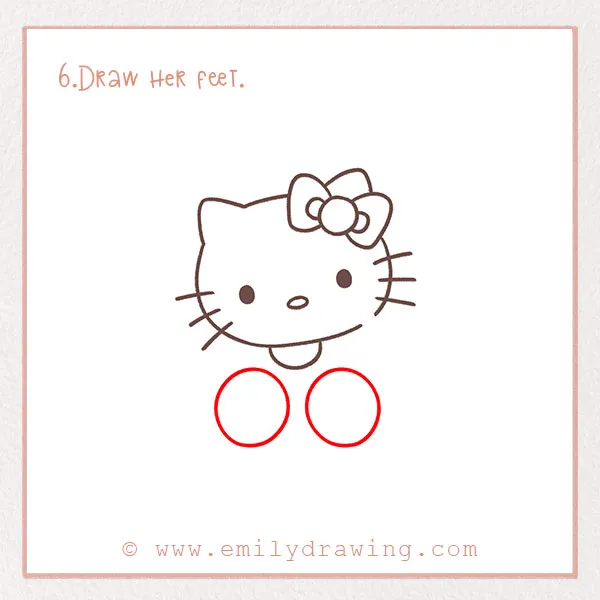
Next, we are going to draw her feet using a technique called foreshortening. Since she’s sitting down, we can only see her feet, not her legs, and the perspective needs to show this. So, simply draw two large circles centered below the head. This is foreshortening! Awesome job.
Step 7 – Continue forming the body.
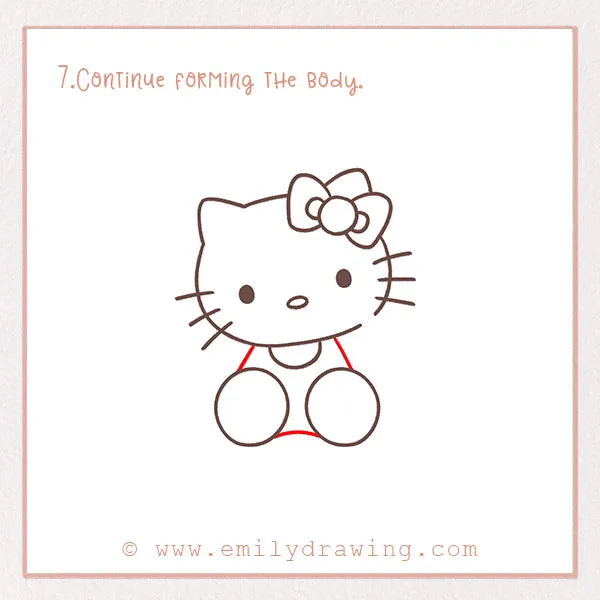
We need to connect the feet to the body, of course! Refer to the photo for this step. You’re basically connecting them with simple lines.
From the top of each foot, draw slanting lines inwards and upwards to the bottom of the head. Also draw a line connecting the feet to each other. All done? Keep reading for Step 8!
Step 8 – Draw her arm!
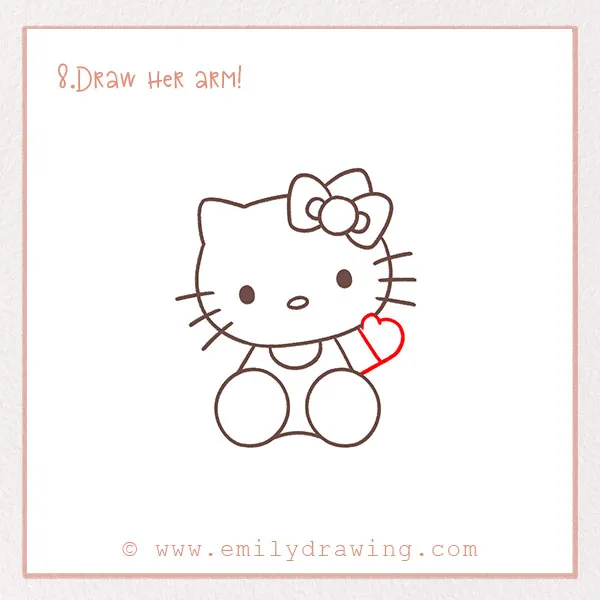
Our Hello Kitty is going to be waving in our drawing because she’s known for being very friendly and approachable. On the right side, let’s add her waving arm and hand. Draw a short line coming up from her foot. Next, add a heart shape for her hand. Good job!
Step 9 – Add her other arm.
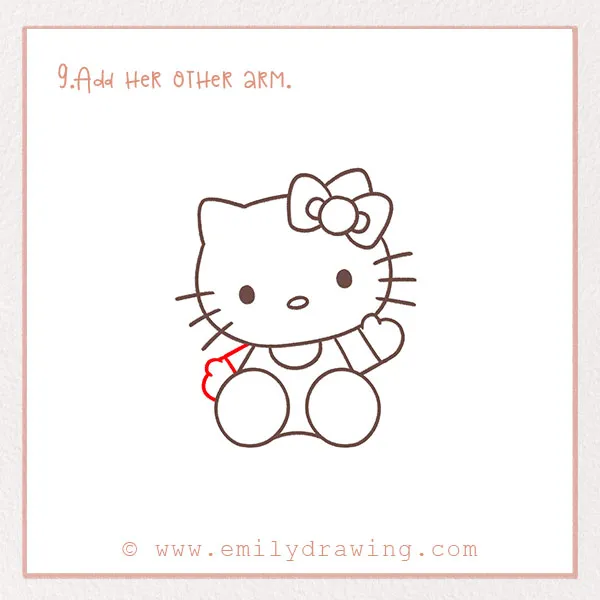
Finally, let’s finish the shape of our Hello Kitty. Draw a similar shape to Step 7, except this time, her arm is by her side. Check out the photo.
You’re almost done…keep reading for the last fun step.
Step 10 – Color in your Hello Kitty!
This is always our favorite step—time to color! Hello Kitty can be different colors (although her bow is normally pink!) so pick some of your favorite shades and go for it. The more color the better!
Good job! You’re all done! How did it go? We had a good time and we hope you did too—and hopefully you learned some more drawing techniques along the way!
Once you’ve mastered Hello Kitty, try How to Draw a Unicorn or How to Draw an Angel.
If you’d like more cartoon tutorials, you can look up our My Little Pony and Spongebob tutorials! We love these characters and hope you do too. There’s also tons of others, so find one that looks interesting to you!
If you enjoyed this tutorial, share it with people who would also have fun with it! Simply share it online with the social media icons on this page.
Pin it now, Draw later!
Get the FREE Printable Drawing Guide
FREE Download Printable Hello Kitty Drawings Tutorials


This was so helpful and out of all the step by step drawings I think this was the best one yet!🎀👏😁
Thank you so much for your kind words! 🎉😊 I’m thrilled to hear that you found it helpful and enjoyed the step-by-step process. Your feedback means a lot! 💖
Thank you, I really liked it that I’m using it again for inspiration. You are such an inspiring artist I love artwork!😁
This was SO helpful! Thank you so much! Now I can start working on my school project!
Thank you so much! I’m so glad it was helpful, and good luck with your school project!