This easy drawing tutorial shows how to draw a cute bug step by step. We will build the sketch in small, simple shapes. Take your time, and enjoy watching your bug come to life.
What You Will Need
- Pencil
- Eraser
- Black pen or marker (optional for outlining)
- Coloring tools (crayons, colored pencils, or markers)
- Paper
Here are my RECOMMENDED Art Supplies!
- Crayola Coloring Set (140 Pieces – Mega Value!)
- 24 Colored Crayon Set
- A4 Printer Paper
- Crayola Coloring Pencils
- HP Home Printer with Instant Ink!
Time needed:
11 minutes.
Step-by-Step Drawing Guide
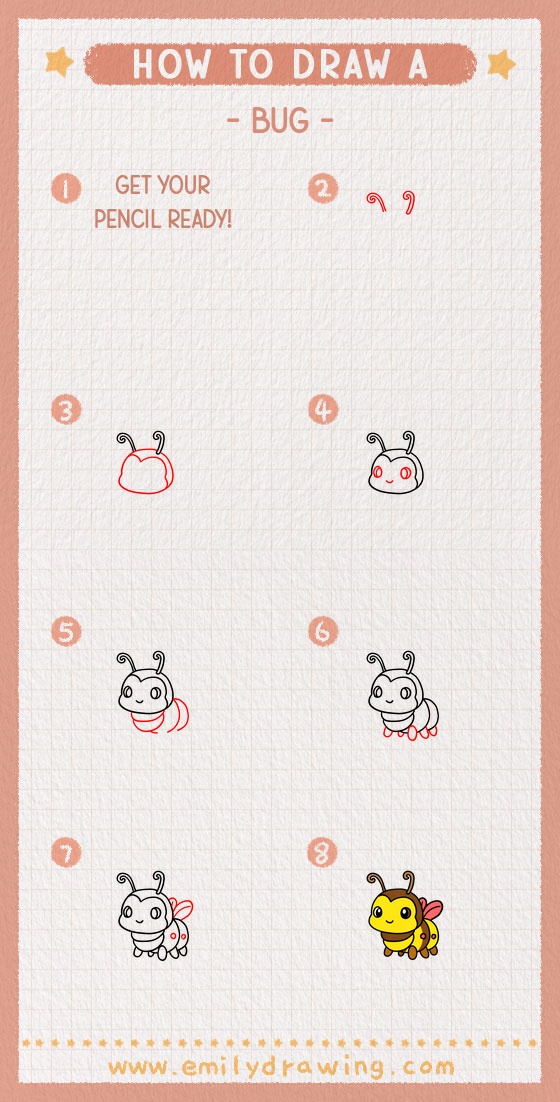
Step 1: Add the Bug’s Curly Antennae
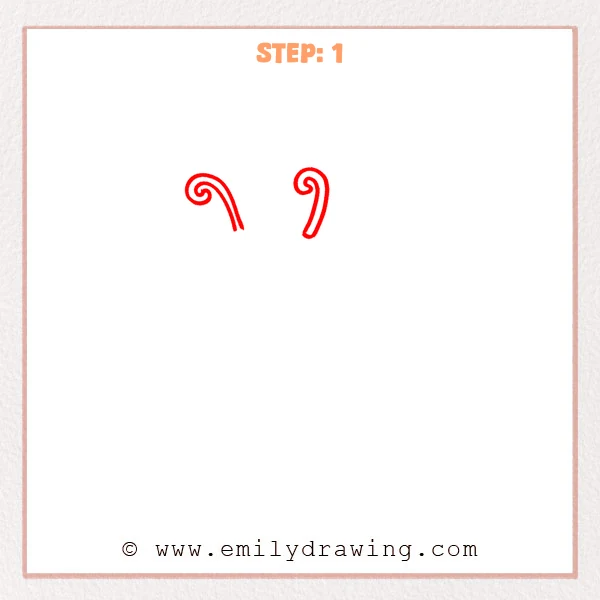
Leave space below, then sketch two separate curved lines near the top. Curl the tip of each line into a small spiral, like a gentle roll. Keep them similar in size, but tilt them slightly differently for a natural look.
Pro Tip: Keep the spiral loops similar so the antennae feel balanced.
Alt Text: Two curly antennae sketched at the top of the page for an easy bug drawing.
Step 2: Add the Bug’s Round Head Shape
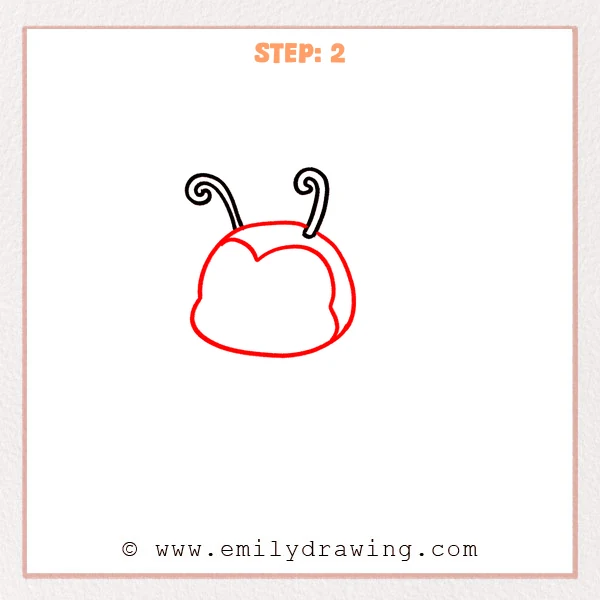
Under the antennae, sketch a big rounded head outline with a slightly flatter bottom. Inside the head, add a smooth curved inner shape to mark a soft face area. On the right side, draw a narrow curved strip to show the head’s thickness.
Pro Tip: Keep the inner curve away from the edge so it looks clean.
Alt Text: A simple bug head outline with an inner face curve and a right-side edge strip.
Step 3: Add the Eyes and a Small Smile
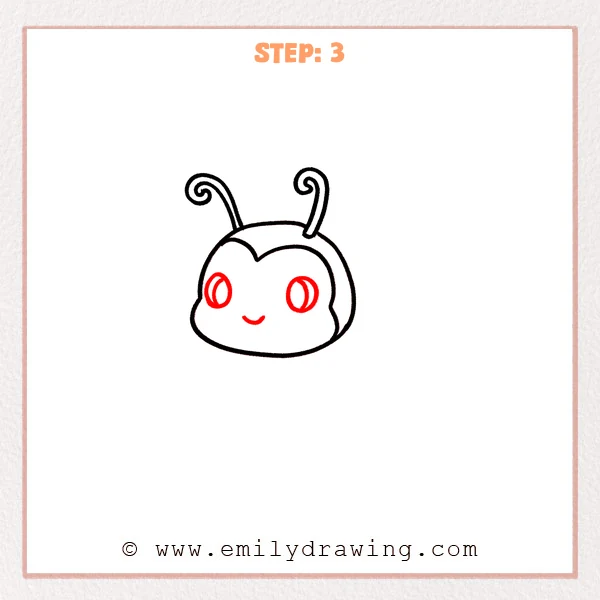
Add one vertical oval eye on each side of the face area. Inside each eye, draw a curved inner line to show a simple shine. Then place a small curved line between them, slightly lower, for a gentle smile.
Pro Tip: Keep both eyes at the same height so the face looks calm.
Alt Text: A cute bug head with two oval eyes, inner highlights, and a small smiling mouth.
Step 4: Add the Body and Striped Belly
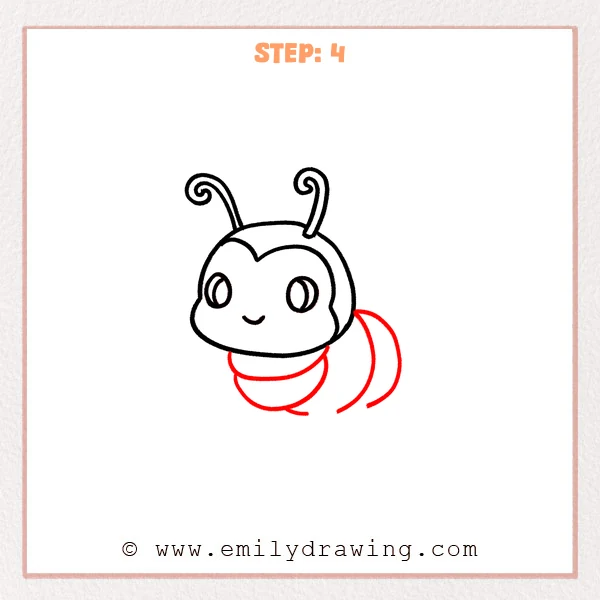
Under the head, add two curved band shapes to form simple body segments. From the lower right of the head, draw a big rounded belly that curves outward, then add one inner curved line to show a stripe. Let the belly extend a bit to the right so it feels like the bug is flying.
Pro Tip: Keep the curved bands roughly parallel so the belly looks neat.
Alt Text: A cute bug with a striped belly extending to the right from under the head.
Step 5: Add the Bug’s Little Feet
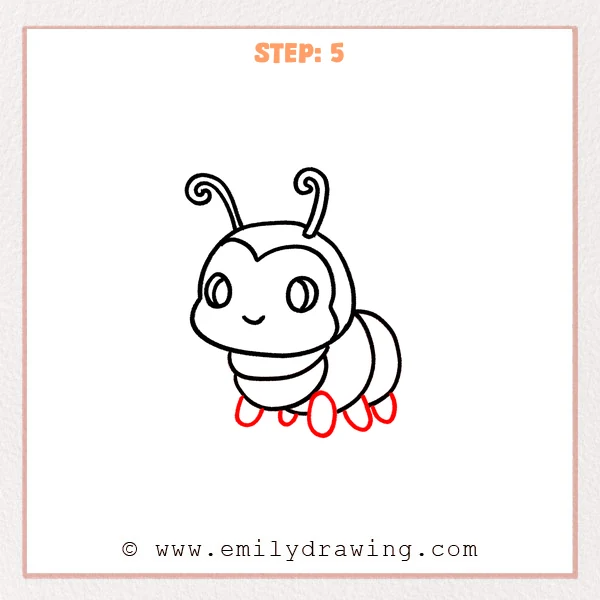
Add several small oval feet under the body, like a row of soft beans. Make the front feet slightly larger, and place the back feet a bit smaller and farther behind. Leave tiny gaps under the ovals so they feel grounded.
Pro Tip: Stagger the feet slightly instead of lining them up perfectly.
Alt Text: A cute bug with several small oval feet added underneath the body.
Step 6: Add the Wings and Back Spots
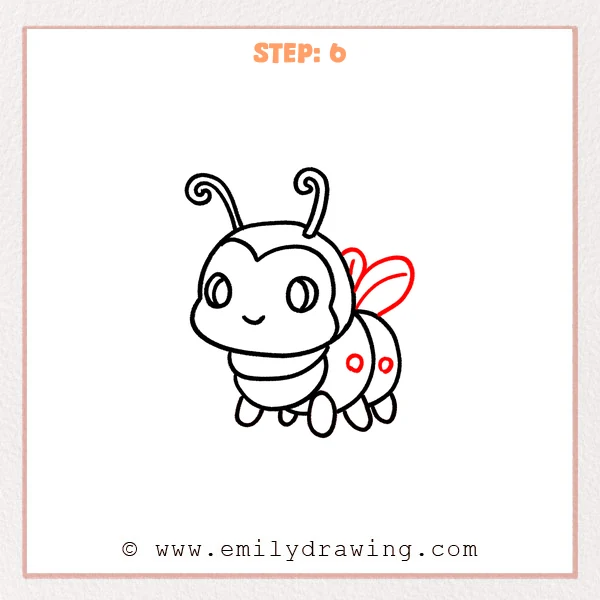
Behind the head on the right, draw two leaf-shaped wings, with the front wing a bit larger. Add a curved line inside each wing to suggest a simple vein and a light feel. Then place two small circles on the back section, slightly staggered for a playful look.
Pro Tip: Keep the wing tips rounded instead of sharp for a cute style.
Alt Text: A cute bug with two simple wings and two small spots on its back.
Step 7: Color in your drawing!
Fun Facts
- Many bugs use antennae to smell and feel what is around them.
- Some insects have wings that are thin and see-through, like tiny leaves.
- Spots and stripes can help bugs blend in or warn other animals.
Pin it now, Draw later!
You now have a friendly bug with curly antennae, a sweet face, a striped body, and wings. For coloring, try a warm yellow belly with darker stripes, or make a bright fantasy bug in any colors you like. Add gentle shading under the head and belly to make the body feel round.
A common beginner mistake is making the wings too pointy or too large, which can change the cute look. Keep them rounded and sized to fit the body.
Practice this step by step drawing a few times, and then try drawing your bug in different poses. If you would like, follow another easy drawing tutorial and build a whole page of tiny creatures.
Get the FREE Printable Drawing Guide

FREE Download Printable Bug Drawing Tutorial
Frequently Asked Questions
How do I make my bug look cuter?
Try bigger eyes, a smaller smile, and rounder wing tips. Soft curves almost always feel friendlier.
What if my stripes look uneven?
Lightly sketch the stripe curve first, then trace it once you like the spacing. Keeping the bands roughly parallel helps.
Can I draw this bug for beginners without a marker?
Yes. You can finish the whole drawing in pencil, then darken the lines you want most. An eraser can clean up extra sketch marks.