Welcome to another tutorial on emilydrawing.com! Today, we’re going to learn how to draw a seahorse with this fun seahorse drawing tutorial! Like all of our tutorials, this guide is perfect for drawing a seahorse for beginners in ten simple steps.
Seahorses are fascinating little sea creatures. They are quite small, with the largest species growing to just about 14 inches. Some seahorses are even smaller than your pinky finger! They have many unusual traits that make them so interesting, their size being one of them. They also have an exceptionally unique shape, leading them to get the name of seahorse.
Like many animals, seahorses have their challenges. For example, they are facing habitat loss and overharvesting. Many people are working to protect these remarkable creatures and their underwater homes. They are just one more unique creature that lives in our diverse oceans.
We will learn more about seahorses as we go through this step-by-step seahorse drawing tutorial. Ready? Keep reading for Step 1!
If you enjoy drawing marine animals, you might also like How to Draw a Starfish or How to Draw a Dolphin.
Materials:
- a piece of paper
- a pencil for the guiding lines and sketching
- an eraser
- a black sharpie or a pen for the outlines
- markers or colored pencils for coloring
- our printable drawing guide (Join my Email List below to get this Tutorial)
Here are my RECOMMENDED Art Supplies!
- Crayola Coloring Set (140 Pieces – Mega Value!)
- 24 Colored Crayon Set
- A4 Printer Paper
- Crayola Coloring Pencils
- HP Home Printer with Instant Ink!
Time needed:
14 minutes.
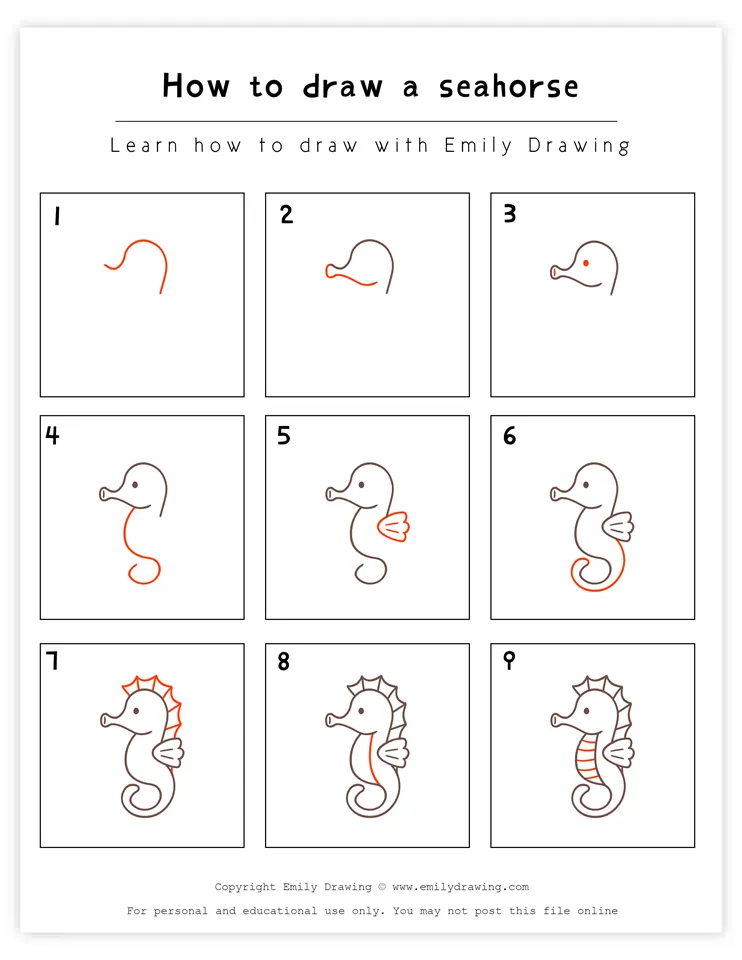
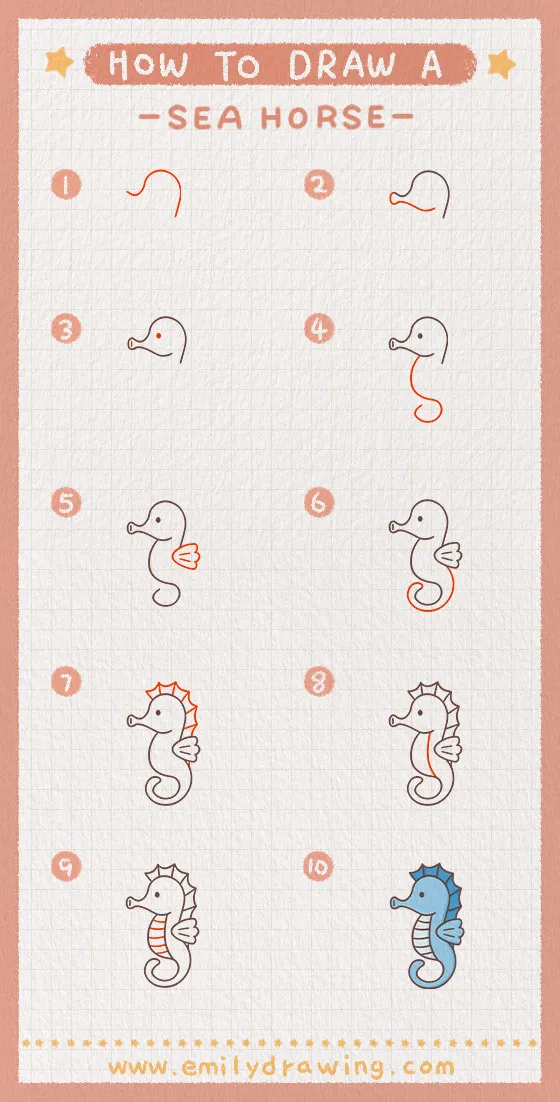
How to Draw a Seahorse — Let’s get started!
Step 1 – Draw the head.
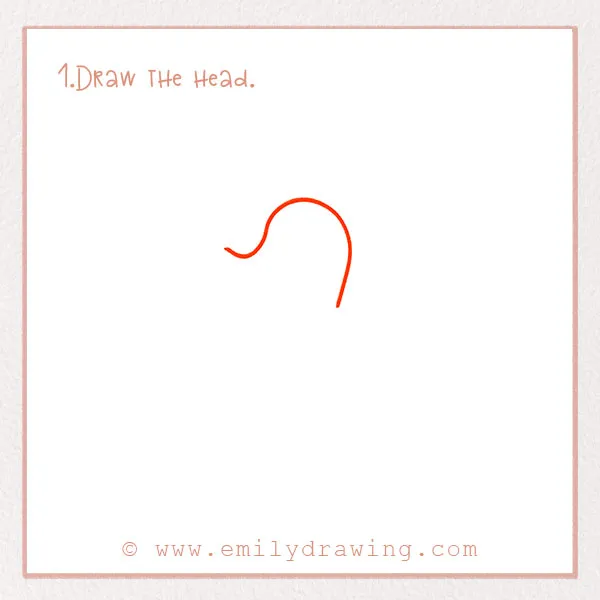
Let’s get started about two-thirds of the way up the page, making sure it’s centered. Draw a large curved line for the head. Towards the right, make it end in a smaller curve—this will be the snout.
Step 2 – Draw the snout.
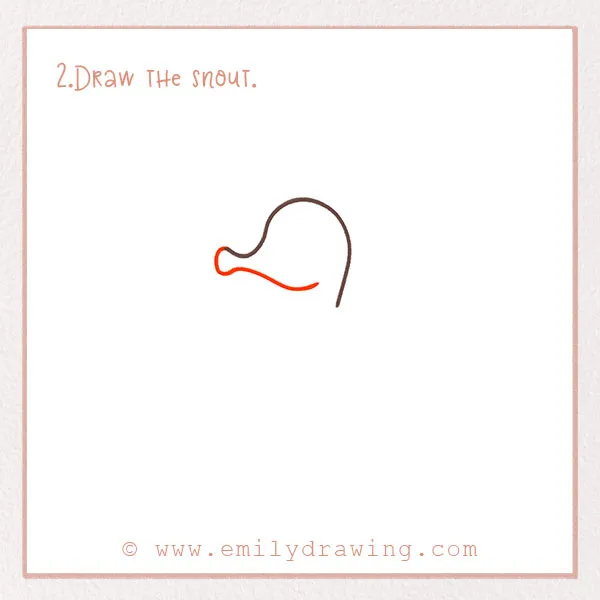
Let’s move on to the snout. Draw a short line from where you left off in Step 1 for the end of the snout. From there, form the bottom of the snout by drawing a long curved line. Check out the photo for this step!
Step 3 – Add the eyes and snout detail.
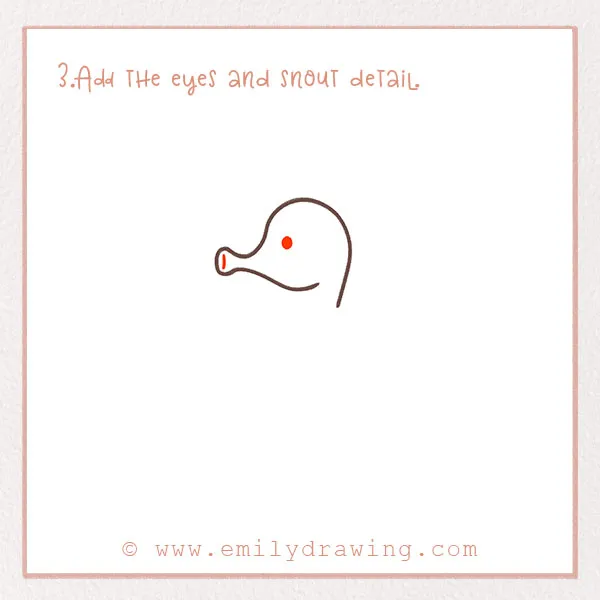
Next, we’re going to add some detail to the face and snout.
Seahorses have amazing eyesight and can move their eyes independently to keep an eye on their surroundings. Cool, right?
So, draw a small dot on the head for the eye. We can only see one eye because it is a profile view of the seahorse. Additionally, draw a small curved line at the end of the snout.
For more practice with flowing and organic shapes, check out How to Draw a Snake or How to Draw an Octopus.
Step 4 – Draw the belly.
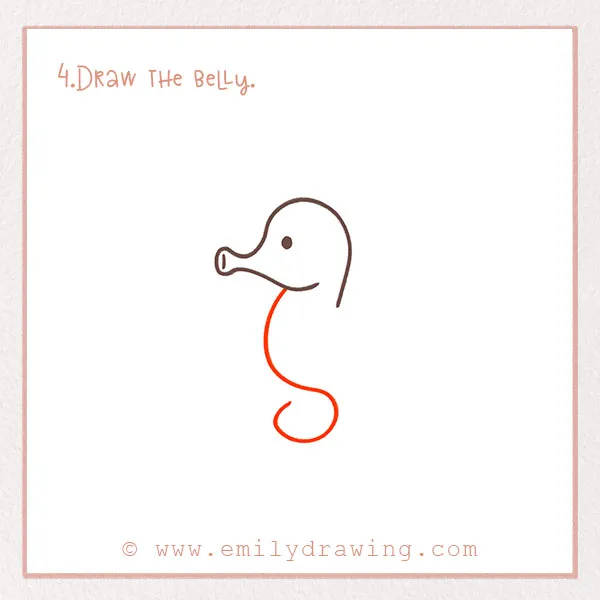
Did you know that seahorses eat 30 to 50 times a day? That’s a lot of eating! Of course, they have a big belly. Let’s draw their belly now.
Draw a long curve beginning at the chin. Make it go outward and then inward for the belly. Finish it off into a spiral—this is the tail. Great job!
Step 5 – Add the seahorse’s dorsal fin.
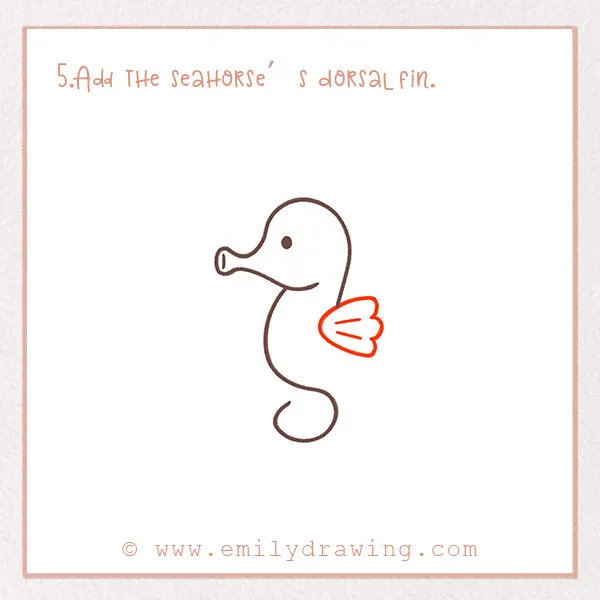
Seahorses are fish, but they’re not very good swimmers. They move by using a small fin on their back, and they anchor themselves to objects in the water with their tails. Our seahorse will have several fins—let’s draw the dorsal fin now.
At the end of the line we drew in Step 1, we’re going to add a dorsal fin. Draw a curve that looks like a backward C. Close it off with scalloped lines to show the texture of the fin. Finally, add two lines in the middle. Check out the photo!
If you enjoy adding intricate details, try How to Draw a Butterfly or How to Draw a Turtle.
Step 6 – Complete the tail.
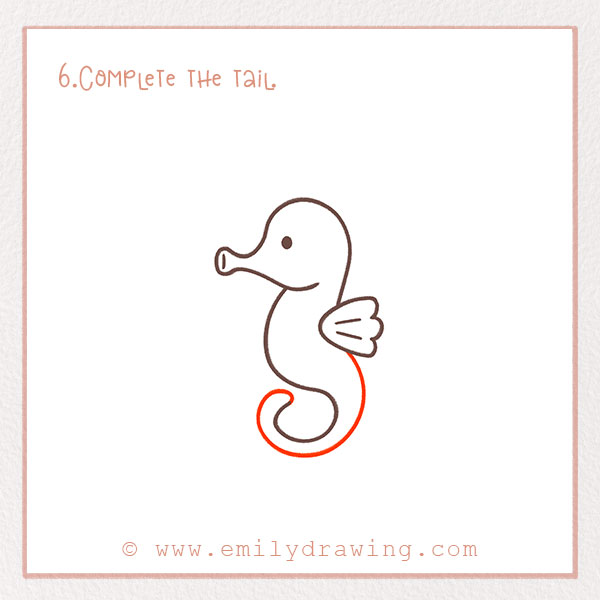
As we mentioned, tails are important for day-to-day life of a seahorse. Seahorses have unique curly tails that they use to hold onto seagrass and corals in the ocean so they don’t get carried away by currents. Let’s finish the tail now.
Draw a curve from the bottom of the dorsal fin to the end of the curve you drew in Step 4. It should mimic the curve already there so that a tail is formed. Great job!
Step 7 – Add more fins.
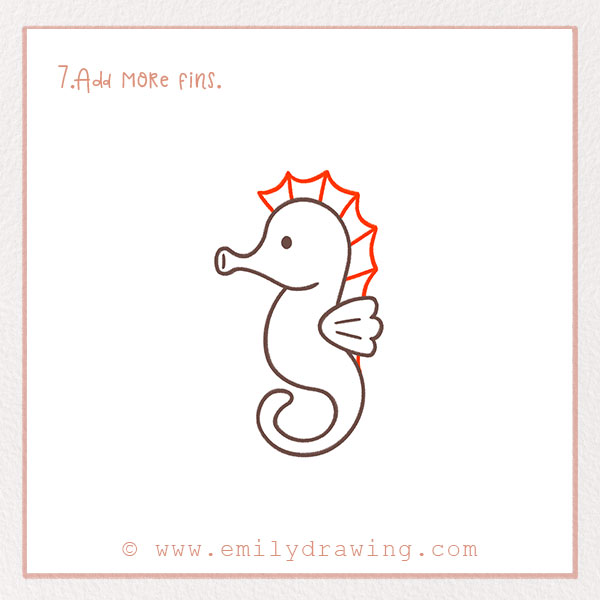
Let’s add more fins! Draw six lines extending out from the back of the seahorse’s head and back. They should be about an inch apart. Connect them with curved lines. It should look like your seahorse has a long fin now.
Step 8 – Add detail to the belly.
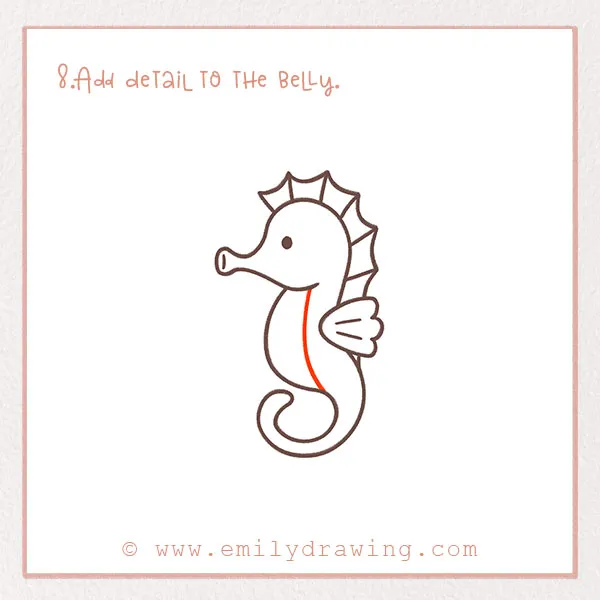
This step is quick and easy. Simply draw another slightly curved line in the belly to show perspective. Check out the photo!
Step 9 – Add more detail to the belly.
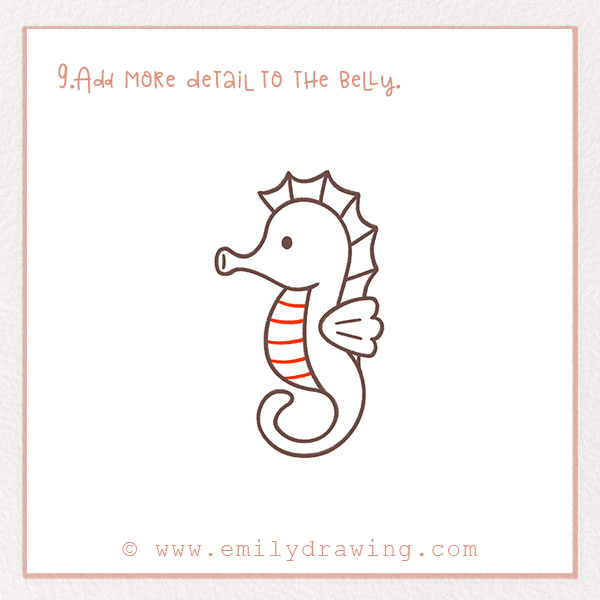
In between the line you just drew and the outer outline of the belly, add lots of lines. These are meant to look like the hard plates that cover seahorses. We’re almost done!
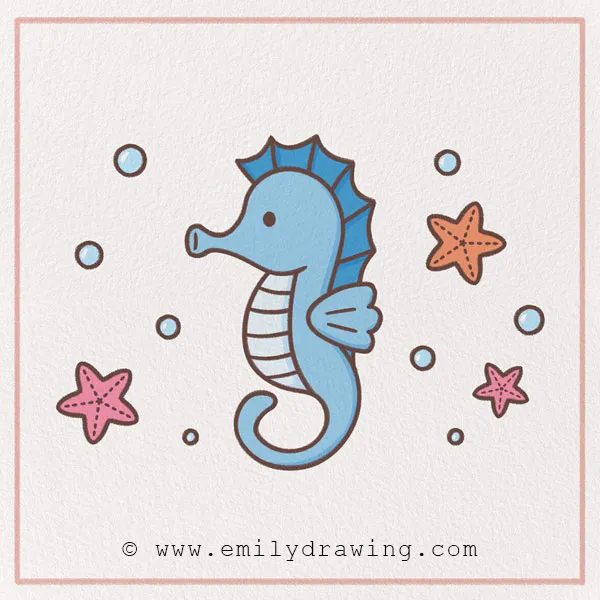
Step 10 – Color in your seahorse!
Did you know that seahorses are masters of disguise? They can easily change color to blend in with their surroundings, making them hard for predators to spot.
Therefore, naturally, seahorses can be nearly any color! Have fun with it. What color will your seahorse be? Make sure to color in the rest of your page, too!
Once you’ve completed your seahorse, continue your aquatic collection with How to Draw a Whale or How to Draw a Koi Fish.
Fantastic job. Thanks for following along with us. Did you enjoy this tutorial? We have lots more to discover if you want to do another one. We are always adding more, too!
If you had fun, feel free to share this page with family and friends using the social icons on this page!
Pin it now, Draw later!
Get the FREE Printable Drawing Guide