Hello and welcome! You’ve found our drawing tutorial for how to draw a sunflower!
There are many interpretations around the world for what sunflowers represent. For example, they can symbolize strength, positivity, and happiness. And, although sunflowers kind of look like the sun, they actually get their name because they face the sun in nature.
Sunflowers, in part, are amazing because of how tall they can get—did you know sunflowers can grow to be 16 feet tall? This one won’t be quite as big, but it can be just as beautiful and unique.
So, get some art materials, and let’s dive into this sunflower drawing step by step. Here we go!
Materials:
- a piece of paper
- a pencil for the guiding lines and sketching
- an eraser
- a black sharpie or a pen for the outlines
- markers or colored pencils for coloring
- our printable drawing guide (Join my Email List below to get this Tutorial)
Here are my RECOMMENDED Art Supplies!
- Crayola Coloring Set (140 Pieces – Mega Value!)
- 24 Colored Crayon Set
- A4 Printer Paper
- Crayola Coloring Pencils
- HP Home Printer with Instant Ink!
Time needed:
12 minutes.
How to Draw a Sunflower — Let’s get started!
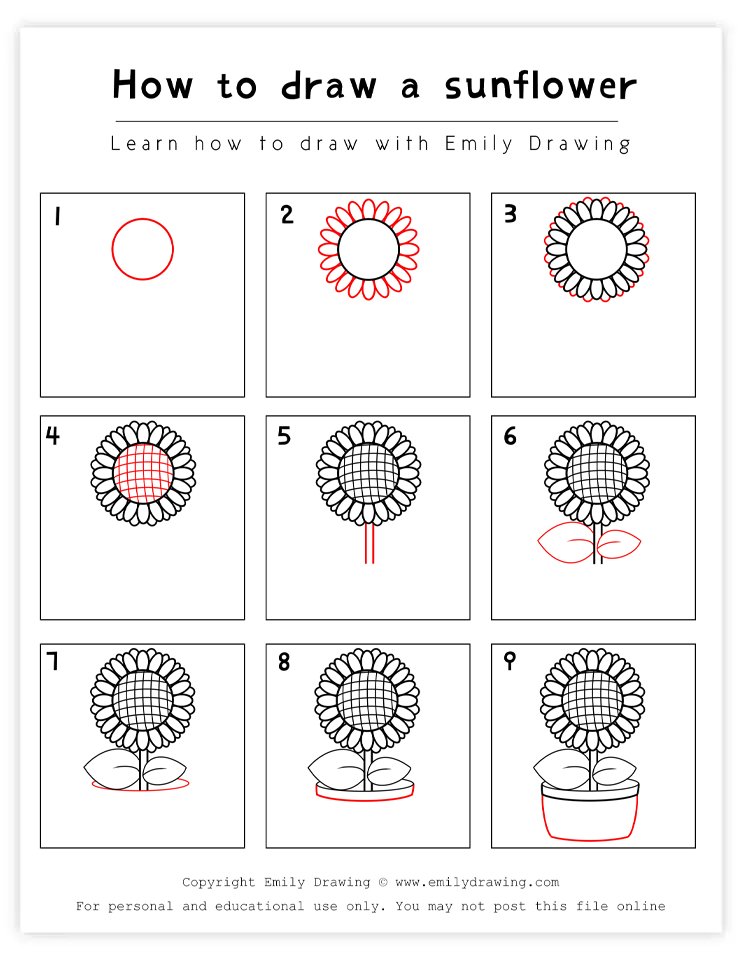
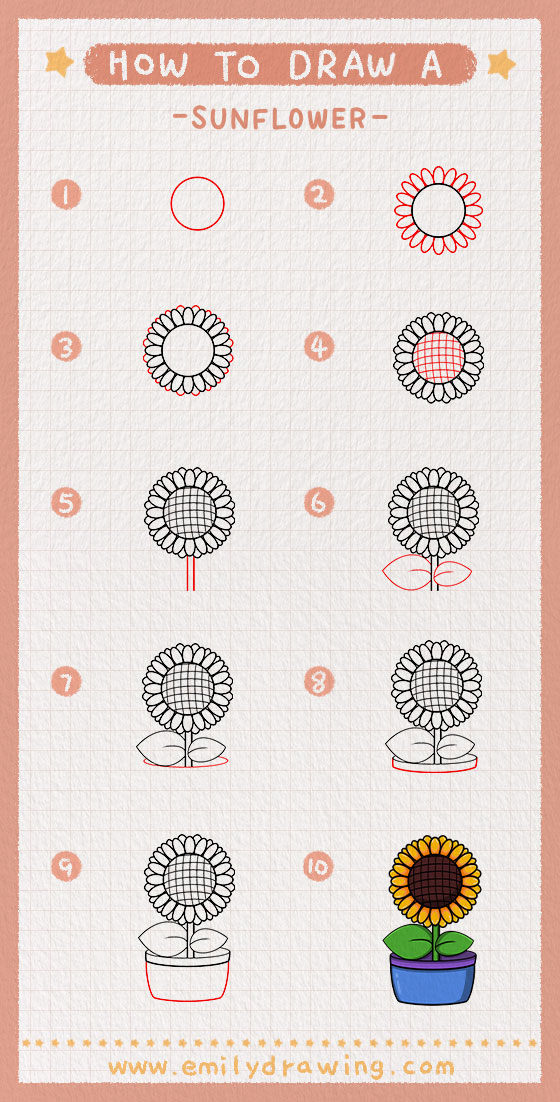
Step 1 – Draw the center of the flower.
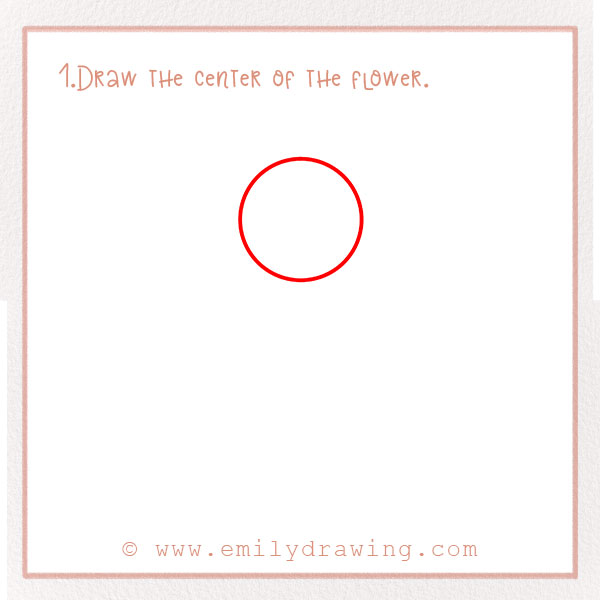
Near the top of the page) start your drawing by making a circle. Leave about an inch of space above it. It should be a few inches wide. This is the center of the flower!
Step 2 – Add the petals.
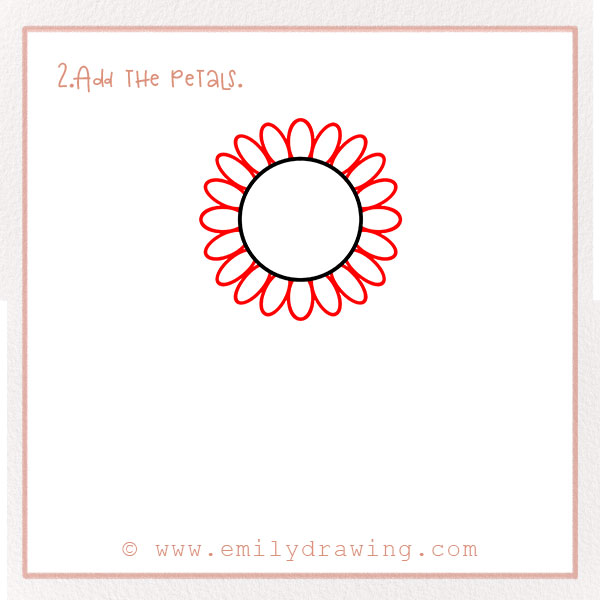
One feature that makes sunflowers so beautiful is their bright, vibrant, orange-yellow petals.
To form the petals, draw many small oval shapes around the entire center of the flower. Have them slightly cut off by the center of the flower. Try to fit around 20 petals around the center. Refer to the photo for the exact shape of the petals.
Step 3 – Add more petals!
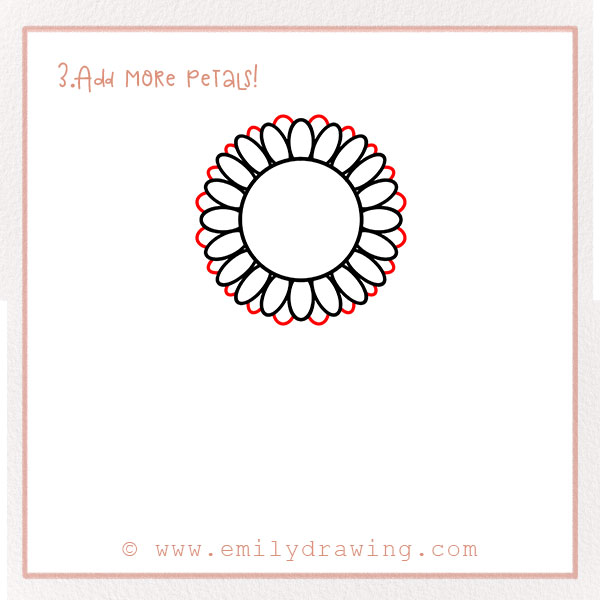
Let’s add even more petals! We want to make it look like a realistic sunflower drawing, so let’s draw the petals so that they look like they are behind the ones we already drew.
To do this, draw small curved lines that connect the outer edges of the petals from Step 2. This adds more depth to the flower.
Step 4 – Add detail to the center.
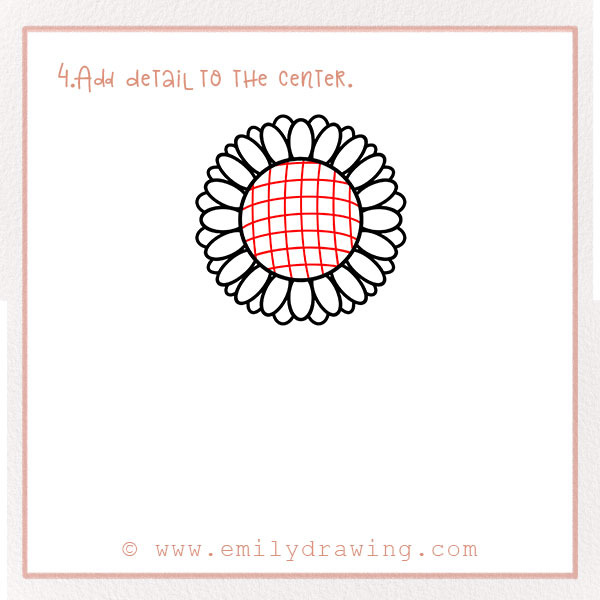
Next, we want to add more detail to the center of the flower that we drew in the very first step. We’re going to form a grid-like pattern to create this texture.
To do that, draw 5 or 6 vertical lines in the circle. Then, to form the grid, add the same amount of lines going horizontally.
To make it look a little bit three-dimensional, make the lines a little curved. Refer to the photo to see what this looks like.
Step 5 – Draw the stem.
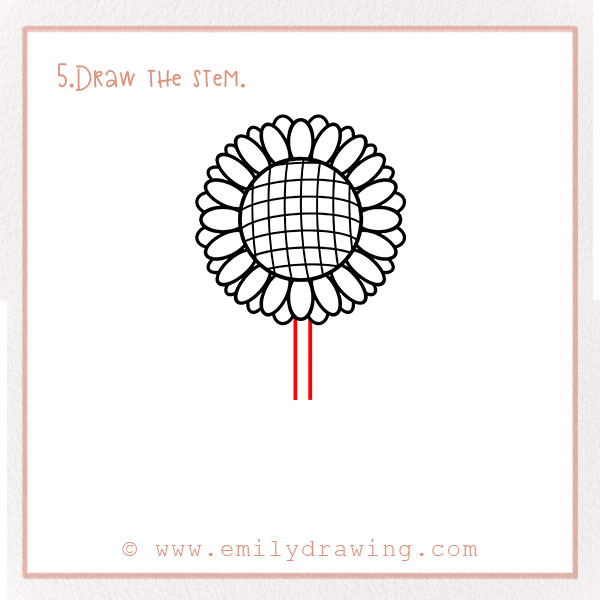
We still need to add the stem! Draw two lines close together extending downwards from the center bottom of the flower face. Leave about one-third of the page empty for the rest of the drawing.
Step 6 – Add two leaves to the stem.
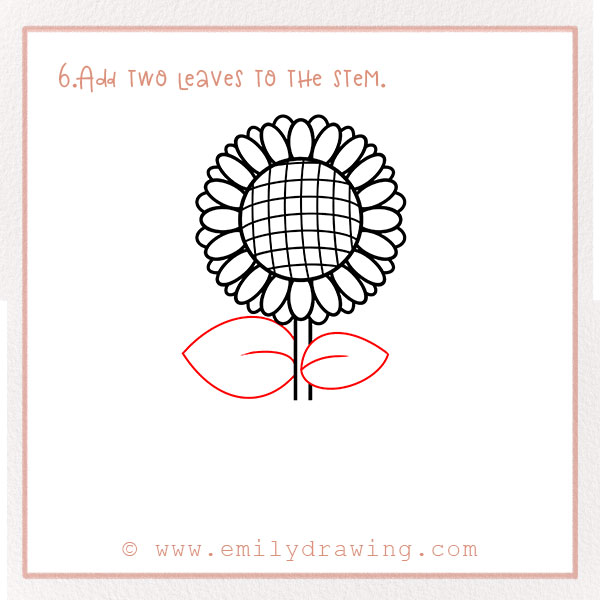
Like all flowers, sunflowers have leaves. Let’s add those now to the sides of the stem.
On the left side, draw an oval-like shape that is slightly pointy, like in the photo. Let the stem stay in front of it by cutting off the edge of the leaf slightly. Add a small, curved, horizontal line to show a vein on the leaf.
Do this again on the right side, but make this leaf a little bit smaller. Also, this time, draw the leaf so that it is overlapping the stem. Leaves are all a little bit different; we want our drawing to show that. This also adds visual variety.
For more flower drawing guides, check out How to Draw a Rose and How to Draw a Lily.
Step 7 – Begin to draw the flower pot.
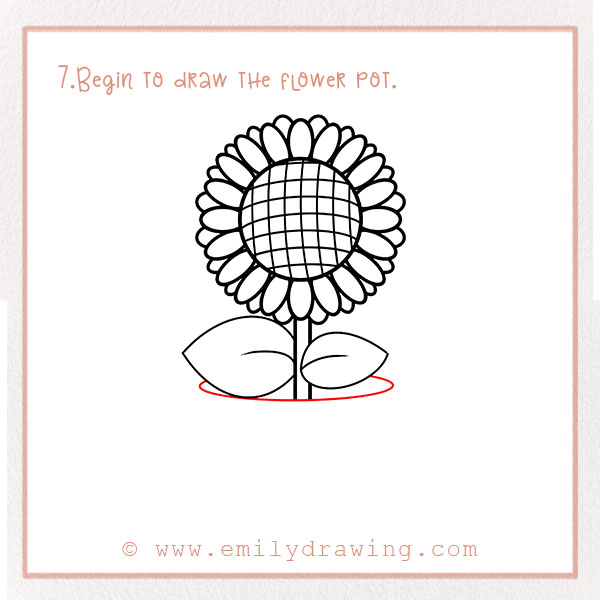
We want to show that the flower is sitting inside something and not just floating on the page! Let’s make a pot for it to sit in.
Draw a curved line underneath the leaves and stem. It should cross the bottom of the stem. This is the first step to making the pot.
Step 8 – Form the rim of the pot.
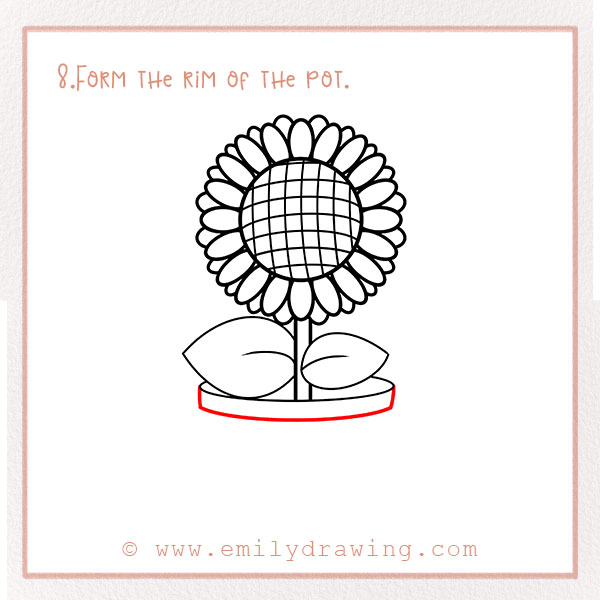
Make another line right below one in Step 7 to form the rim of the pot. Connect it to the top line with two small lines on the edges.
Step 9 – Draw the bottom of the pot.
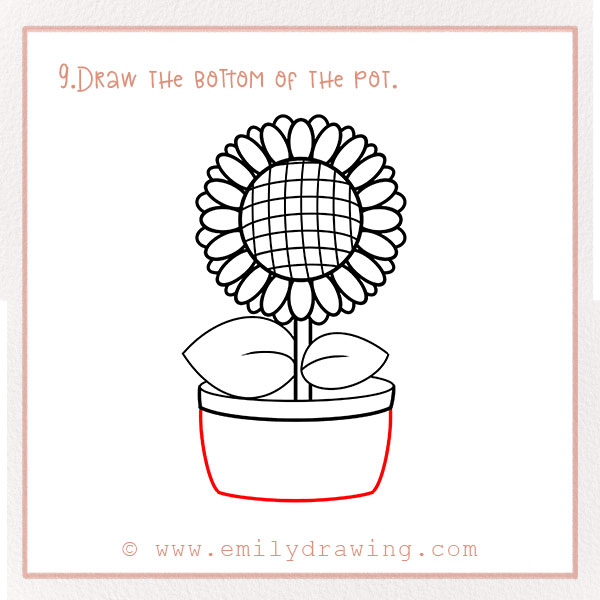
Our flower needs soil and water to stay healthy, right? So we need to add a big pot to hold all of that!
Start by drawing two slightly curved lines downwards from both sides of the rim from Step 7.
Then, connect the two lines to form the flat bottom of the pot.
Step 10 – Color!
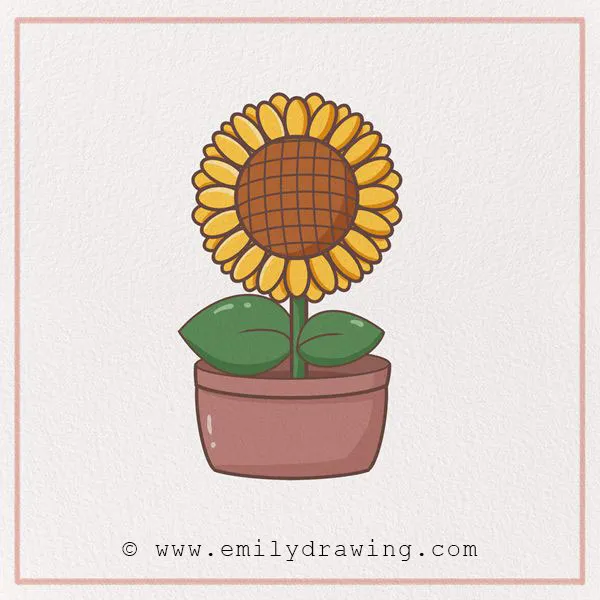
Finally, we have to add color! Nature is full of beautiful and bold colors, so let’s make this art to reflect that. Make your flower pop off the page with crayons, colored pencils, or markers!
That’s it! Now you have your very own slice of nature. Hopefully, this reminds you of the great outdoors or maybe even gives you a feeling of happiness.
Hang it up, give it to a loved one, or even carry it with you. Enjoy your beautiful art! We hope you had a lot of fun with this guide on drawing flowers for kids, especially learning how to draw a sunflower.
Share this tutorial with someone you think might enjoy it! Leave a comment below with what you thought of this tutorial and your suggestions for more of them. Browse our site for more drawing adventures like how to draw a cactus or how to draw a coffee shop.
Pin it now, Draw later!
Get the FREE Printable Drawing Guide