Hello and welcome to our art tutorial that helps you learn to draw with clear, easy-to-follow steps. Today, we are going to learn How to Draw a Lily!
Lilies are well-loved flowers, and for good reason! They are very beautiful, both in color and in shape. Often, a lily flower is associated with life and rebirth, and is also a very popular baby name.
Flowers all have similar fundamentals to them, so once you do this tutorial, you can learn to draw other flowers as well!
Grab your drawing materials, and let’s get started!
Materials:
- a piece of paper
- a pencil for the guiding lines and sketching
- an eraser
- a black sharpie or a pen for the outlines
- markers or colored pencils for coloring
- our printable drawing guide (Join my Email List below to get this Tutorial)
Here are my RECOMMENDED Art Supplies!
- Crayola Coloring Set (140 Pieces – Mega Value!)
- 24 Colored Crayon Set
- A4 Printer Paper
- Crayola Coloring Pencils
- HP Home Printer with Instant Ink!
Time needed:
13 minutes.
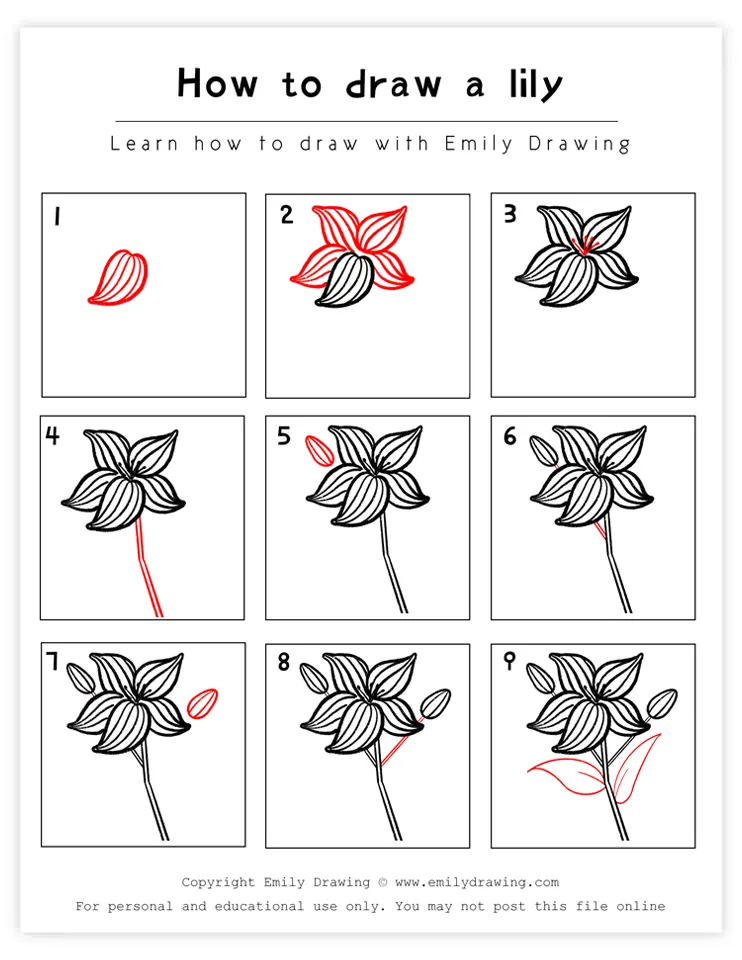
How to Draw a Lily — Let’s get started!
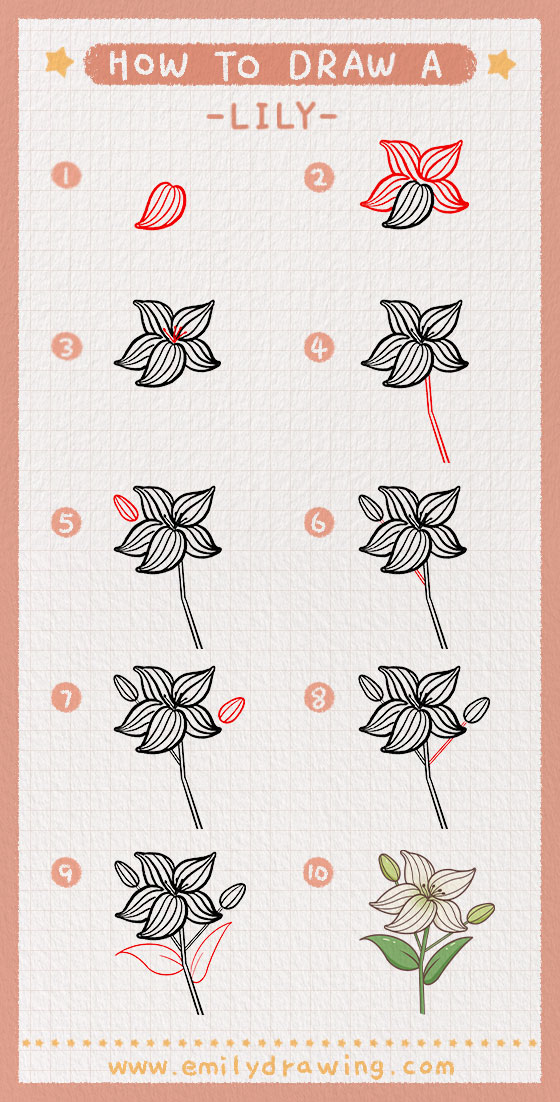
Step 1 – Draw the first petal.
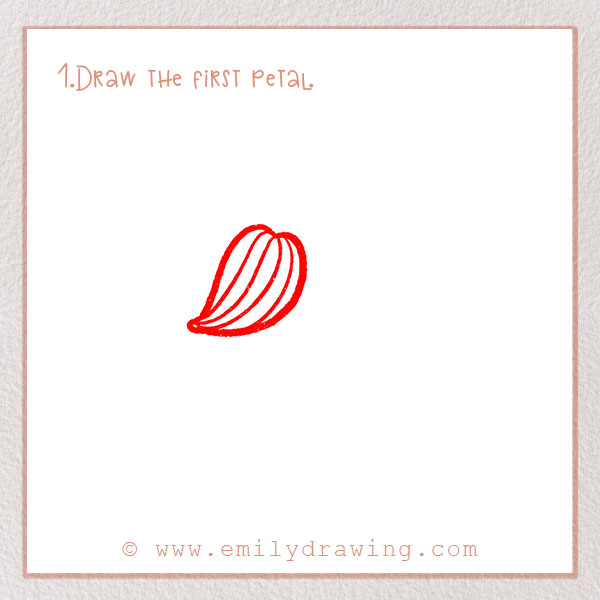
We’re going to start by drawing the first petal. Put this on the upper-left of the page, and leave plenty of space around for the rest of the drawing.
Refer to the photo for the shape; it should be an oval shape, except pointed at one end. It is almost a heart shape.
Then, add veins to the leaf. To do this, add five skinny lines inside of it which converge at the point.
Step 2 – Draw the remaining four petals.
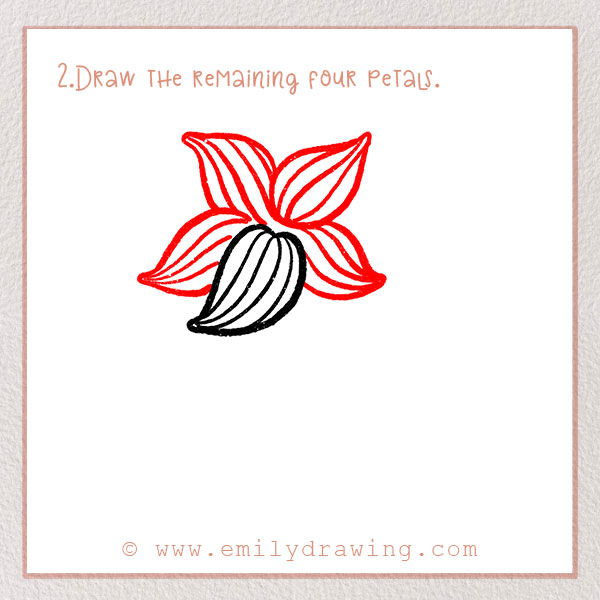
Let’s add the rest of the petals. These other four petals will be very similar to the first one in their shape. All of the petals should be centered around a center point. Refer to the drawing.
Step 3 – Add detail to the center of the flower.
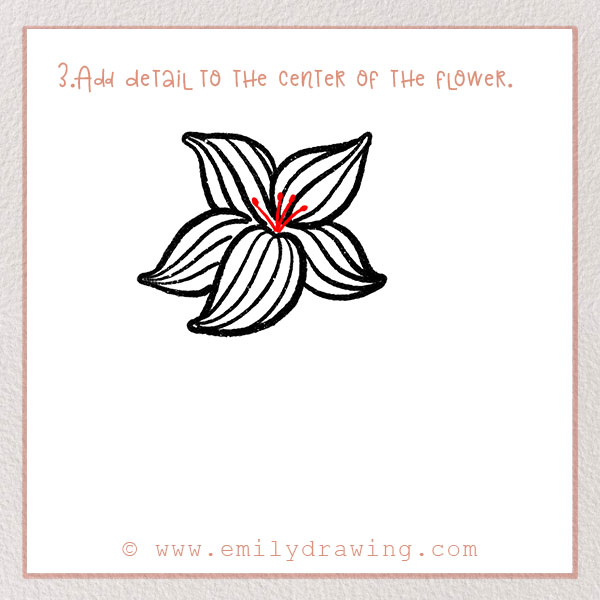
Lilies have long tubes that emerge from the center of the flower. These are called the pistils.
In the center of the flower, add a few short lines with dots on the top to form these. They should be going upwards.
Step 4 – Draw the stem!
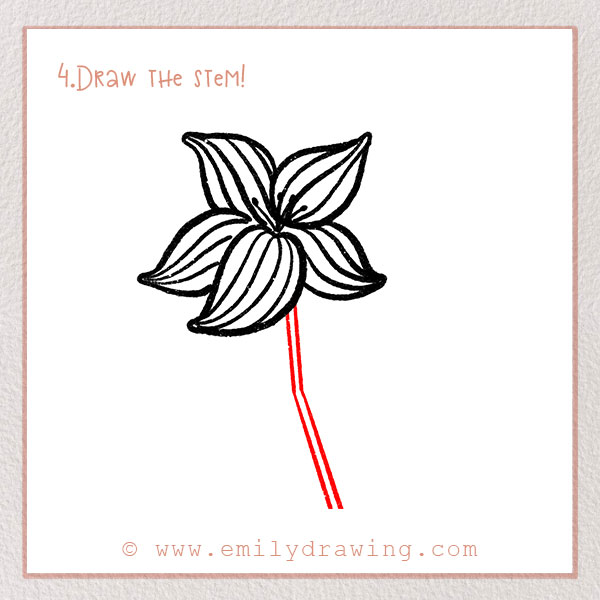
Flowers have to have stems so that they can absorb water and nutrients from the ground. Let’s add a stem to our flower now!
Draw two skinny lines very close to each other. Add a small bend in the middle to make it look more realistic. It should extend from the petals to the bottom of the page. Now your flower has a stem!
For more plant drawing guides, check out How to Draw a Cactus and How to Draw a Tree.
Step 5 – Draw a flower bud.
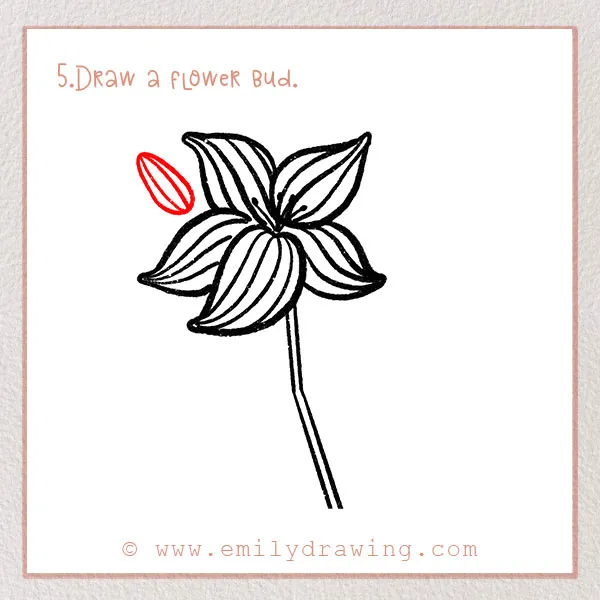
Behind the bloom we just drew, let’s draw a closed flower bud. A bud is just a flower that’s going to bloom soon, meaning it will open up its petals.
On the left side of the flower, draw an oval in between two petals. Add two lines inside it to show detail.
Step 6 – Add another stem.
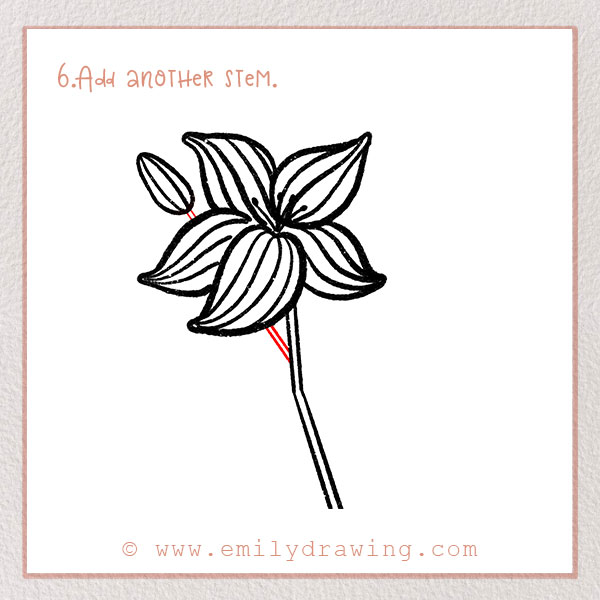
Let’s add some more detail to the stem. On the upper-left side of the stem, draw two small, skinny lines. They should go from the stem to the petals, upward and diagonally.
Also, add a few small lines that connect this flower bud to the rest of the flower. Look at the photo!
Step 7 – Draw another flower bud.
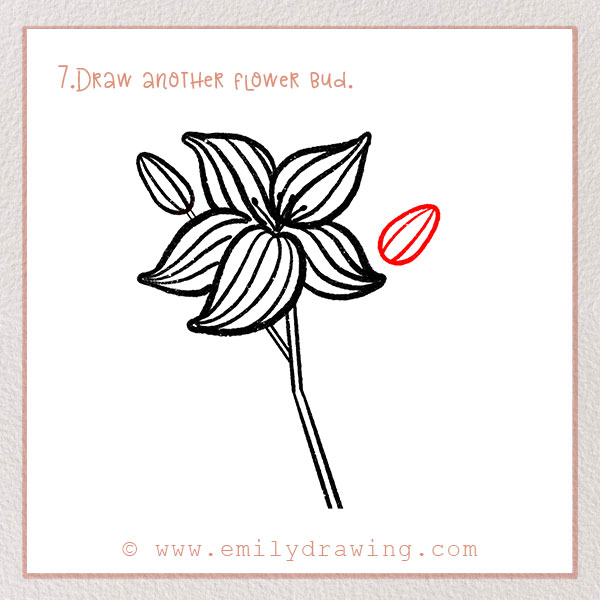
Behind the right side of the main flower, let’s draw another closed flower bud!
Draw a similar oval shape as the bud in Step 5. This time, it should be on the right side of the petals. Refer to the photo.
Step 8 – Add another stem.
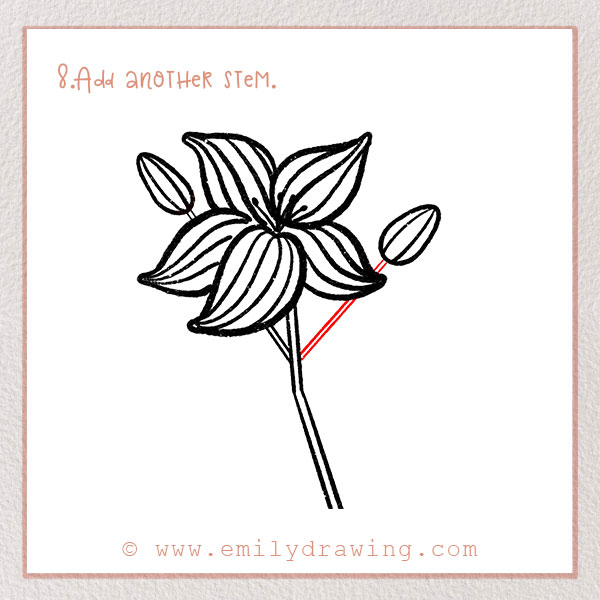
Let’s add the last segment of the stem. Branching out from the right side of the stem, draw two long skinny lines. It should go upwards and diagonal, towards the flower bud on the right from the last step. This will connect the bud to the main stem.
Step 9 – Draw leaves on the flower.
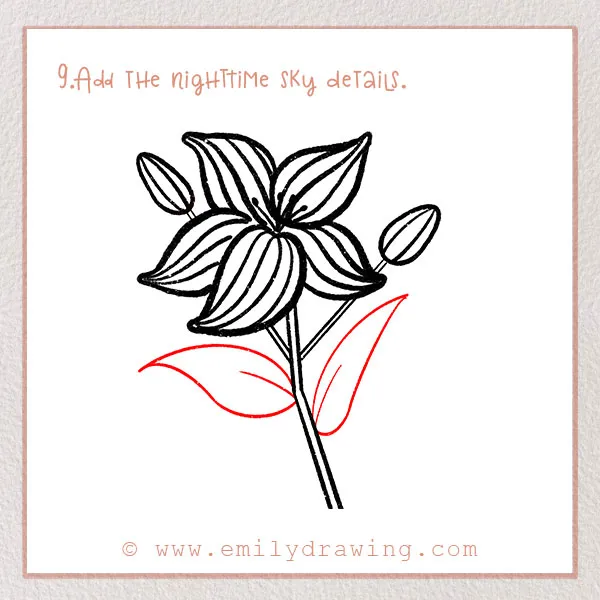
We are going to add two leaves to the flower stem in this step. The leaves will be similar oval shapes to the petals but with ends that are more pointed.
For a more balanced flower illustration, draw one leaf on the right of the stem, and one on the left. Vary the shape just a little bit to make it more interesting visually and to reflect all the variety in nature.
Also add small lines in the middle of the leaves to show the vein.
We’ve completed our flower! Good job!
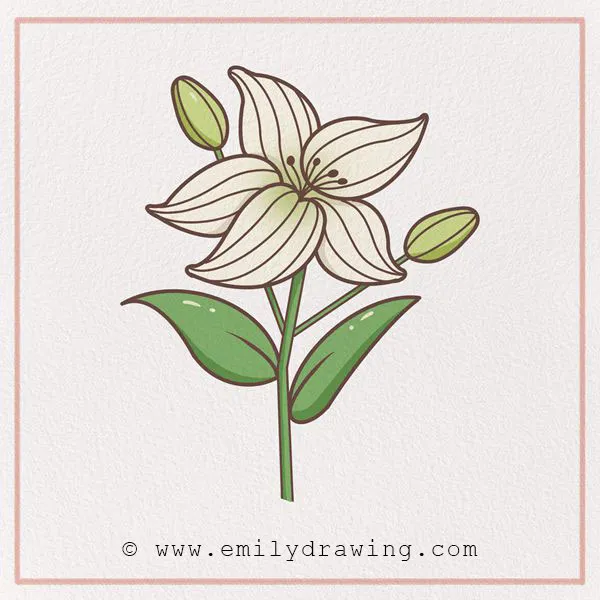
Step 10 – Color in your drawing!
One reason flowers are so beautiful is because of their bold, bright colors! We have to add color to this flower, too, of course.
Lilies have whites, pinks, yellows, and oranges making up their beautiful blooms. Find your favorite colors and add even more beauty to your flower now!
Voila, all done! Do you like your lily flower drawing creation? We hope you loved this step-by-step lily sketch tutorial for how to draw a lily.
Hang your drawing up or share it with friends and family! Make sure to share its beauty with those around you!
Next time you’re outside on a walk, take extra care to enjoy any lovely flowers or other natural beauty around you! Maybe you’ll even find a lily and feel inspired to learn to draw lilies. Or, maybe you’ll find another flower you want to learn how to draw! And if so, suggest it in the comments so we can make a tutorial for you!
If you’re interested in drawing more flowers, you might also enjoy our tutorials on How to Draw a Tulip and How to Draw a Sunflower.
Pin it now, Draw later!
Get the FREE Printable Drawing Guide