Hey there, young artists and creative parents! Are you ready to dive into the world of drawing and create something amazing? In this Cupid arrow drawing tutorial, we’ll show you how to create the perfect symbol of love in just a few simple steps! Have you ever wanted to create Valentine’s Day arrow art, featuring Cupid’s magical symbol of love? Well, you’re in luck! In this fun and easy tutorial, we’ll show you how to draw Cupid’s arrow step by step.
Cupid, the Roman god of love, is famous for his enchanted arrows. It’s said that when someone is struck by Cupid’s golden arrow, they fall deeply in love. But did you know that Cupid also has lead-tipped arrows that make people fall out of love? His archery skills have shaped many stories, from ancient mythology to modern Valentine’s Day traditions. Get your pencils ready, and let’s start drawing!
Materials:
- a piece of paper
- a pencil for the guiding lines and sketching
- an eraser
- a black sharpie or a pen for the outlines
- markers or colored pencils for coloring
- our printable drawing guide (Join my Email List below to get this Tutorial)
Here are my RECOMMENDED Art Supplies!
- Crayola Coloring Set (140 Pieces – Mega Value!)
- 24 Colored Crayon Set
- A4 Printer Paper
- Crayola Coloring Pencils
- HP Home Printer with Instant Ink!
Time needed:
15 minutes.
How to Draw Cupids Arrow — Let’s get started!
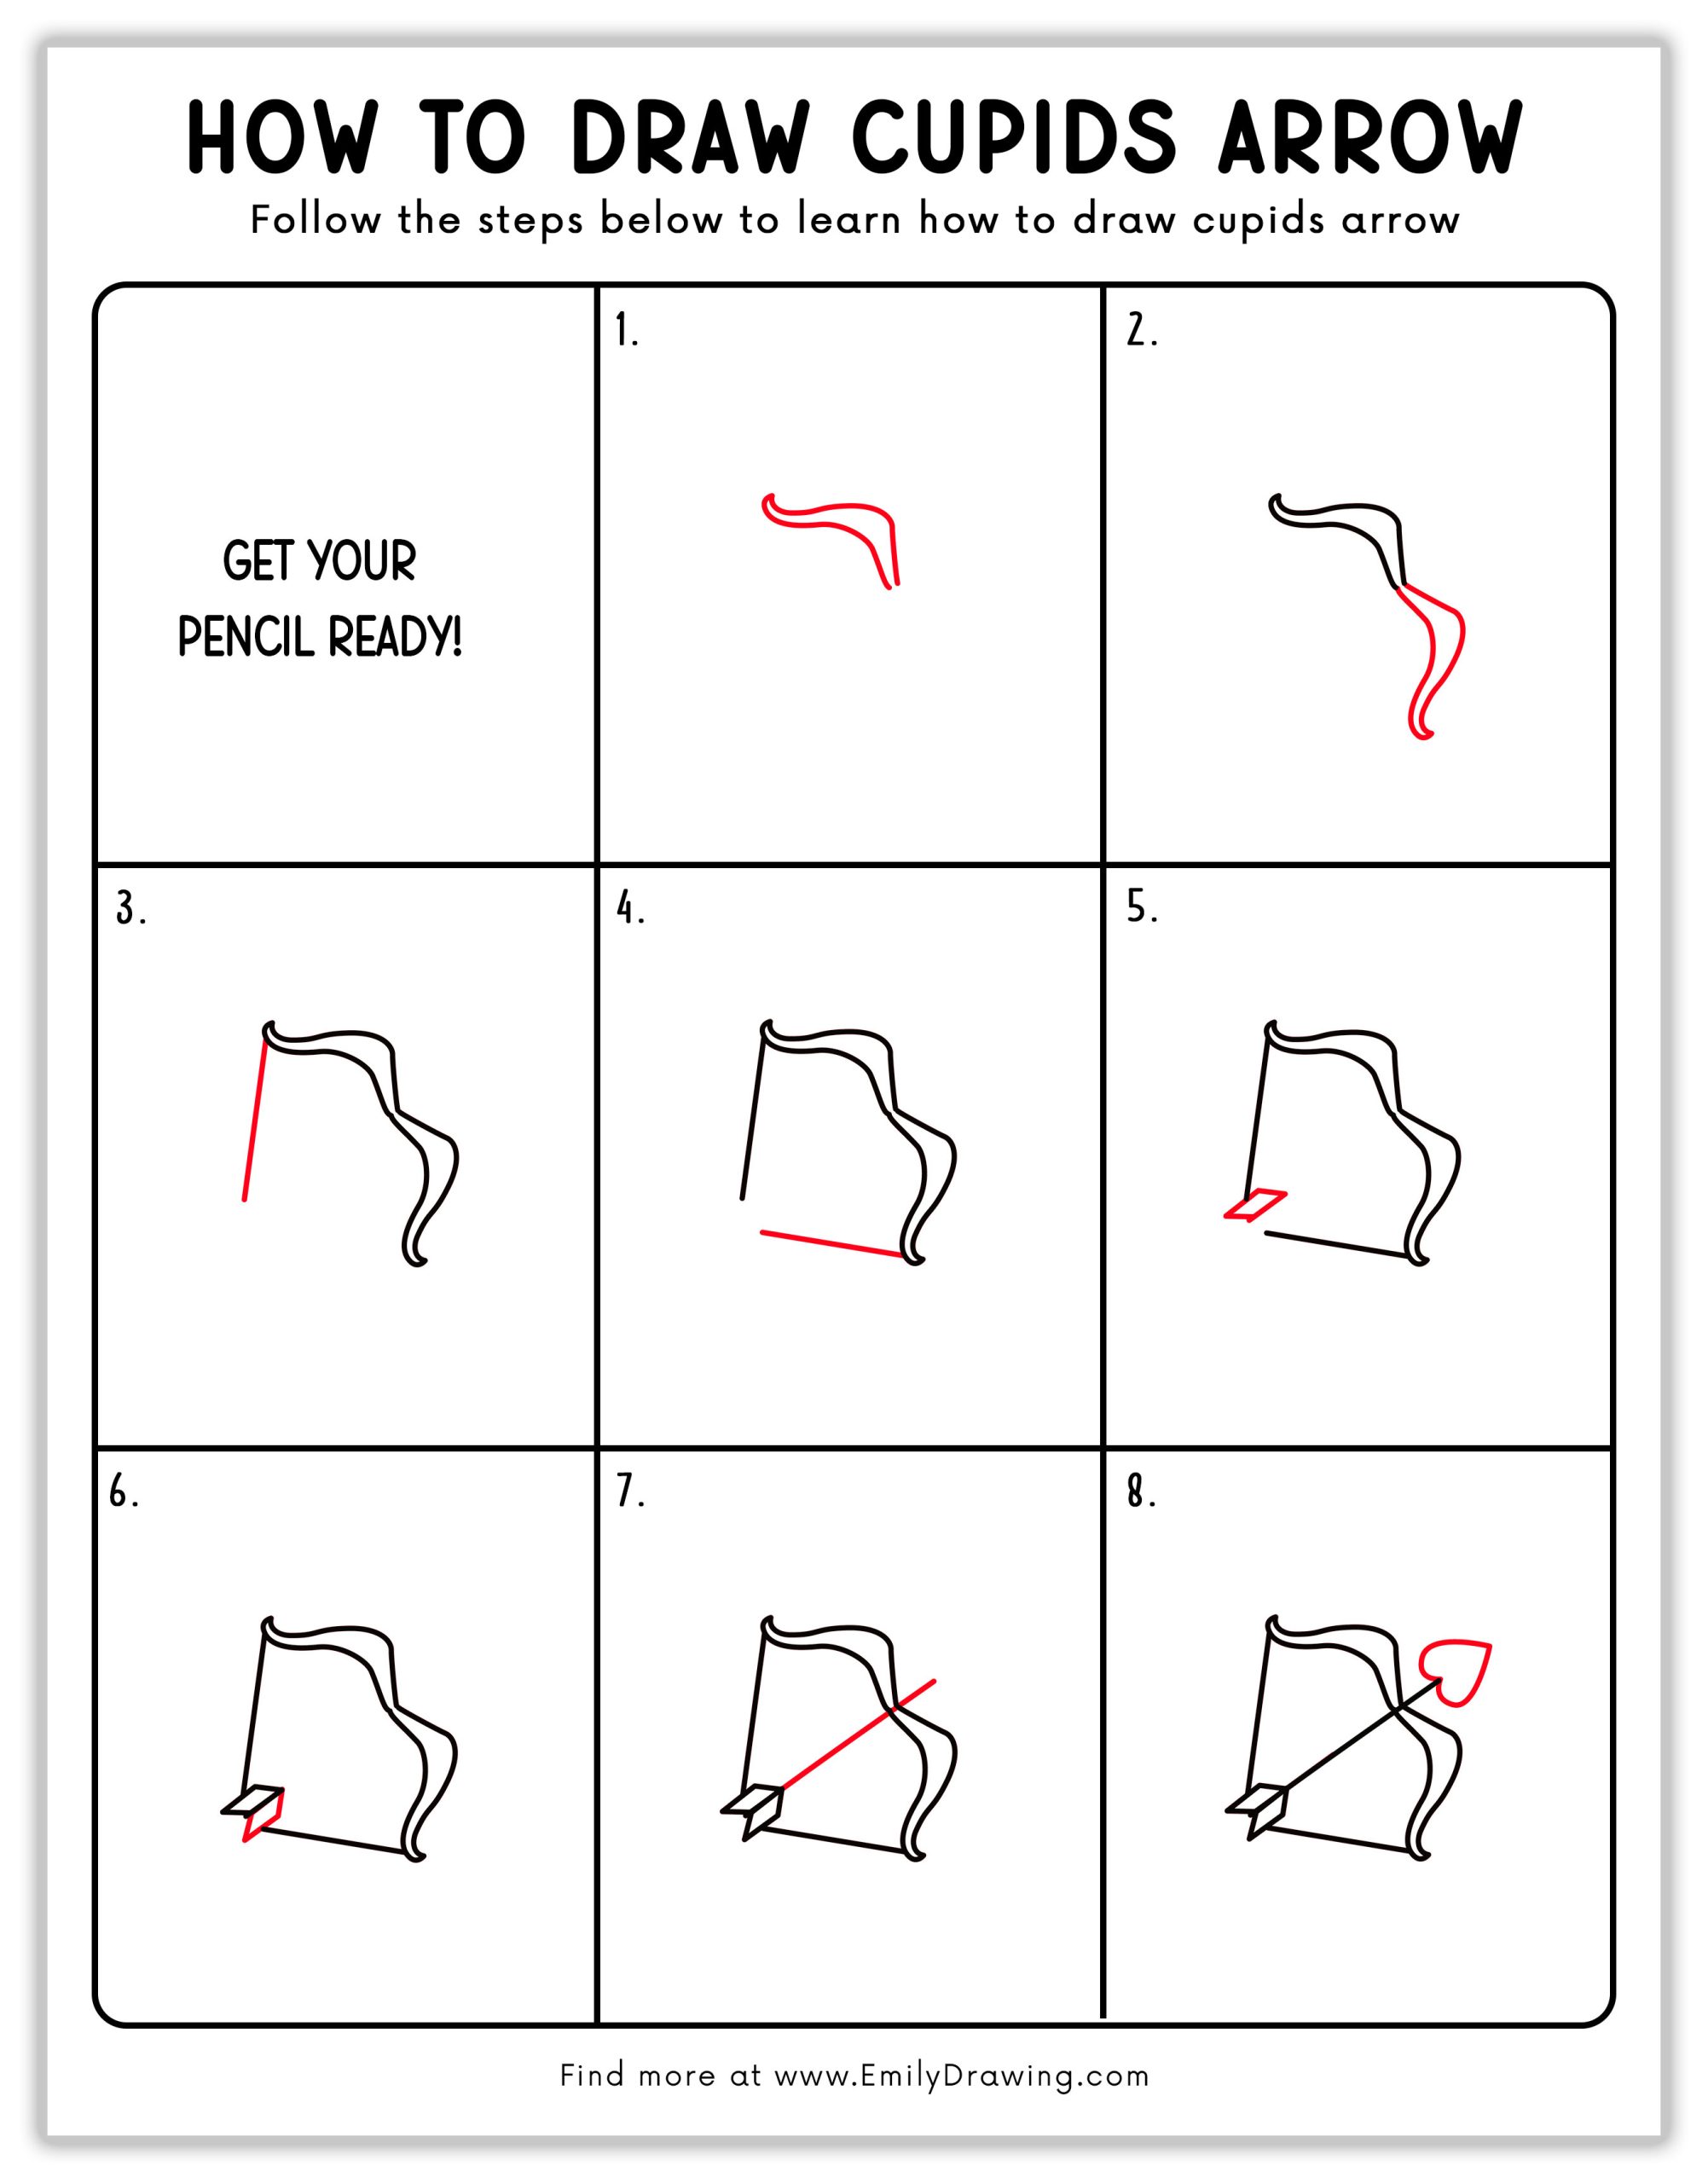
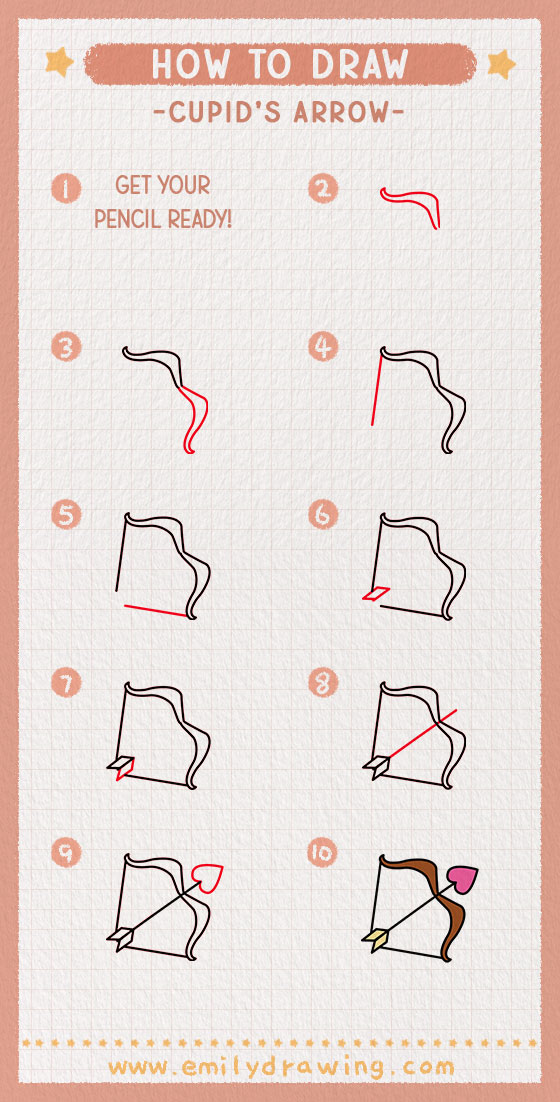
Step 1 – Draw the Bow’s Top Curve
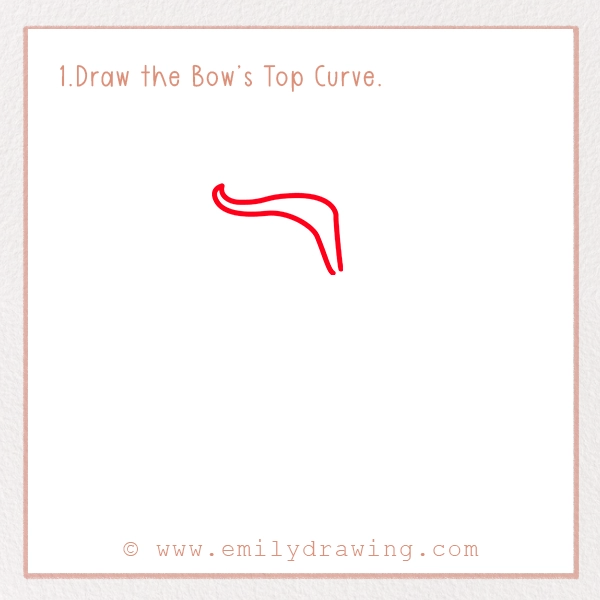
Start by drawing a curved line for the top part of the bow. This should look a little wavy, almost like a stretched-out letter “S.” The bow is the most important part, as it holds the power to launch Cupid’s arrow of love.
Tip: Don’t worry if it’s not perfect! Bows are often carved from wood, so a little unevenness makes it look more natural.
Step 2 – Complete the Bow’s Shape
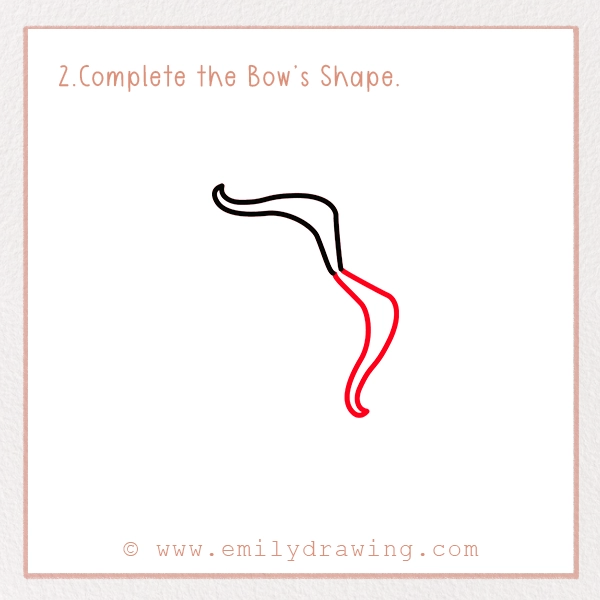
Now, draw the bottom part of the bow by adding another curve. This should mirror the top curve but bend slightly outward at the bottom. Connect both ends with a short vertical line to complete the bow’s frame.
Fun Fact: In real life, bows have existed for over 10,000 years! They were used for hunting and battle long before Cupid made them a symbol of love.
Step 3 – Draw the Bowstring
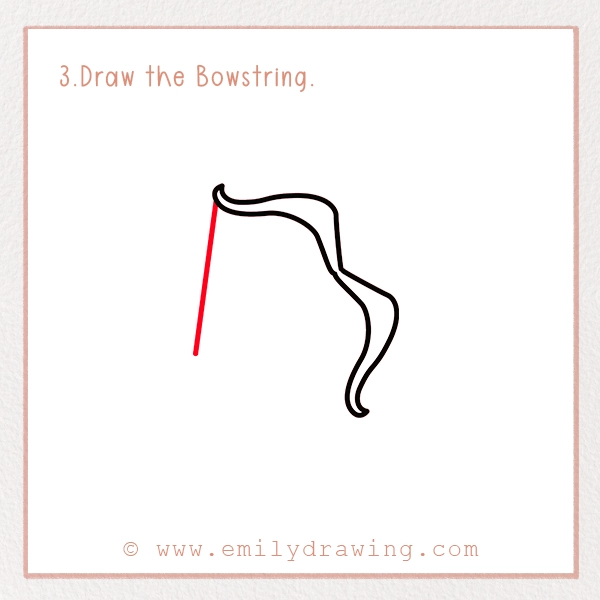
To make the bowstring, draw a straight vertical line connecting the top and bottom of the bow. This will form the first part of the string. This string is what pulls the arrow back and releases it with speed.
Tip: Keep this line as straight as possible to give your bow a strong and stable look.
Step 4 – Complete the Bowstring
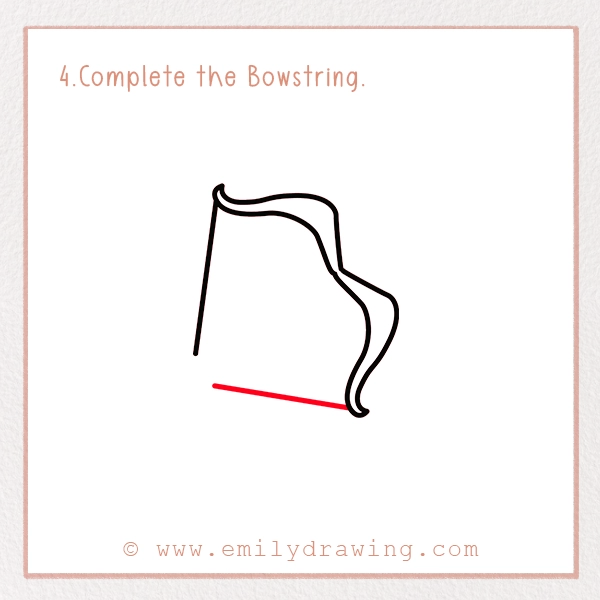
Now, finish the bowstring by drawing another straight line from the middle of the bow to the opposite end. This completes the bowstring structure, showing the tension ready to launch an arrow!
Step 5 – Draw the First Half of the Arrow’s Fletching
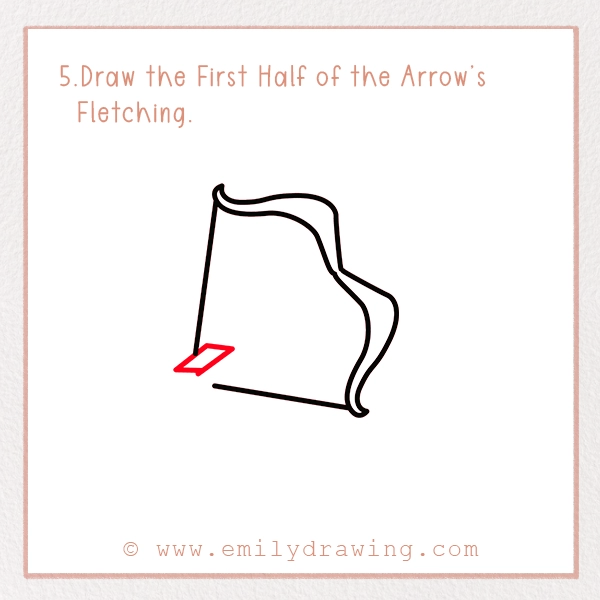
At the back end of where the arrow will go, draw a small triangular shape on one side. This is the first half of the fletching, which helps stabilize the arrow when it flies.
Did You Know? The fletching on an arrow is usually made of feathers! Traditional arrows often use bird feathers to improve flight accuracy.
Step 6 – Complete the Arrow’s Fletching
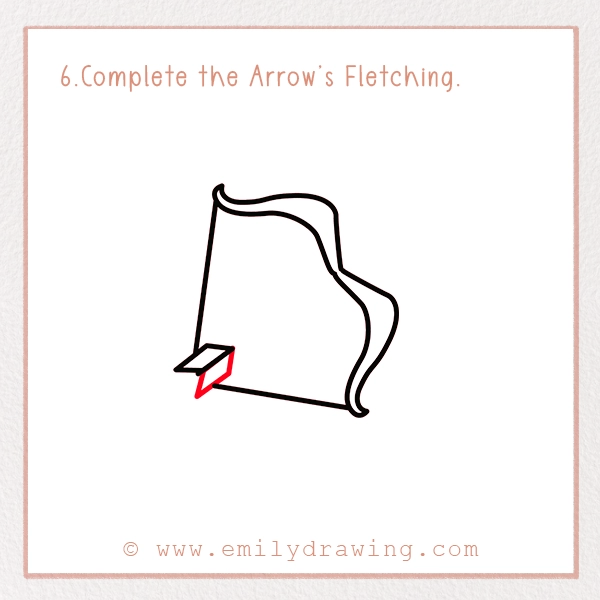
Now, draw another triangle on the opposite side of the first one. This completes the fletching, making the arrow look balanced and aerodynamic.
Step 7 – Draw the Arrow’s Shaft
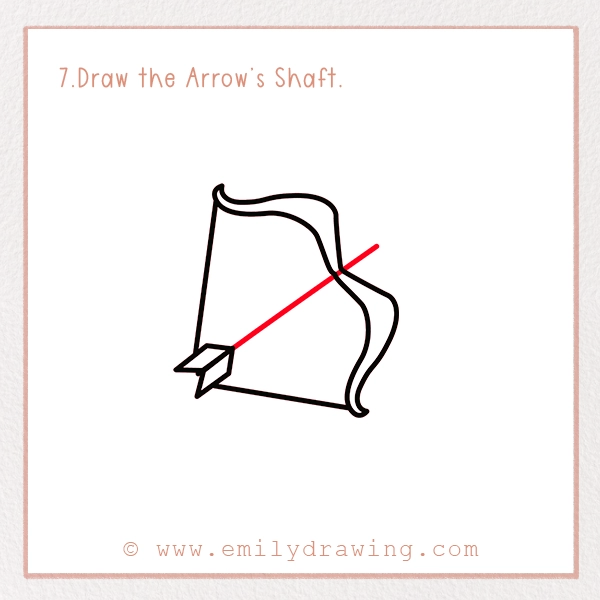
Draw a long diagonal line starting from the bowstring and extending outward. This is the shaft of the arrow, the main body that carries the tip forward.
Step 8 – Draw the Arrow’s Tip
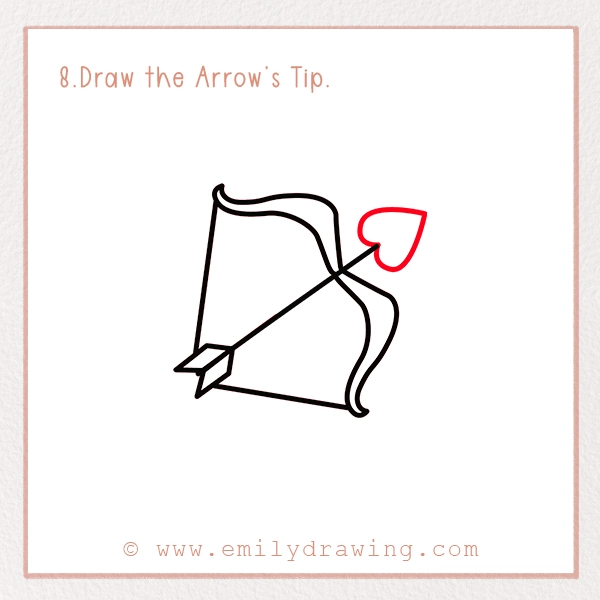
Instead of a sharp tip, let’s make this a Cupid-style arrow! At the front end of the shaft, draw a small heart shape to complete your arrow of love illustration. This is the magical part that spreads love wherever it lands!
Tip: If you want to get creative, you can add extra details, like sparkles around the heart-shaped tip to show its magical power.
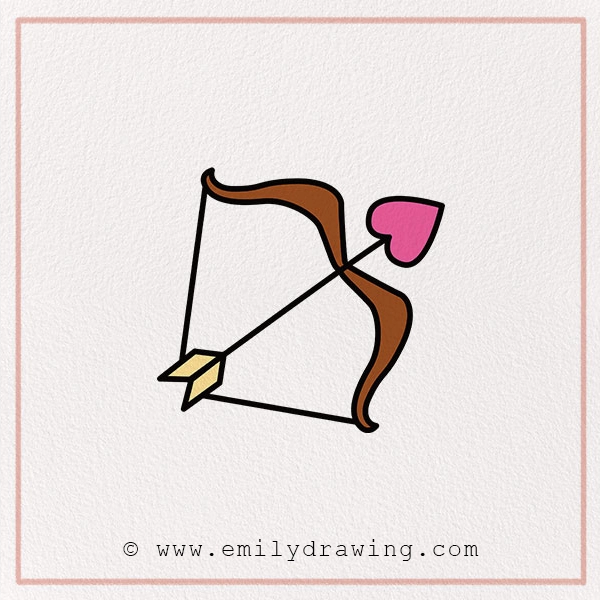
Step 9 – Color Your Drawing!

Time to bring your drawing to life with colors! Use brown for the bow, black for the bowstring, red or pink for the heart-shaped arrowhead, and yellow or white for the fletching. Have fun and get creative!
Creative Challenge: Try making different versions of Cupid’s arrow! What would a golden love arrow look like? How about a dark lead arrow that breaks hearts instead of uniting them?
Pin it now, Draw later!
Fun Facts About Cupid’s Arrow.
- Cupid’s arrows come in two types! Gold-tipped arrows make people fall in love, while lead-tipped arrows make them fall out of love.
- Cupid is known as Eros in Greek mythology. He is the god of love and attraction, often seen as a playful, mischievous figure.
- The image of Cupid with his bow and arrows has been around for centuries. Ancient artists often depicted him as a young boy with wings, but in some stories, he is an older, more serious figure.
- Cupid’s bow and arrow are often linked to Valentine’s Day. Every year, people send cards and gifts featuring this love-striking symbol.
Tips and Tricks for Better Drawing
- Even though this is an easy tutorial, here are some extra tricks to help improve your Cupid’s arrow drawing:
- If you’re struggling with symmetry, use light pencil strokes first. This will help you adjust before finalizing the drawing.
- Try different bow styles. Some bows are curvier, while others are straighter—experiment to find the one you like best!
- Experiment with color! Cupid’s arrows don’t have to be red and brown. You could make them gold, silver, or even rainbow-colored!
- Make it magical! Add some floating hearts, stars, or sparkles around the arrow to give it an enchanting look.
- Practice drawing the heart tip separately. If you’re not confident with drawing hearts, sketch a few on another paper until you’re happy with the shape.
Great job! You’ve successfully drawn Cupid’s arrow! Whether you followed along carefully or added your own creative touches, you now have a beautiful drawing to share.
We hope you had fun learning this simple and exciting drawing. If you enjoyed this tutorial, don’t forget to share your artwork with your friends and family. You can also post it on social media using #EmilyDrawing.
Want to keep practicing? Try drawing Cupid himself, designing different types of magical arrows, or even creating sweet treats like this adorable Valentine cupcake drawing to complete your holiday artwork set. Keep practicing, and who knows? Maybe your drawing will strike someone’s heart with creativity and love!
