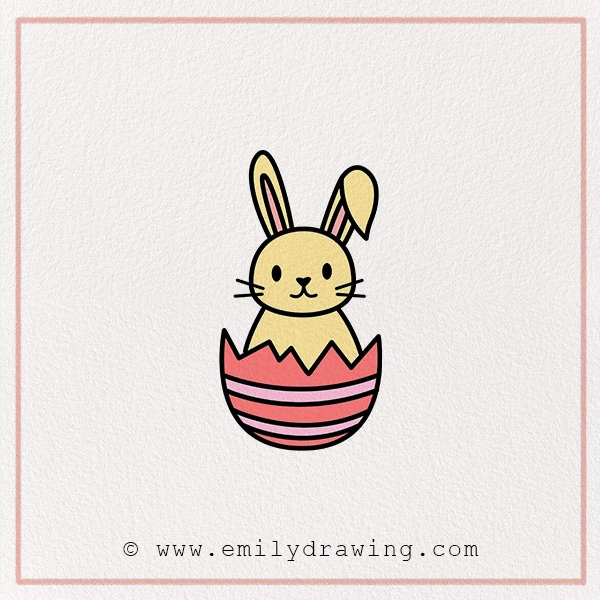
Have you ever wanted to draw your very own Easter bunny hatching out of a colorful egg? Well, you’re in luck! In this easy Easter drawing tutorial, we’ll show you how to draw a cheerful Easter bunny hatch using just a pencil and your imagination.
Did you know? The Easter Bunny is a beloved character in springtime traditions, often bringing colorful eggs and sweet treats—just like the one in our step-by-step guide on how to draw a bunny. This drawing is not only fun, but also perfect for Easter cards, decorations, or just to show off your creativity—especially when paired with this adorable bunny coloring page.
So, grab your pencils, sharpen those crayons, and let’s hop right in!
Let’s break down the drawing in this Easter bunny step-by-step guide. Each step builds upon the last, so don’t worry if it’s not perfect—just have fun!
Materials:
- a piece of paper
- a pencil for the guiding lines and sketching
- an eraser
- a black sharpie or a pen for the outlines
- markers or colored pencils for coloring
- our printable drawing guide (Join my Email List below to get this Tutorial)
Here are my RECOMMENDED Art Supplies!
- Crayola Coloring Set (140 Pieces – Mega Value!)
- 24 Colored Crayon Set
- A4 Printer Paper
- Crayola Coloring Pencils
- HP Home Printer with Instant Ink!
Time needed:
15 minutes.
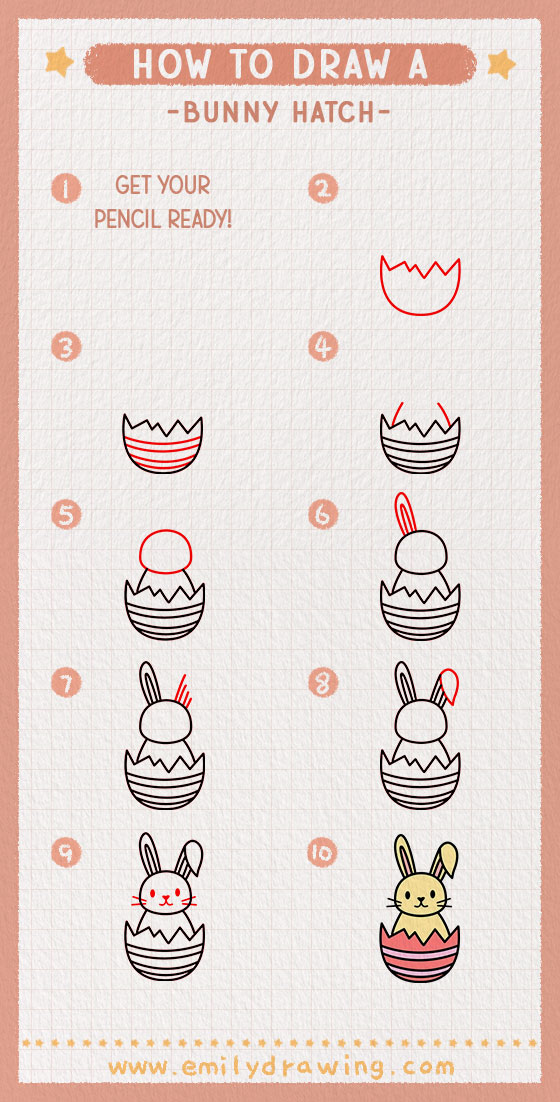
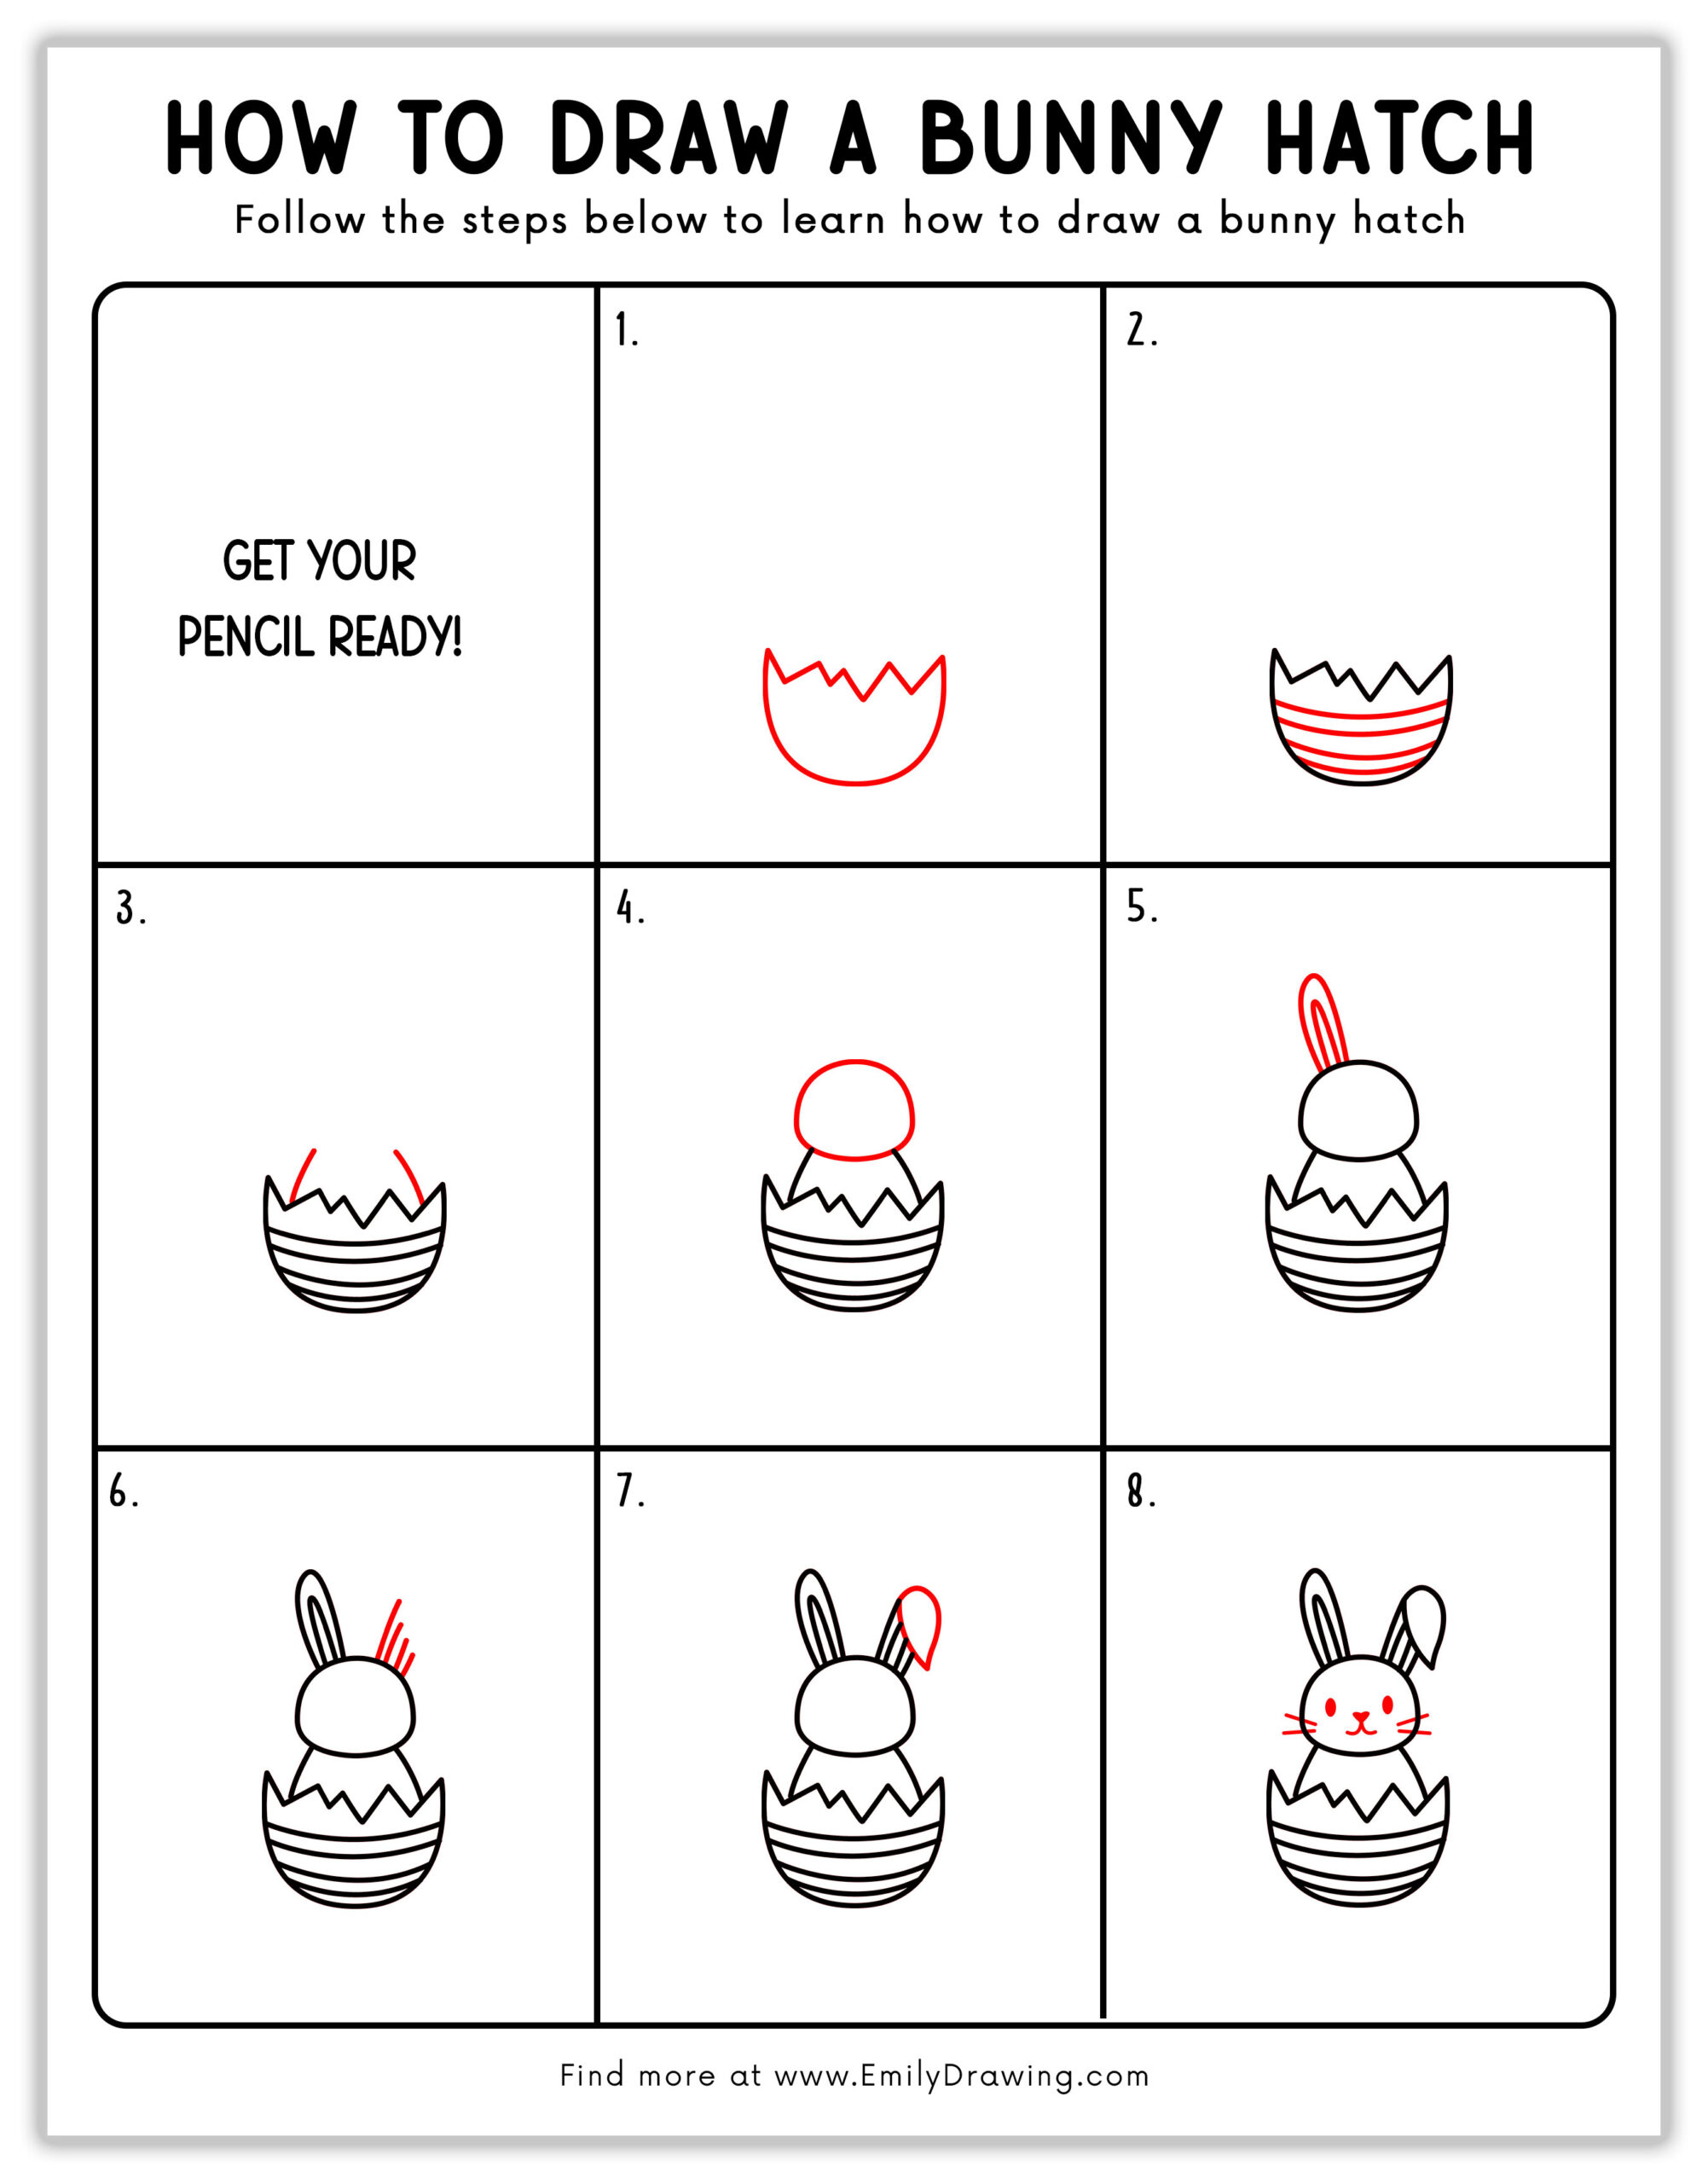
How to Draw an Easter Bunny Hatch — Let’s get started!
Step 1 – Draw the Bottom Half of the Eggshell.
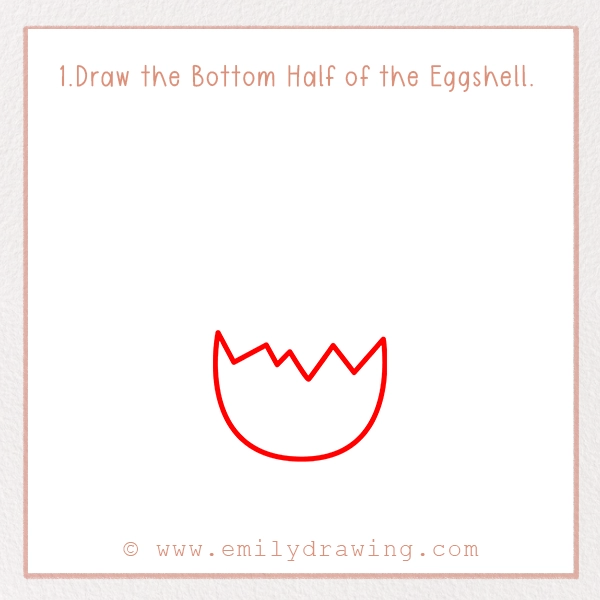
Start by drawing a semi-circle or a wide “U” shape. This is the bottom of your Easter egg. Now, instead of a smooth top, add a zigzag line across the top edge to make it look cracked. It should resemble the egg breaking open.
💡 Tip: Keep the zigzags big and bouncy—they don’t have to be perfect!
Step 2 – Add Stripes to the Egg.

Time to decorate the egg! Inside the bottom shell, draw three to four curved lines going horizontally across the egg. These stripes will give your egg some personality.
🎨 Fun Idea: You can change the stripes into patterns like zigzags, dots, or even little hearts if you want to be creative!
Step 3 – Add the Bunny’s Body Peeking Out.
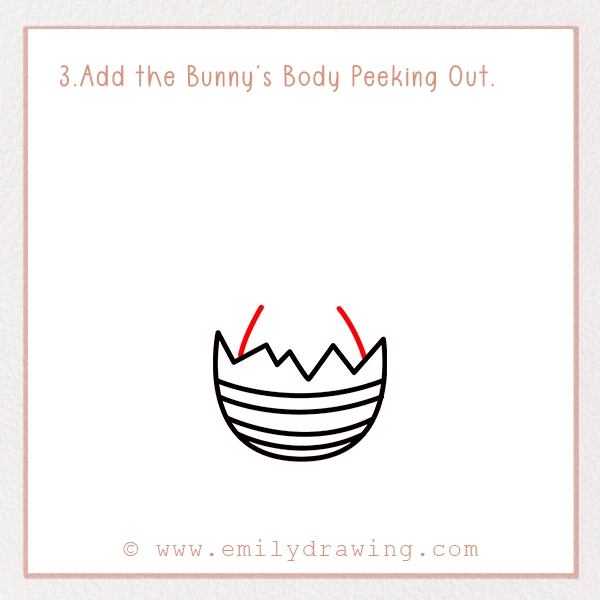
Now let’s bring the bunny into the picture! Just above the cracked shell, draw two slightly curved lines rising upwards—these will form the bunny’s fluffy body peeking out from the egg. Connect them with a curved line on top, forming an oval shape.
✏️ Tip: Keep the body smaller than the egg so it looks like the bunny is sitting inside it.
Step 4 – Draw the Bunny’s Head.
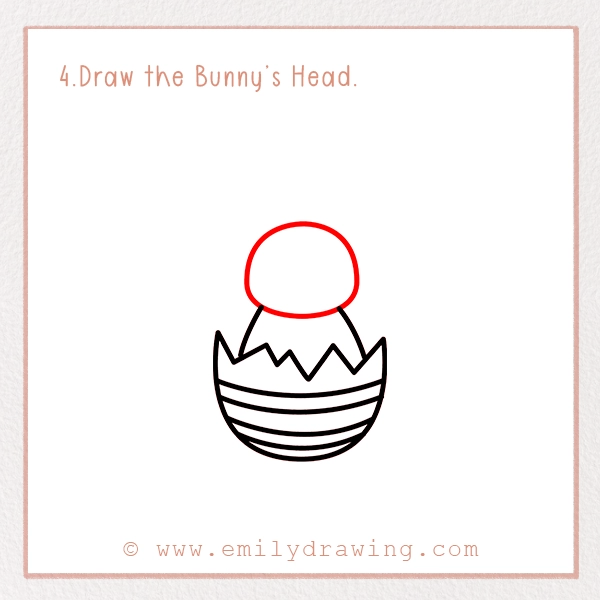
Ready to add a cute bunny face? Above the body you just drew, sketch a large oval for the head. This should be slightly wider than the body and nicely centered.
🔍 Helpful Hint: You can use a light hand while sketching so it’s easy to erase and adjust if needed.
Step 5 – Add One Full Ear.
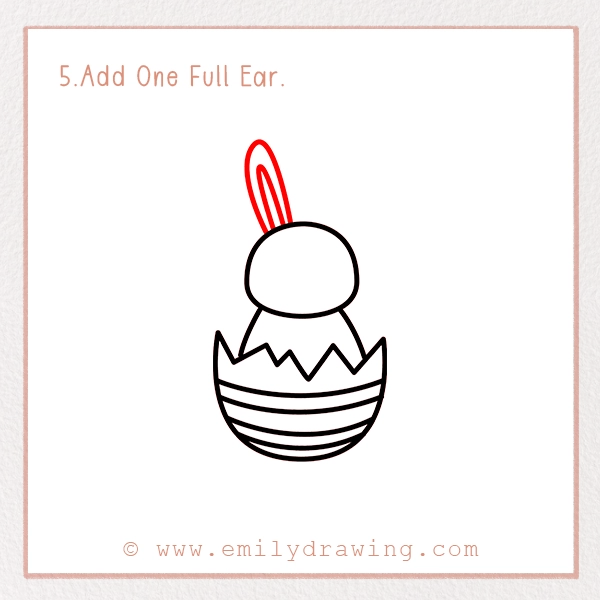
Time to add those adorable bunny ears! On one side of the bunny’s head, draw a tall, narrow oval pointing upwards. This is the first ear standing up straight.
✨ Creative Twist: Some bunnies have shorter or rounded ears. Want to make your bunny unique? Go for it!
Step 6 – Add Fluff and Detail the First Ear.
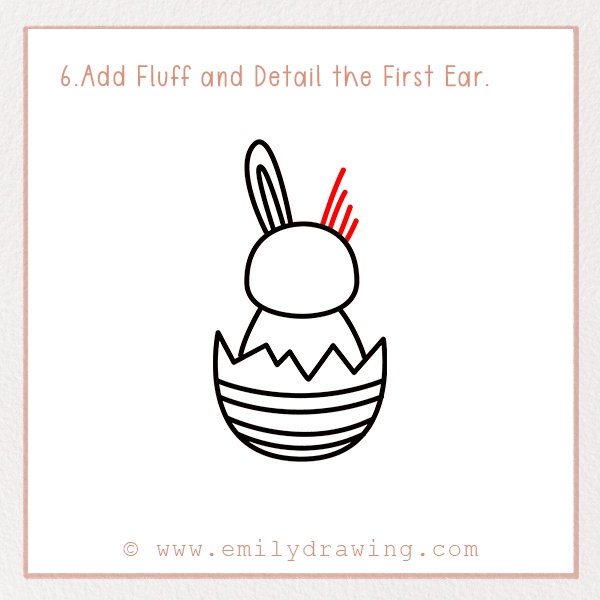
To make your bunny even cuter, add some fluff! Right next to the standing ear, draw three or four short, upward curved lines on top of the bunny’s head to look like tufts of fur.
Then, inside the first ear, add a smaller oval to give it some detail—this inner shape shows the soft inside of the ear.
🐰 Fun Fact: Did you know that rabbits use their ears to regulate their body temperature?
Step 7 – Draw the Second Floppy Ear.

Now let’s add a bit of playfulness! Draw the second ear flopping over to one side. Start by drawing a curved line from the head, then bring it down like a soft teardrop shape.
Add another smaller curve inside the ear to match the first ear’s detail.
🌟 Pro Tip: Making one ear stand and the other flop adds cuteness and character!
Step 8 – Add the Bunny’s Facial Details.
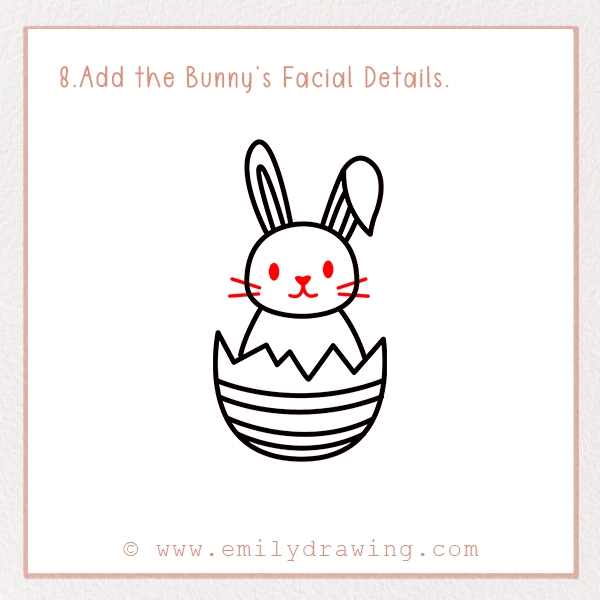
Let’s bring your bunny to life! Draw two small ovals for eyes and a small triangle for the nose. Under the nose, draw a short line going down, then add a “W” shape for the mouth.
Now, add three short whiskers on each side of the face to finish it off.
🎨 Optional: You can add rosy cheeks or little eyebrows for even more expression.
Step 9 – Color Your Drawing!
Time to make your bunny hatch pop with color! Use crayons, colored pencils, or markers to bring your drawing to life—or try this delightful bunny coloring page for extra fun!
Pin it now, Draw later!
Here’s a fun idea for coloring:
- Eggshell: Mix pastel pinks, purples, and blues.
- Bunny: Use soft browns, grays, or even white with pink inner ears.
- Background: Add grass, flowers, or a rainbow sky!
🎯 Creative Challenge: Try making several bunnies, each with a different egg design!
Fun Facts About the Easter Bunny Hatch
Here are some quirky facts that will make your Easter drawing even more egg-citing:
- The Easter Bunny is said to have originated in Germany in the 1600s!
- Decorated eggs have been a symbol of spring and new life for thousands of years.
- In some cultures, the bunny is believed to lay colorful eggs in nests left by children—what a magical thought!
Tips and Tricks for Better Drawing
Even the best artists start with simple lines! Here are a few tips to help make your drawing even more awesome:
- Use light pencil strokes first: That way, you can erase if needed.
- Practice shapes separately: Try drawing the bunny ears or egg patterns a few times on another sheet before your final version.
- Make it your own: Add a bow tie, glasses, or even tiny bunny feet sticking out!
- Layer your colors: Start with light shades and build up for more depth and texture.
- Remember: There’s no “wrong” way to draw your bunny. It’s all about having fun and using your imagination.
And there you have it—your very own Easter Bunny Hatch! You’ve followed each step and brought a happy bunny to life, all snuggled inside a cracking egg.
Whether you’re drawing just for fun, making Easter cards, or decorating your room, this cheerful bunny is sure to spread smiles.
We’d love to see what you’ve created! Don’t forget to share your masterpiece with your family and friends—or even post it online using #EmilyDrawing. Who knows, your bunny might just be the star of Easter!
Want more fun drawing adventures? Stay tuned for more tutorials like how to draw a bunny, chicks, spring flowers, and even a basket full of chocolate eggs!
🐣 Happy drawing, and Happy Easter!
Get the FREE Printable Drawing Guide
FREE Download Printable Easter Bunny Hatch Drawings Tutorials