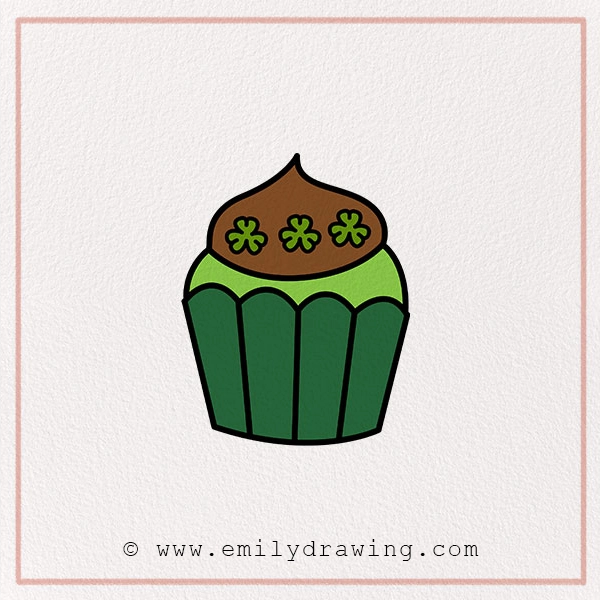
Get your pencils ready, because today we’re going to draw something sweet, lucky, and oh-so-fun—a St. Patrick’s Day Clover Cupcake! This St. Patrick’s Day drawing tutorial is perfect for kids and parents alike. Whether you’re a beginner or a doodling expert, you’ll have a blast creating this festive holiday treat—especially if you’ve already tried our fun tutorial on how to draw a cupcake.
St. Patrick’s Day is all about leprechauns, rainbows, pots of gold, and of course—clovers! So what happens when you mix all that luck with a yummy dessert? You get a Clover Cupcake that’s both magical and fun to draw, much like our other sweet treat in the cupcake drawing guide. Let’s get started!
Grab your favorite pencil, a clean sheet of paper, and maybe some crayons or markers for coloring. Let’s draw this lucky cupcake together—one simple step at a time!
Materials:
- a piece of paper
- a pencil for the guiding lines and sketching
- an eraser
- a black sharpie or a pen for the outlines
- markers or colored pencils for coloring
- our printable drawing guide (Join my Email List below to get this Tutorial)
Here are my RECOMMENDED Art Supplies!
- Crayola Coloring Set (140 Pieces – Mega Value!)
- 24 Colored Crayon Set
- A4 Printer Paper
- Crayola Coloring Pencils
- HP Home Printer with Instant Ink!
Time needed:
15 minutes.
How to Draw a St. Patrick’s Day Clover Cupcake — Let’s get started!
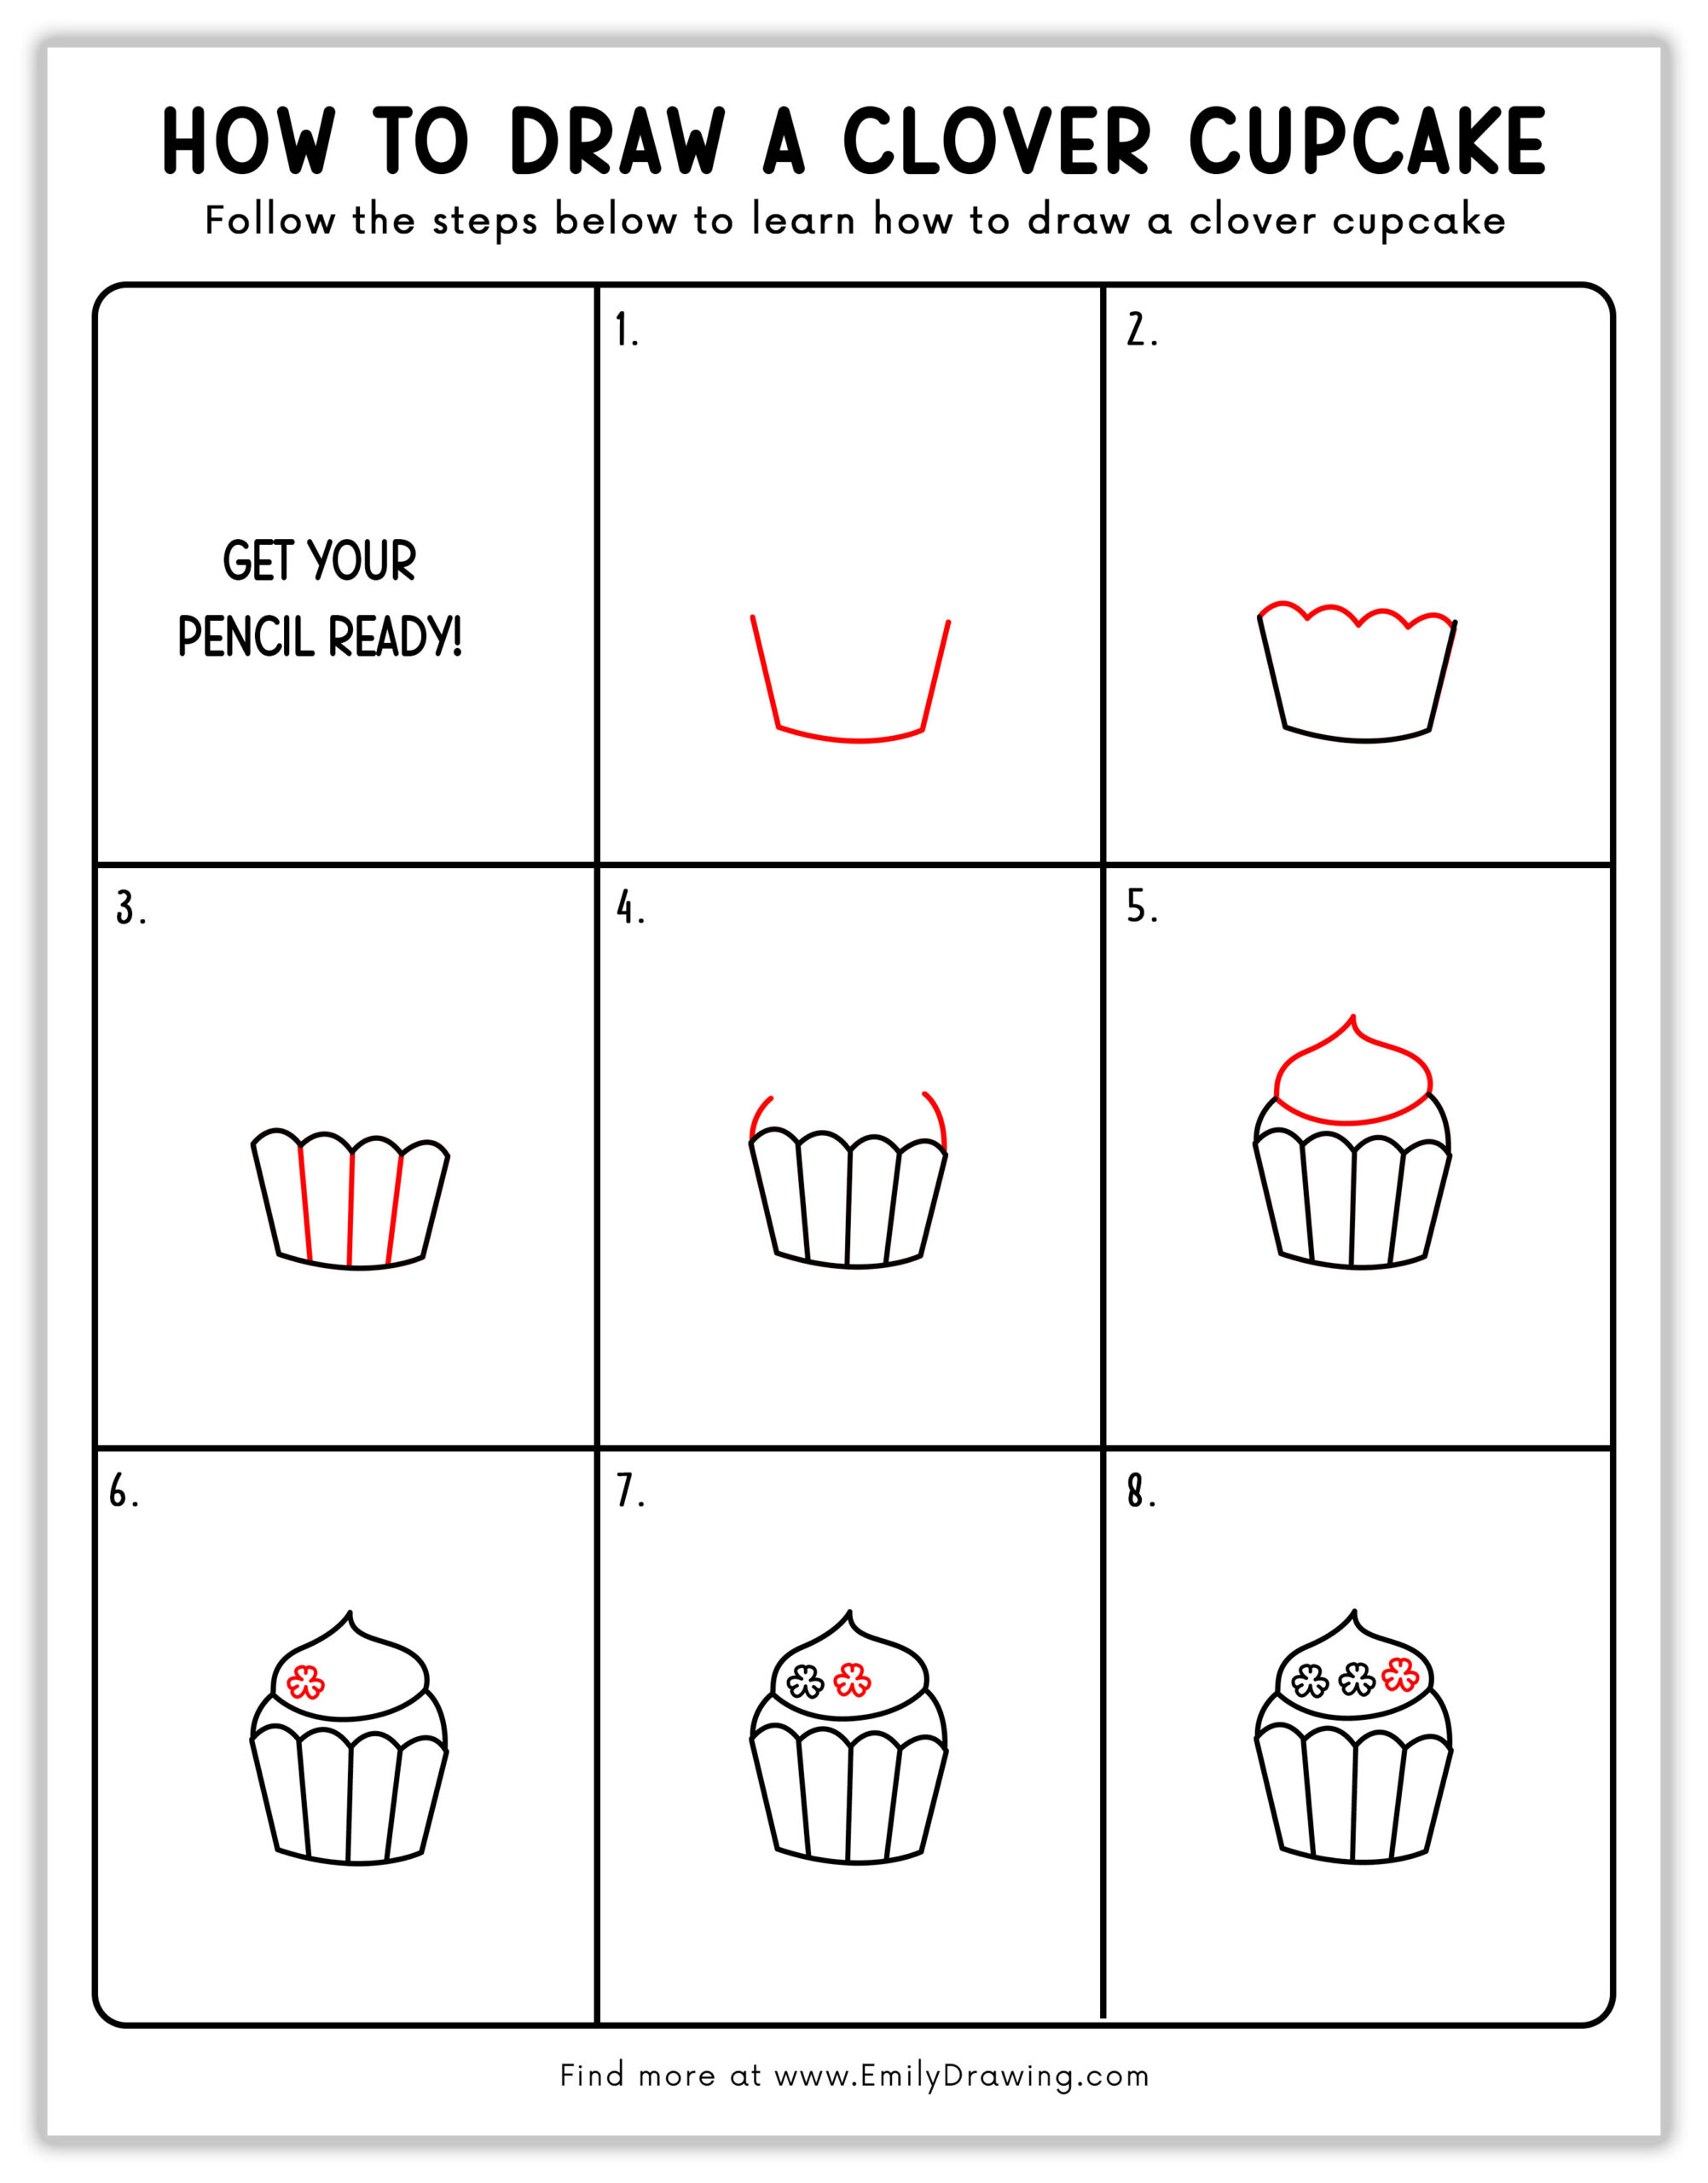
Step 1 – Draw the Base of the Cupcake Wrapper.
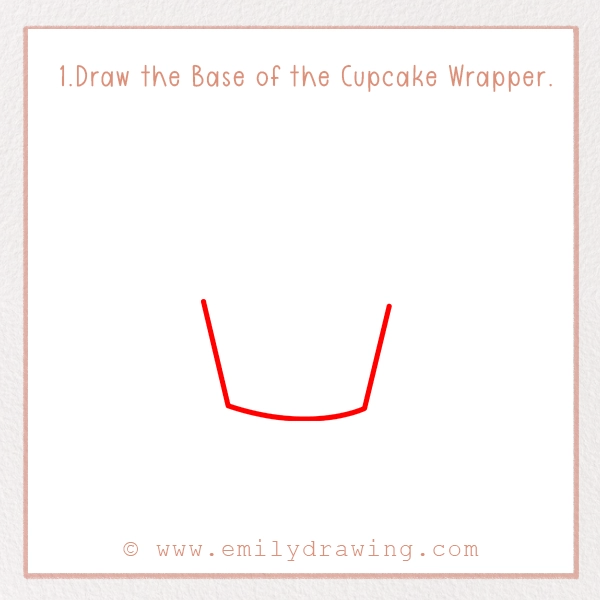
Start with the bottom of the cupcake—the wrapper.
Draw a wide “U” shape with slightly slanted sides and a flat bottom. This forms the base of your cupcake liner.
Tip: Sketch lightly—you can always make changes later!
Step 2 – Add the Top Edge of the Wrapper.
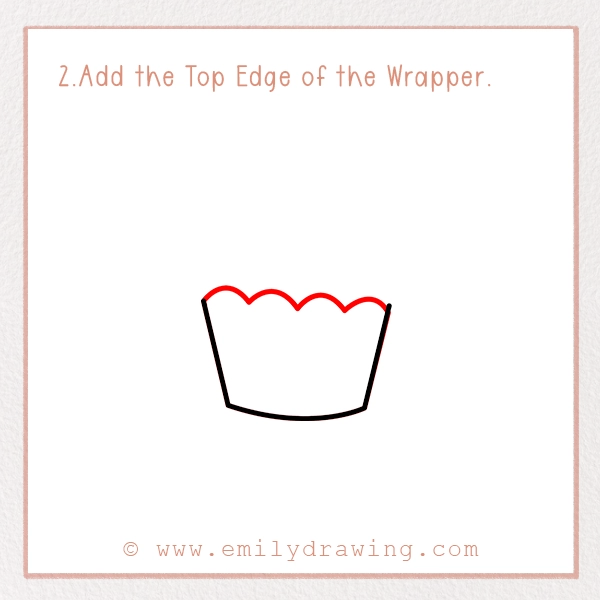
Across the top of the wrapper, draw five or six small bumps like rolling hills. These make it look like a real crinkled cupcake liner.
Fun Fact: Real cupcake wrappers have folds like this to help hold the cake in place!
Step 3 – Divide the Wrapper into Sections.
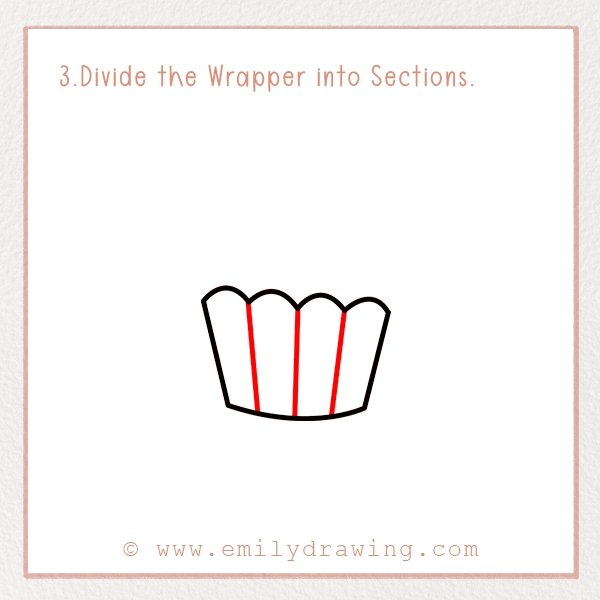
Draw four or five vertical lines inside the wrapper from top to bottom. Slightly curve them inward to give your wrapper depth.
Style Tip: Even spacing will make your wrapper look neat and realistic.
Step 4 – Start the Frosting Swirl.
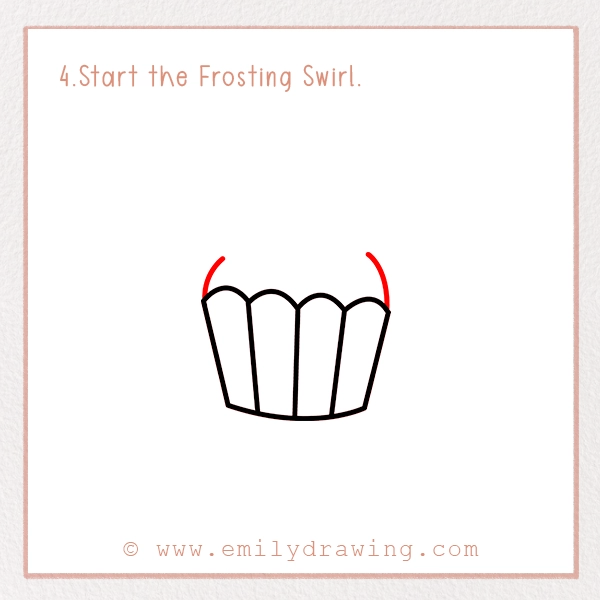
Now for the best part—the frosting!
From both top corners of the wrapper, draw curved lines going upward toward the center. These lines should create a fluffy, round base for the frosting swirl.
Imagine: This is a scoop of soft chocolate, vanilla, or mint frosting. Yum!
Step 5 – Add the Frosting Peak.
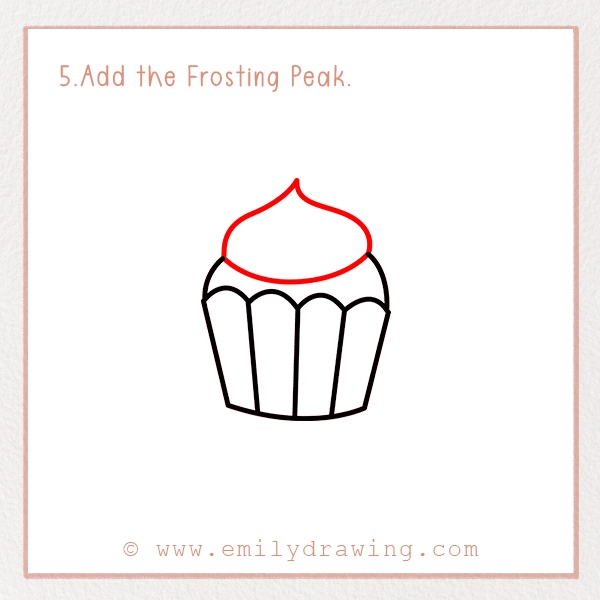
Connect the frosting with a rounded triangle shape to make the frosting peak. You can make it tall and swirly or short and puffy—it’s up to you!
Frosting Fact: Cupcakes get their signature swirl from frosting being piped on with a decorating bag.
Step 6 – Draw the First Clover.
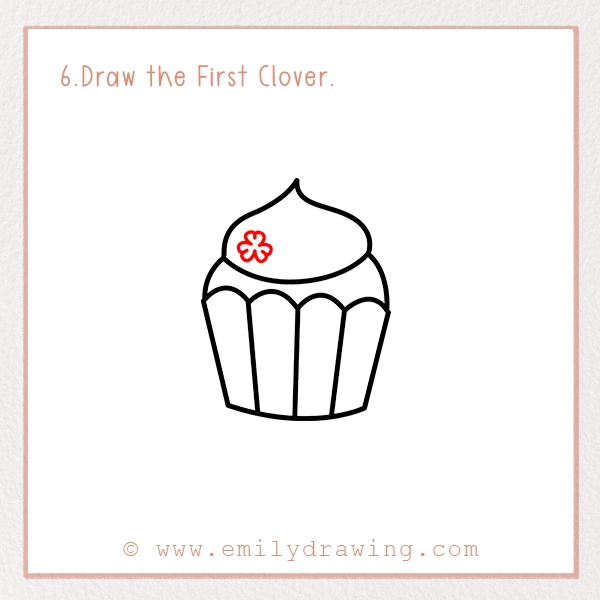
Let’s make this cupcake lucky!
On the left side of the frosting, draw a three-leaf clover:
Draw three small heart shapes connected at the base.
Add a short stem beneath them.
Lucky Tip: Three-leaf clovers are classic Irish symbols of good fortune—perfect to color in too, as shown in our shamrock coloring page.
Step 7 – Add Two More Clovers.
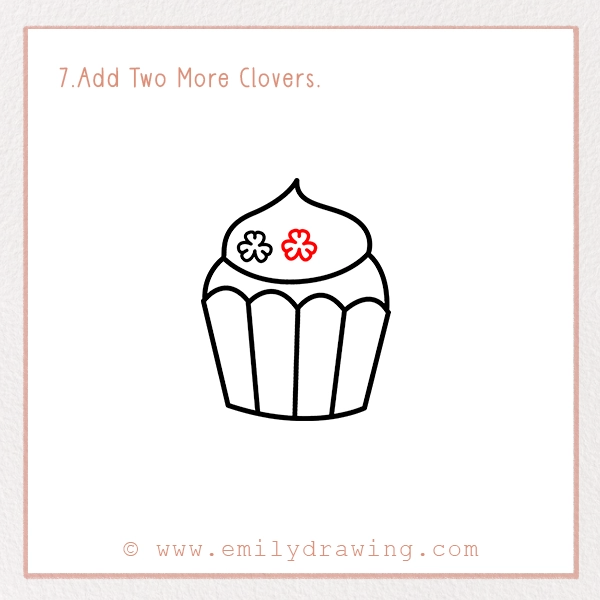
Draw two more clovers—one in the center and one on the right side of the frosting.
You can make them match the first, or get creative and try a four-leaf clover in the middle for extra luck!
Step 8 – Add Fun Details and Decorations.
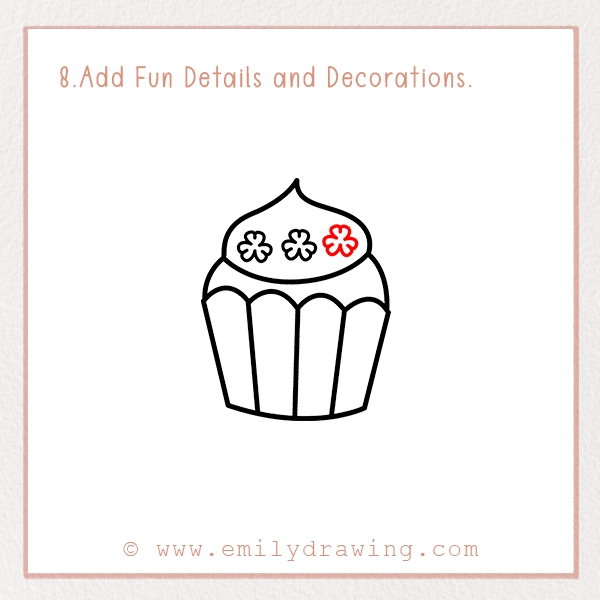
Let’s make this cupcake magical!
Add sparkles, sprinkles, or tiny stars on the frosting—just like the ones you’ll find on our shamrock coloring page if you want extra inspiration.
Add a cherry, a gold coin, or a mini leprechaun hat on top—similar to some festive motifs in our Christmas drawing ideas collection.
Add a background—maybe a party table, a rainbow, or even a cloud!
Imagination Boost: What if this cupcake is sitting at the end of a rainbow?
Step 9 – Color Your Drawing!
Time to bring your cupcake to life!
Coloring Ideas:
- Wrapper: Green, light green, or rainbow stripes
- Frosting: Chocolate brown, mint green, gold, or even white with green swirls
- Clovers: Bright green with darker outlines
- Background: Add coins, rainbows, or a smiling sun
Coloring Tip: Use colored pencils for gentle shading, crayons for texture, and glitter pens for sparkle!
Pin it now, Draw later!

Fun Facts About Clover Cupcakes
Here are some sweet and lucky tidbits:
- Clover cupcakes are often made for St. Patrick’s Day parties with green frosting and shamrock sprinkles!
- The word “cupcake” first appeared in a cookbook in 1796—over 200 years ago!
- In Irish legend, clovers represent hope, faith, love, and luck—especially when you find a rare four-leaf one!
Tips and Tricks for Better Drawing
Here are a few tips to make your cupcake even more amazing:
- Sketch lightly first, then go over it with pen or marker once you’re happy.
- Break things into shapes—start with ovals, hearts, and curves before adding details.
- Practice clovers on a scrap sheet before drawing them on your cupcake.
- Add shadows under the frosting and inside the wrapper folds for a 3D effect.
- Create a whole tray of cupcakes with different toppings and clover styles!
Woo-hoo! You just drew a St. Patrick’s Day Clover Cupcake—and it looks amazing! Whether you’re using it as art for school, a holiday card, or just having fun, you’ve created something lucky and sweet.
Let’s Celebrate Your Art!
Take a photo of your finished drawing and share it using #EmilyDrawing so others can see your cupcake magic!
Want more fun? Check out our other drawing tutorials—rainbows, leprechauns, pots of gold, and even Christmas drawing ideas for holiday inspiration.
So keep those pencils moving, keep dreaming big, and have a sweet and lucky St. Patrick’s Day! 🍀🧁🌈✨
Get the FREE Printable Drawing Guide
FREE Download Printable Patrick’s Day Clover Cupcake Drawings Tutorials