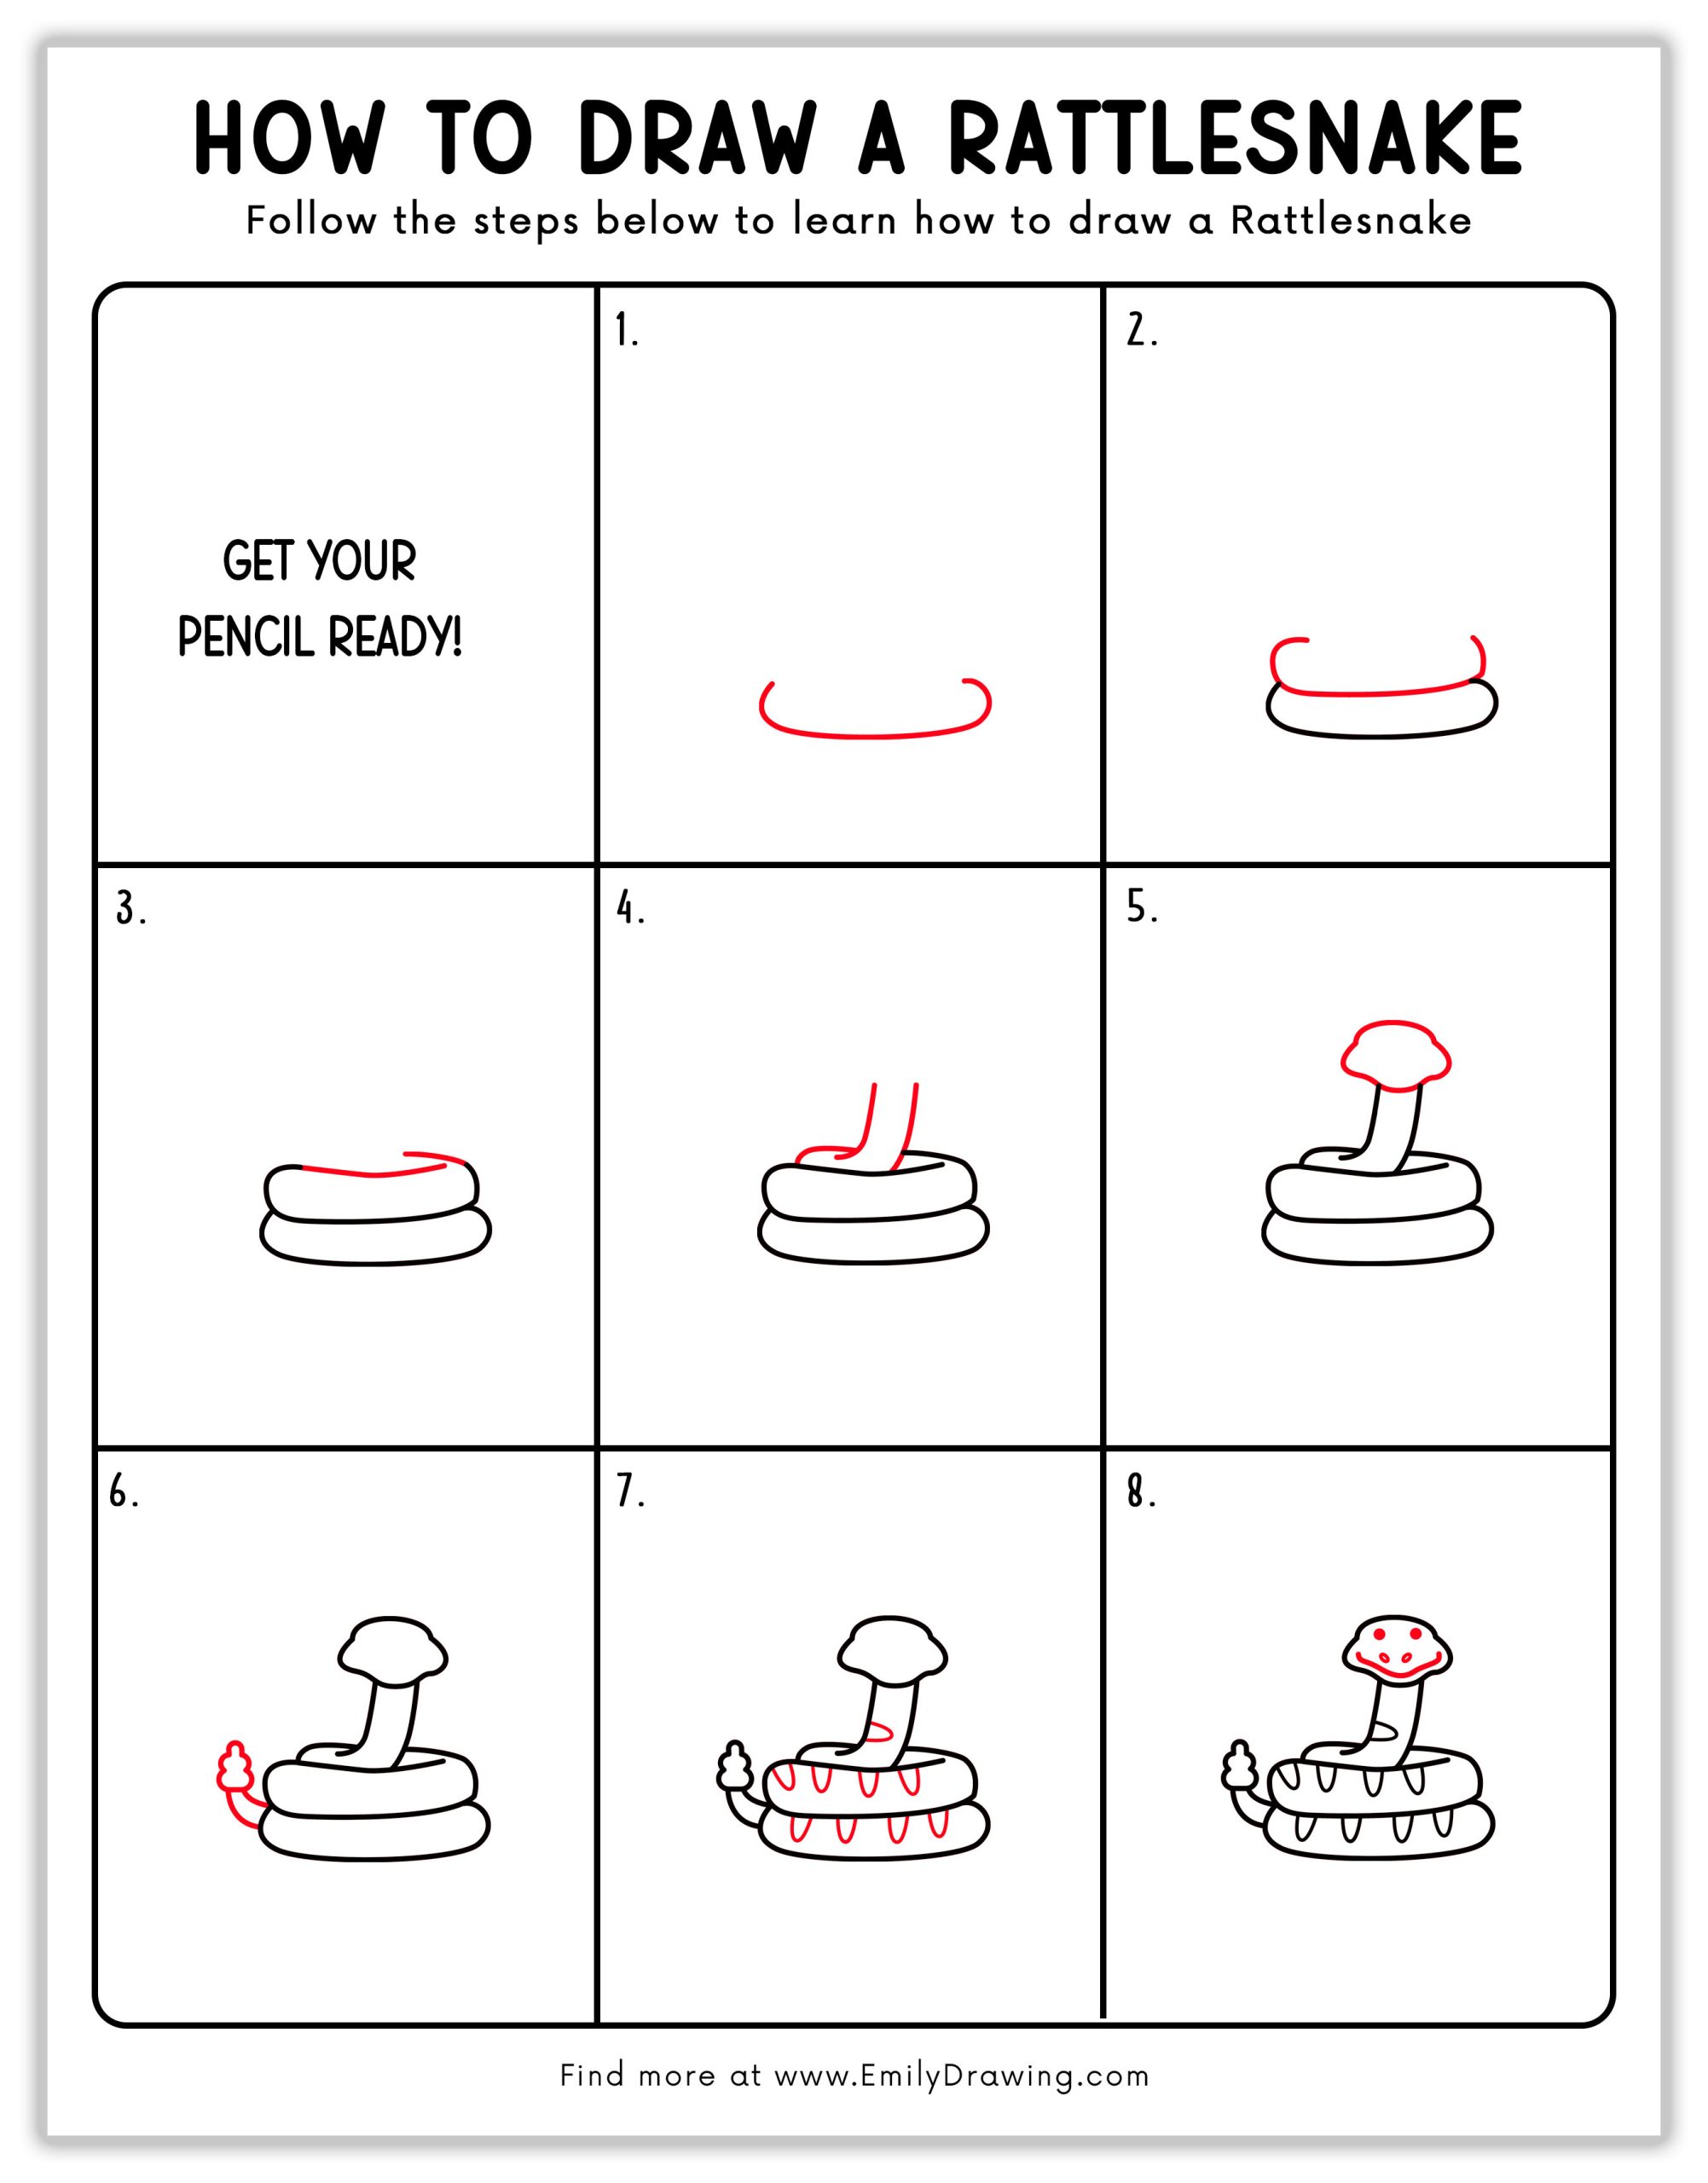
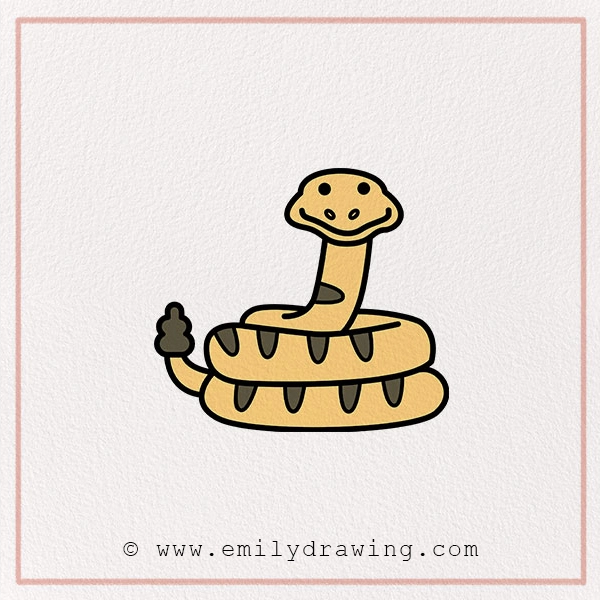
Are you ready to create a slithering masterpiece? In this tutorial, we’ll learn how to draw a rattlesnake in just a few simple steps! Rattlesnakes are famous for their noisy tails and unique coiled stance, and if you’re interested in other types of snakes, check out our tutorial on how to draw a snake. Did you know that a rattlesnake’s rattle is made of hollow keratin segments, just like your fingernails? These fascinating snakes use their rattles to warn potential threats to stay away.
Drawing a rattlesnake may seem tricky, but with our easy-to-follow steps, your rattlesnake sketch will look awesome and realistic in no time! So grab your pencil, eraser, and some colors, and let’s get started!
Materials:
- a piece of paper
- a pencil for the guiding lines and sketching
- an eraser
- a black sharpie or a pen for the outlines
- markers or colored pencils for coloring
- our printable drawing guide (Join my Email List below to get this Tutorial)
Here are my RECOMMENDED Art Supplies!
- Crayola Coloring Set (140 Pieces – Mega Value!)
- 24 Colored Crayon Set
- A4 Printer Paper
- Crayola Coloring Pencils
- HP Home Printer with Instant Ink!
Time needed:
15 minutes.
How to Draw a Rattlesnake — Let’s get started!
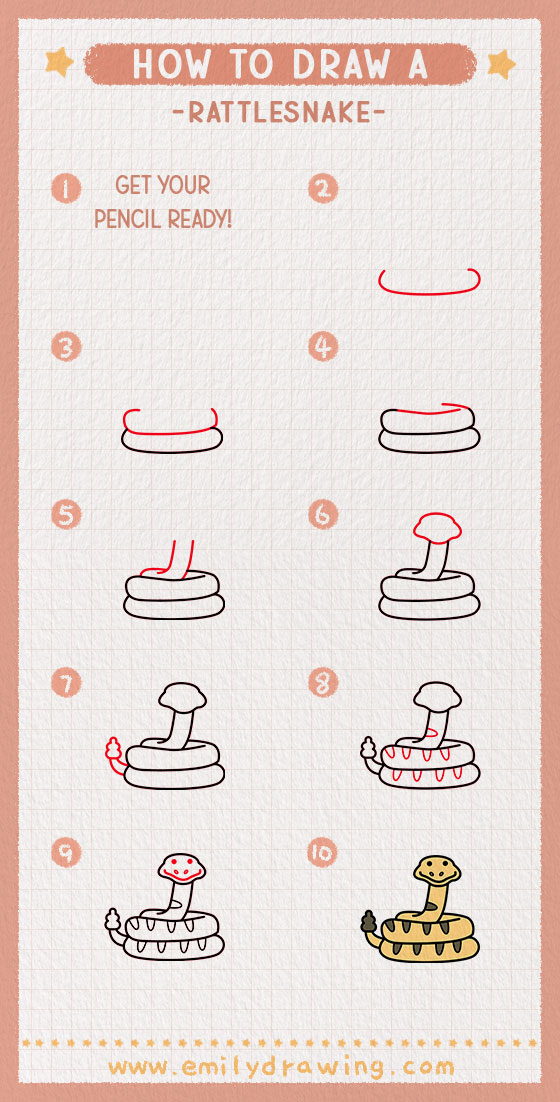
Step 1 – Draw the Snake’s Base
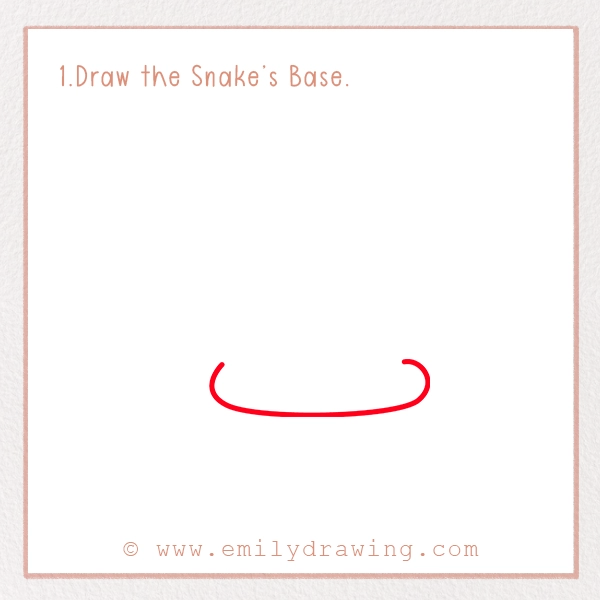
To start, draw a simple curved line like a smile. This will be the foundation for the snake’s coiled body. Think of it as the bottom part of a spiral, as this will help give the snake a realistic look.
Pro Tip: If you’re having trouble making it smooth, try drawing lightly with your pencil so you can make adjustments if needed!
Step 2 – Complete the First Coil
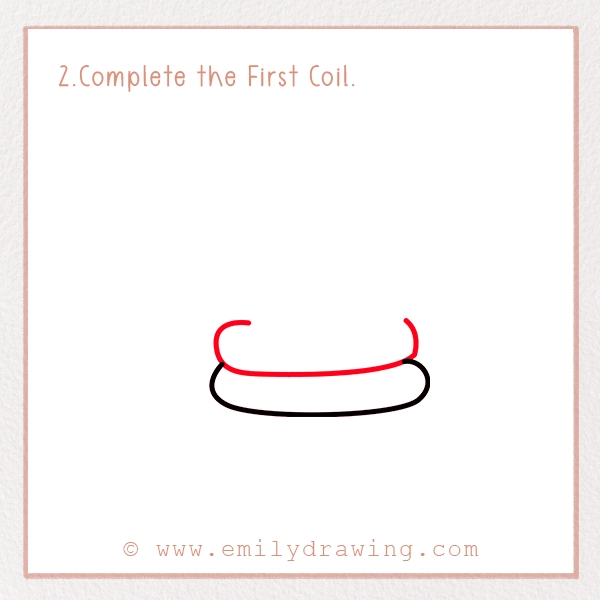
Now, draw another curved line above it, closing the shape. Then, add an oval-like shape underneath to give it a rounded appearance. This forms the bottom layer of the rattlesnake’s coiled body. It should look like a thick donut resting on the ground.
Fun Fact: Rattlesnakes coil their bodies to prepare for striking when they feel threatened!
Step 3 – Add the Second Coil
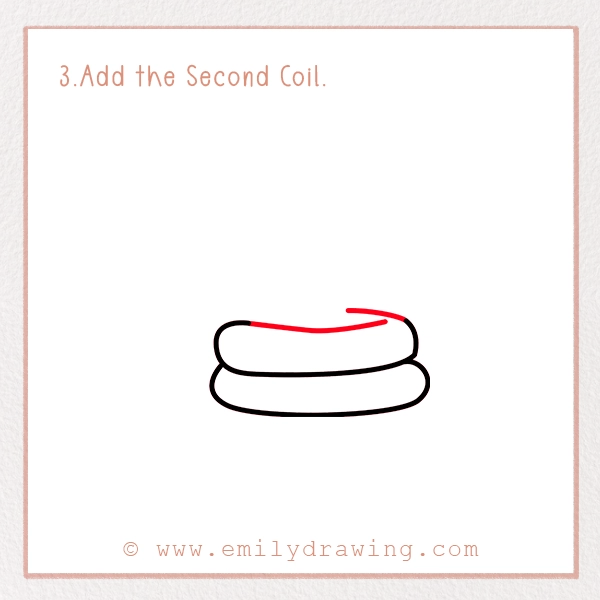
Draw another oval sitting on top of the first coil. Make sure it overlaps slightly to give it a stacked look. This helps create depth in the drawing. The second coil should be a bit smaller than the first to show perspective.
Pro Tip: You can add more coils if you want your snake to look longer!
Step 4 – Sketch the Snake’s Neck
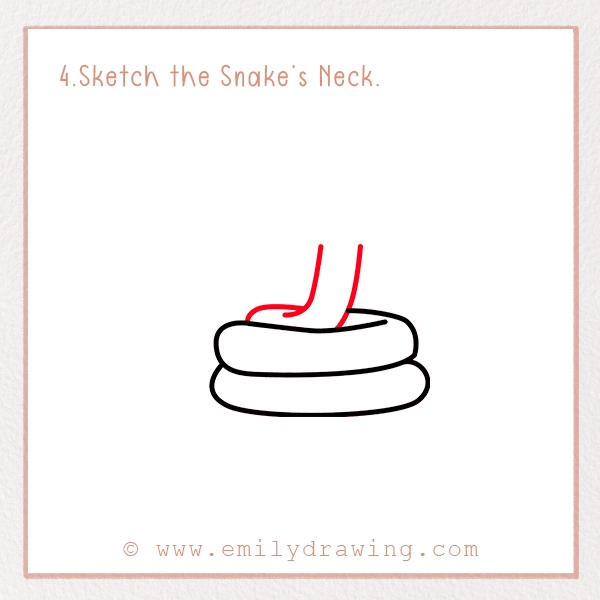
From the center of the top coil, draw two slightly curved vertical lines that move upwards. This will form the rattlesnake’s long and flexible neck. Try to keep the lines even so that the neck looks balanced.
Fun Fact: Rattlesnakes can raise their heads and expand their necks to appear more intimidating!
Step 5 – Draw the Head
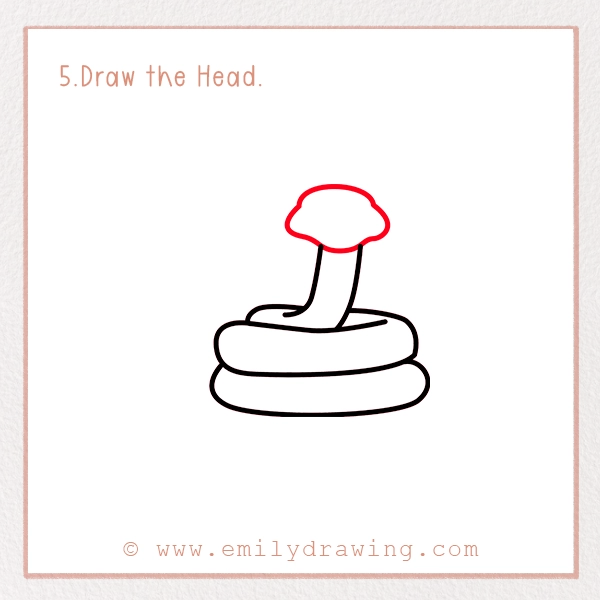
At the top of the neck, sketch an oval-like shape with a slightly wider bottom. This gives the rattlesnake its distinctive broad head. Don’t forget to round out the edges for a softer, cartoon-like look!
Pro Tip: If you want a more realistic rattlesnake, shape the head like a triangle with rounded corners.
Step 6 – Add the Rattle
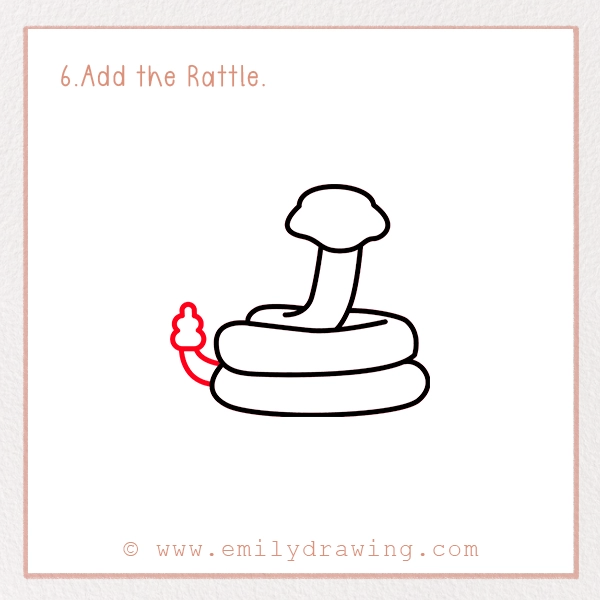
Now, it’s time to add the famous rattle! Draw a small curved tail at the end of the bottom coil and attach a few tiny, bumpy segments. These will make the rattle look realistic.
Fun Fact: The rattlesnake’s rattle makes a buzzing sound when shaken. The more segments a rattlesnake has, the louder the sound!
Step 7 – Detail the Body
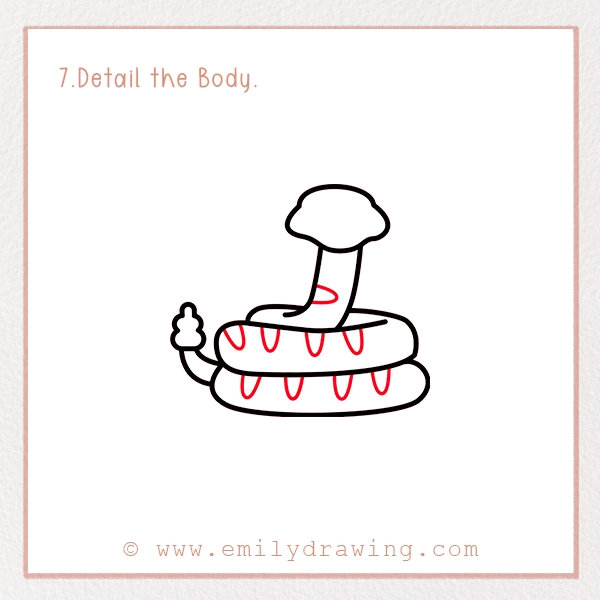
To make your rattlesnake look more lifelike, add small triangular shapes along the edges of its coils. These will be the snake’s patterns. You can also add curved lines along its body to show the natural bends of its form.
Creative Tip: Try giving your snake different patterns, like stripes or spots, for a unique look!
Step 8 – Give It a Face!

Now, let’s bring the rattlesnake to life! Draw two round eyes, a smiling mouth, and small curved lines for nostrils. You can also add tiny fangs for a cute but slightly fierce look.
Fun Fact: Rattlesnakes use heat-sensing pits near their eyes to detect warm-blooded prey, even in the dark!
Step 9 – Color Your Drawing!
It’s time to add some color! Rattlesnakes are usually shades of brown, tan, or yellow, with dark diamond patterns along their bodies. Use your favorite colors to make your snake unique!
Coloring Tip: Adding shading under the coils and on the snake’s body will make it look more three-dimensional!
Pin it now, Draw later!
Fun Facts About Rattlesnakes
- Rattlesnakes can’t hear their own rattles! Instead, they sense vibrations in the ground to detect movement.
- Baby rattlesnakes are born with just one small segment on their tail. They grow more rattles as they shed their skin!
- A rattlesnake’s venom isn’t just for defense; it helps them digest their food by breaking it down before swallowing.
- Some rattlesnakes can go without eating for months because their metabolism is so slow!
- The Western Diamondback Rattlesnake is one of the most well-known rattlesnake species and can grow up to 7 feet long.
- Rattlesnakes have special heat-sensing pits near their eyes that help them detect warm-blooded prey, even in the dark.
- Rattlesnakes shed their skin several times a year as they grow. Imagine outgrowing your clothes that often.
Tips and Tricks for Better Drawing
- Use Light Pencil Strokes First: Start with gentle sketches and go over them once you’re happy with the shape.
- Break It Down: If a step feels tricky, try breaking the shape into smaller parts, like circles and lines.
- Add Shading: Use light pencil shading under the coils and along the body to create a more realistic effect.
- Experiment with Expressions: Want your rattlesnake to look friendlier? Try making its eyes bigger and adding curved eyebrows!
- Draw a Background: Make your drawing stand out by adding a desert background with cacti and rocks!
Great job! You’ve successfully completed a step-by-step snake sketch! By following these simple steps, you’ve learned how to create a detailed and realistic snake while having fun. Keep practicing and try adding different poses, expressions, or even a background to your drawing for more creativity!
We’d love to see your creations—share your drawings with us on social media using #EmilyDrawing. If you enjoyed this snake illustration tutorial, check out our other fun drawing guides and keep creating amazing artwork. Happy drawing!
What’s Next?
Want to learn how to draw more cool animals? Try drawing a desert scene with a scorpion, lizard, or even a howling coyote! Keep exploring, keep drawing, and most importantly have fun!
Get the FREE Printable Drawing Guide