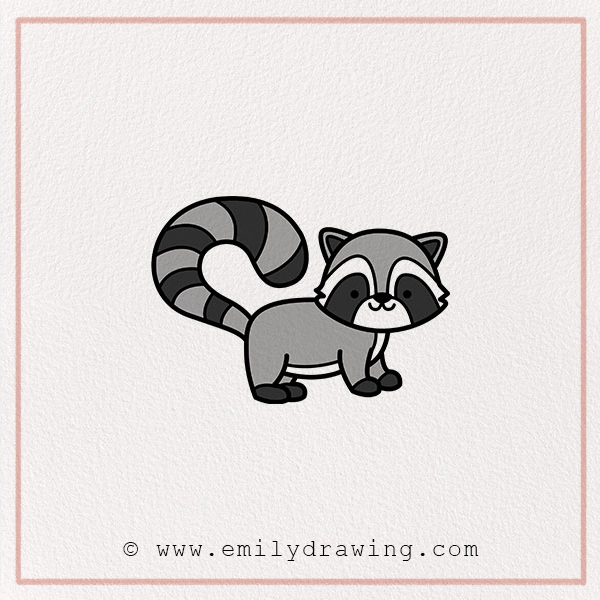
Raccoons are adorable, mischievous creatures known for their masked faces and fluffy tails, much like foxes — see our guide on how to draw a fox for another woodland favorite. Have you ever wanted to draw one? You’re in luck! In this raccoon sketch tutorial, we’ll walk you through simple steps to draw a cute raccoon. Grab your pencil, and let’s get started!
Why Learn to Draw a Raccoon?
Drawing is a great way to express creativity, and raccoons make fantastic subjects. They are playful, full of personality, and have a unique appearance that makes them fun to sketch. Plus, learning how to draw step by step improves focus, patience, and artistic skills. Whether you’re a beginner or an experienced artist, this guide will help you create an adorable raccoon drawing — and if you enjoy forest animals, you might also like our tutorial on how to draw a bear.
Materials:
- a piece of paper
- a pencil for the guiding lines and sketching
- an eraser
- a black sharpie or a pen for the outlines
- markers or colored pencils for coloring
- our printable drawing guide (Join my Email List below to get this Tutorial)
Here are my RECOMMENDED Art Supplies!
- Crayola Coloring Set (140 Pieces – Mega Value!)
- 24 Colored Crayon Set
- A4 Printer Paper
- Crayola Coloring Pencils
- HP Home Printer with Instant Ink!
Time needed:
15 minutes.
How to Draw a Raccoon — Let’s get started!
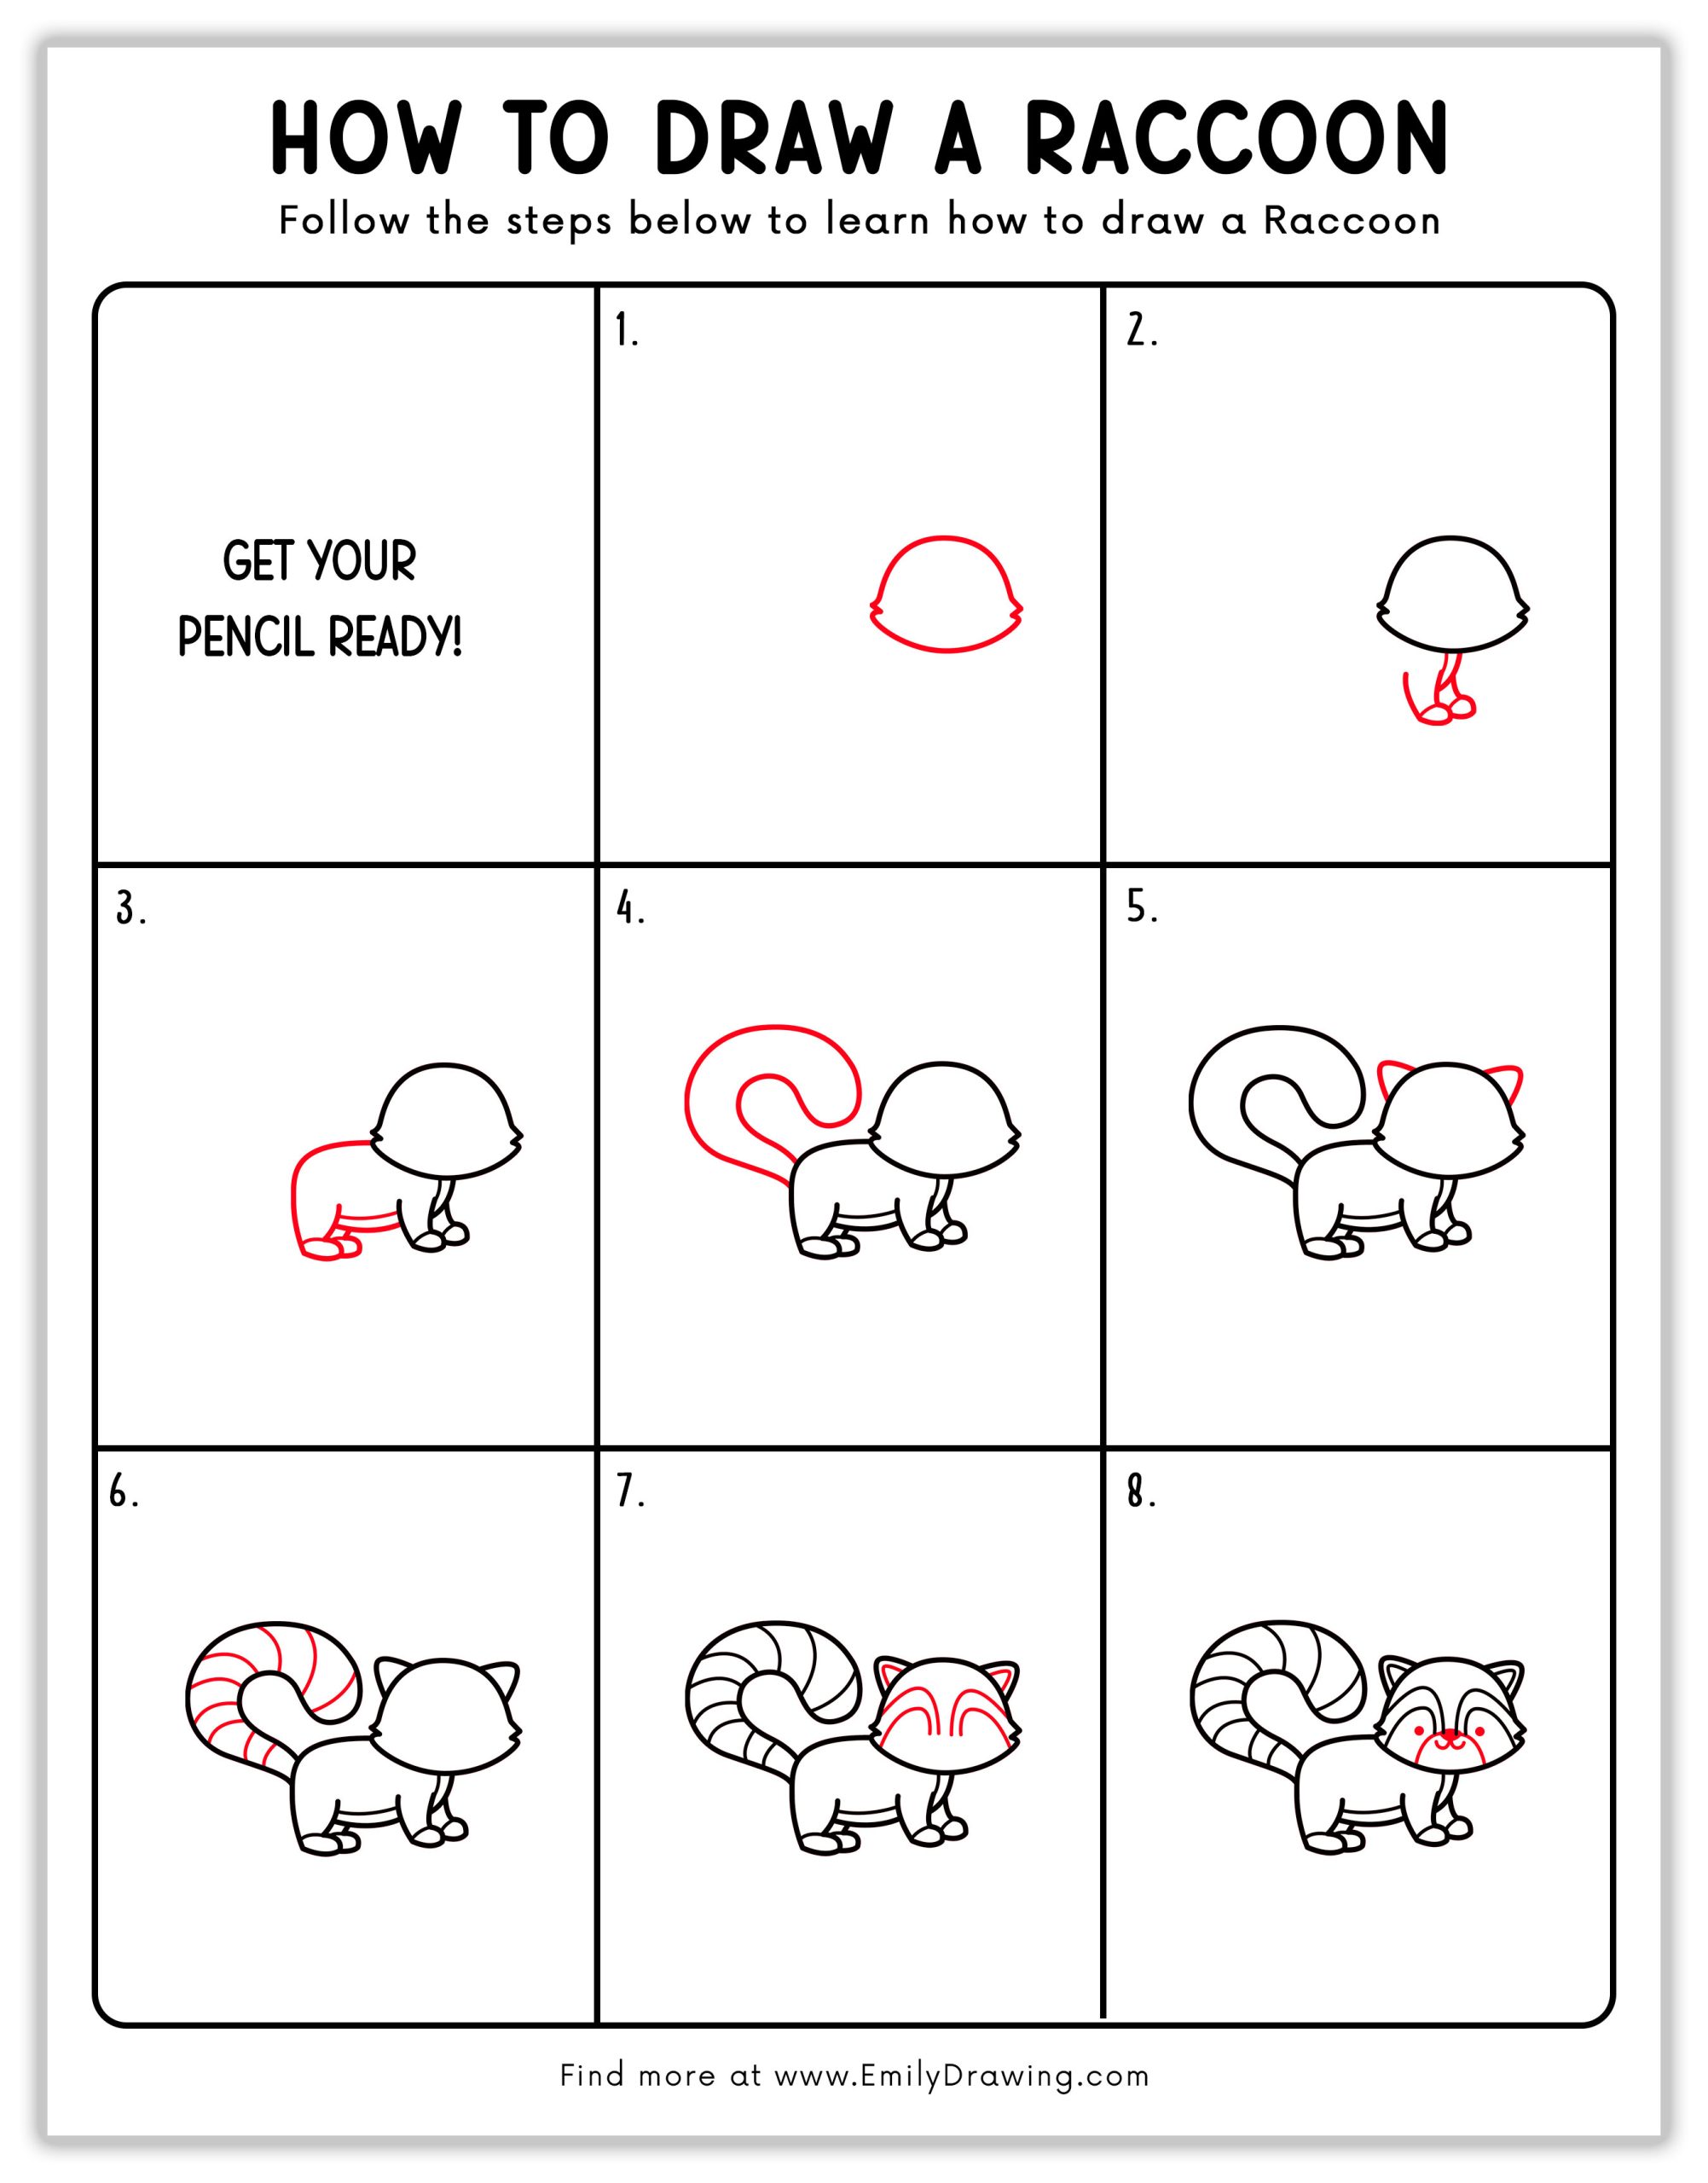
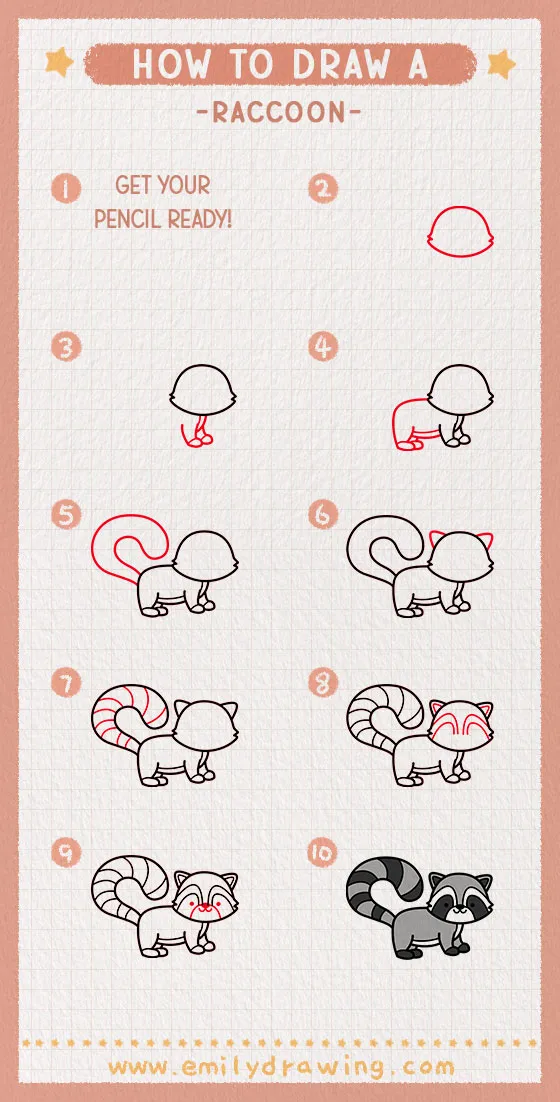
Step 1 – Draw the Raccoon’s Head
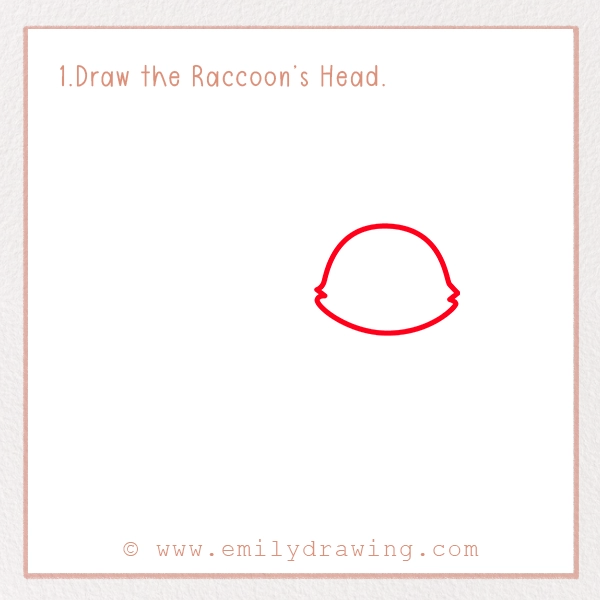
Start by drawing a rounded shape for the raccoon’s head. Make sure the bottom of the head is slightly wider to create the cute, chubby look. You can think of it as a loose oval with small bumps on the sides where the cheeks are.
Step 2 – Add the Body and Front Legs
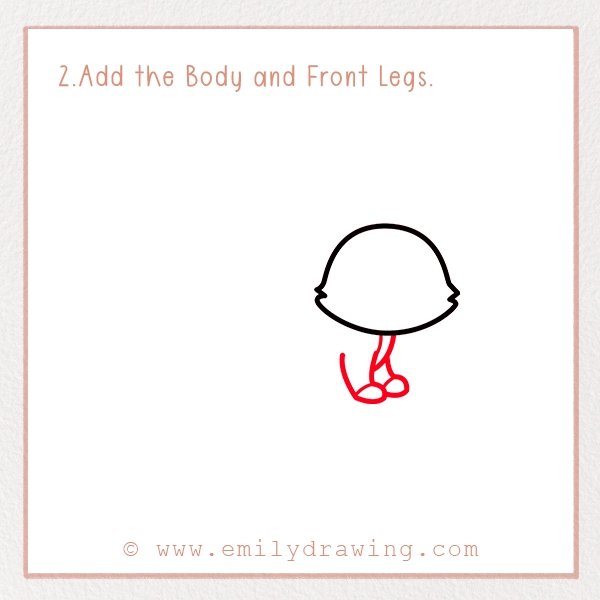
Extend two small lines downward from the head and add tiny ovals for the raccoon’s front paws. Keep the paws close together for a balanced look. The body should be small and rounded, slightly narrower than the head.
Step 3 – Draw the Back and Hind Legs
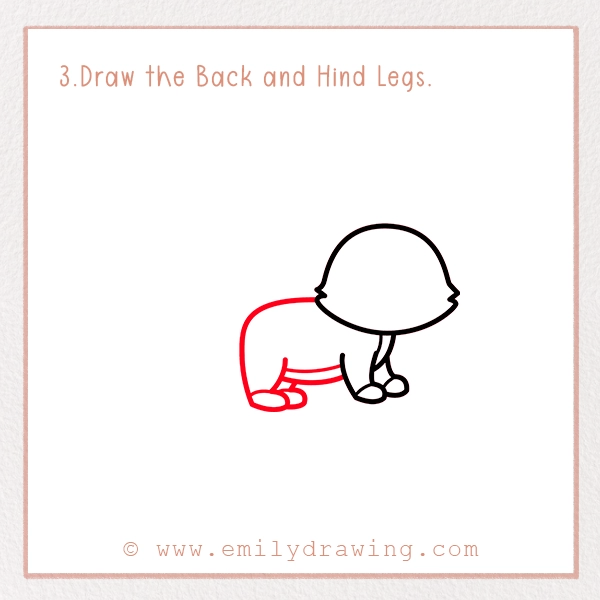
From the back of the head, draw a curved line extending backward to form the body. Add the raccoon’s hind legs at the bottom, making them slightly larger than the front legs. Make sure to keep them slightly apart to give the raccoon a natural, grounded stance.
Step 4 – Sketch the Tail

Raccoons are famous for their fluffy, ringed tails! Draw a long, curved tail that arches behind the raccoon’s body. Make it slightly wavy to give it a soft, fluffy effect. The tail should be bushy and big compared to the body.
Step 5 – Outline the Ears and Face
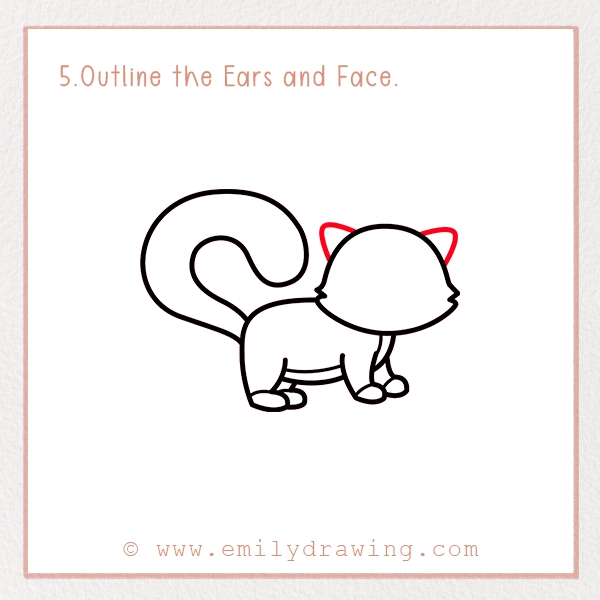
Now, draw two pointy ears on top of the head. Inside the face, outline the signature raccoon mask drawing – a rounded shape covering the eyes. This will give your raccoon its distinctive, mischievous look! The ears should be triangular with a slight curve at the tips.
Step 6 – Add Stripes to the Tail
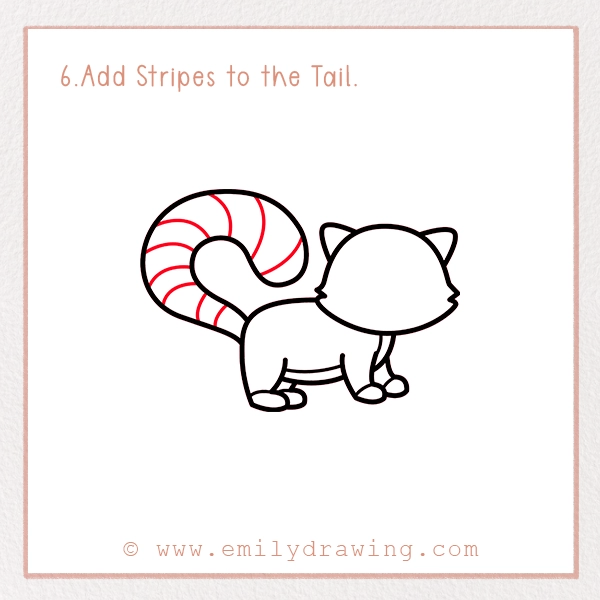
Raccoons have striped tails, so draw curved lines across the tail to make it look more realistic. These stripes will make your raccoon extra cute! Make sure the stripes follow the curve of the tail to create a more natural effect.
Step 7 – Draw the Eyes and Nose
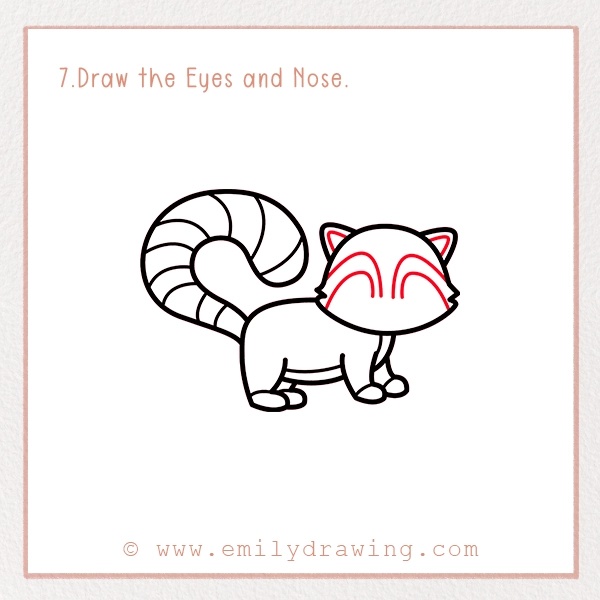
Add two small oval eyes inside the mask area. Then, draw a tiny nose in the center, right below the eyes. You can make the eyes slightly shiny by adding tiny white highlights. The nose should be small and rounded, positioned just above the mouth area.
Step 8 – Add Details and Expressions
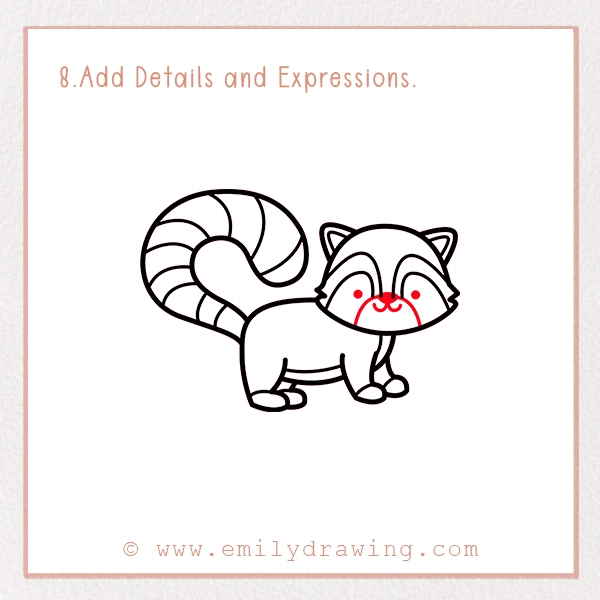
Now, give your raccoon some personality! Add curved lines above the eyes for eyebrows. Draw a small smile or a surprised expression to make your raccoon look friendly and curious. You can also add small whiskers or blush marks for an extra touch of cuteness.
Step 9 – Color Your Drawing!
It’s time to bring your raccoon to life! Use grey or brown shades for the body, black for the mask and tail stripes, and a little pink for the nose and inside the ears. Have fun experimenting with colors! You can also use shading techniques to add depth and texture to your drawing.
Pin it now, Draw later!
Fun Facts About Raccoons!
- Raccoons are excellent problem-solvers! They can open jars, doors, and even solve puzzles.
- Their paws are super sensitive, helping them find food in the dark.
- Raccoons can remember solutions to problems for up to three years! That cleverness reminds us of another forest favorite — check out how to draw a bear.
- These clever creatures wash their food before eating it, which is why they are sometimes called “washing bears.”
- Raccoons are nocturnal, which means they are most active at night!
Tips and Tricks for Better Drawing
- Start with Light Sketches
Use a light pencil sketch before adding final lines. This way, you can erase mistakes easily without leaving heavy marks. A mechanical pencil with a fine tip works best for sketching details. - Use Reference Images
Looking at pictures of real raccoons can help you understand their shape and details. Notice how their fur flows and how their tails curve. This can help you make your drawing more realistic! - Experiment with Expressions
Try different eye shapes and mouth positions to give your raccoon different moods – happy, surprised, or even sleepy! You can also explore more expressive woodland animals in our squirrel drawing tutorial. - Try Different Poses
Instead of just a standing raccoon, why not try drawing it climbing a tree, sitting down, or even holding an object like a tiny snack? For more ideas, see our step-by-step on drawing a squirrel, which includes fun poses too. This will make your drawing even more interesting! - Add a Background
To make your forest animal drawing stand out, add a fun background! You can draw a forest, a backyard, or even a city street where raccoons are often spotted. This will create a story around your artwork. - Use Coloring Techniques
Blend colors for a smooth and natural effect. Use soft strokes to add shadows and highlights. If using colored pencils, layering different shades will make the fur look more realistic. - Practice Makes Perfect
The more you draw, the better you’ll become. Try drawing raccoons from different angles and in different styles – cartoon, realistic, or even chibi-style!
Great job! You’ve just learned how to draw a cute raccoon step by step. This adorable creature is a fun and exciting subject to sketch, and now you can draw it with confidence. We hope you had fun following along.
Why not challenge yourself to draw a whole family of raccoons? You can also create your own raccoon-themed story or comic strip! Don’t forget to share your artwork with friends and family. If you enjoyed this tutorial, post it on social media with #EmilyDrawing and show off your awesome art! Explore more drawing guides and keep practicing.
Happy drawing!
Get the FREE Printable Drawing Guide