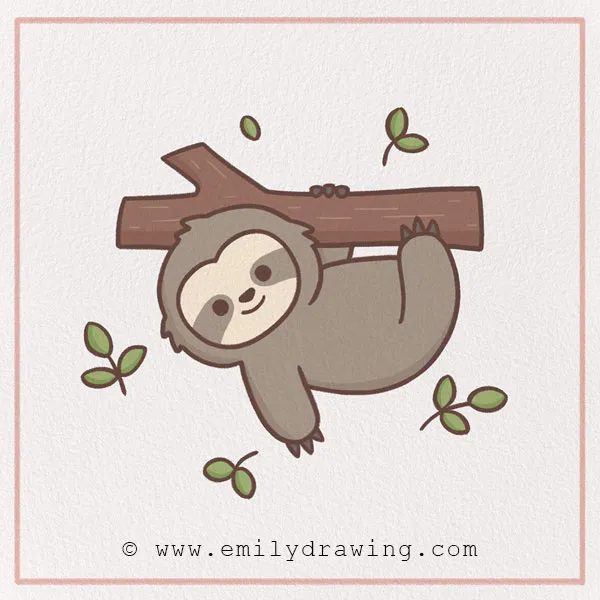
You’ve found our easy sloth drawing tutorial that shows you exactly how to draw a sloth! This step-by-step tutorial will guide you through how to sketch a sloth with simple, fun instructions.
Sloths, like many animals, have some interesting facts about them. Of course, we know that they are very slow creatures: they move slowly, they digest slowly, and generally, everything about sloths just goes slowly. In fact, they spend the majority of their lives simply hanging in trees and slowly moving between branches.
One surprising fact about sloths is that they are surprisingly good swimmers. Sloths living near water might choose to swim to find new territory or a mate. And, did you know that sloths have been around for about 65 million years? That was before dinosaurs went extinct!
Anyway, let’s get to this art project. We will learn some more facts along the way in addition to creating a drawing. Keep reading for Step 1!
If you enjoy drawing cute animals, you might also like How to Draw a Fox or How to Draw a Panda.
Materials:
- a piece of paper
- a pencil for the guiding lines and sketching
- an eraser
- a black sharpie or a pen for the outlines
- markers or colored pencils for coloring
- our printable drawing guide (Join my Email List below to get this Tutorial)
Here are my RECOMMENDED Art Supplies!
- Crayola Coloring Set (140 Pieces – Mega Value!)
- 24 Colored Crayon Set
- A4 Printer Paper
- Crayola Coloring Pencils
- HP Home Printer with Instant Ink!
Time needed:
15 minutes.
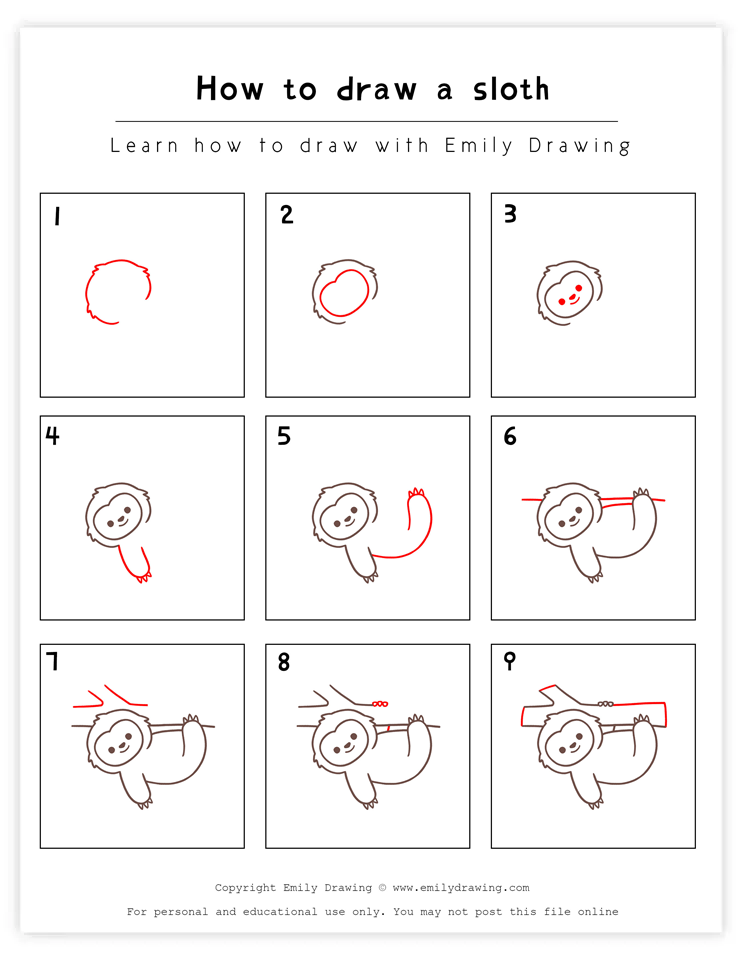
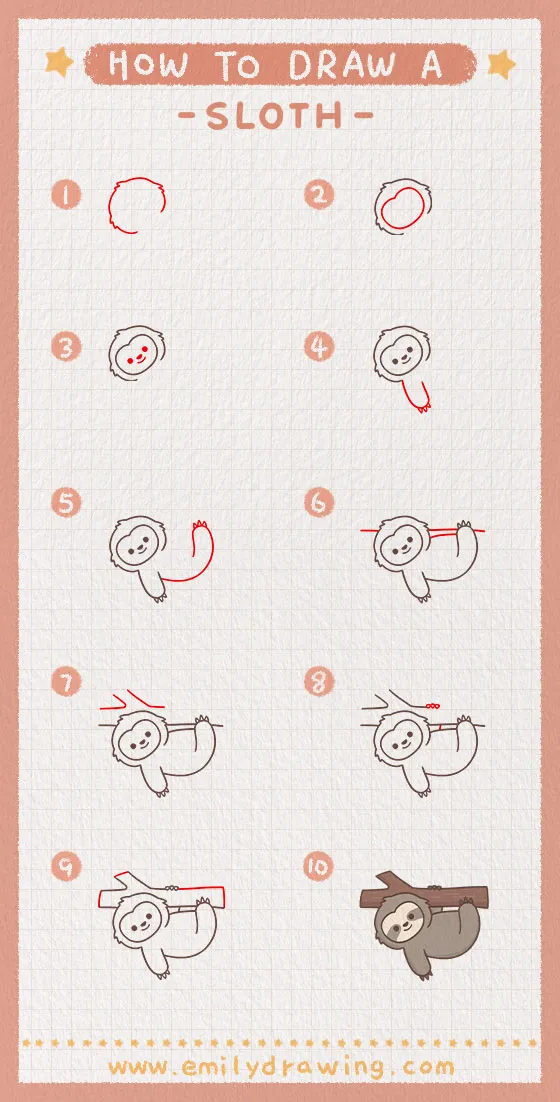
How to Draw a Sloth — Let’s get started!
Step 1 – Draw the top of the sloth’s head.
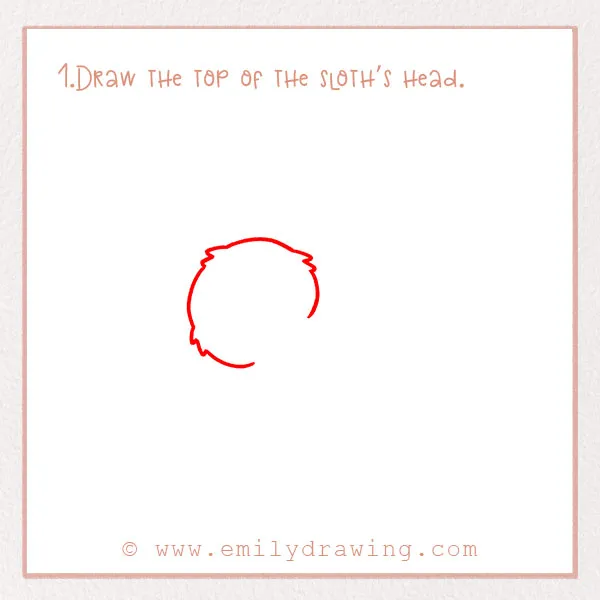
Near the middle of the page, draw the outline of the sloth’s head. Draw it tilted because the sloth will be hanging on a tree! So draw an almost-complete circle (leave a gap on the right side for the neck) and make sure to draw little tufts of fur everywhere. Check out the photo!
Step 2 – Start drawing its face.
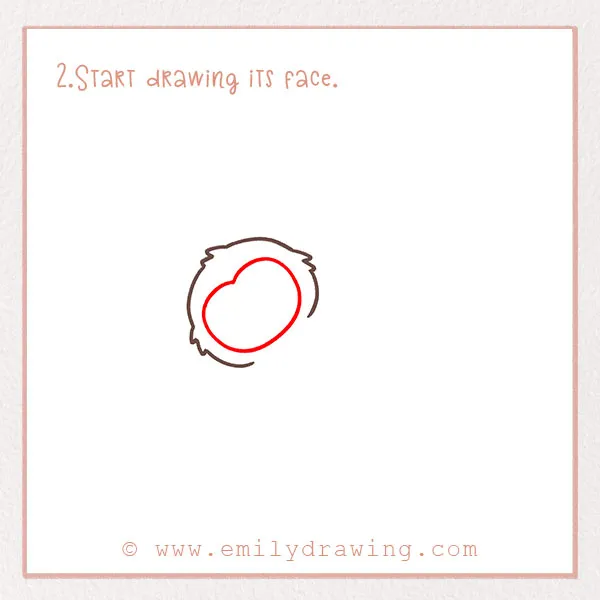
Let’s add more detail to the sloth’s head. If you’ve ever seen one, you know that it has markings on its head around its face, kind of like a monkey. Let’s draw that now. Simply draw a smaller oval inside the head.
Step 3 – Draw the sloth’s face.
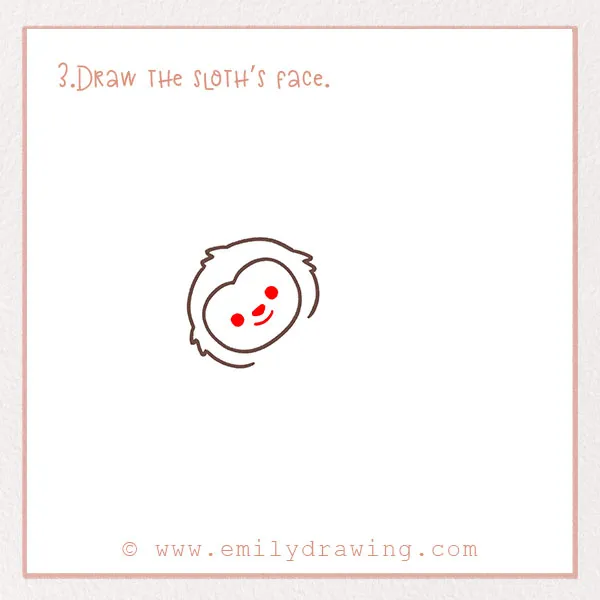
Let’s draw the sloth’s face. Draw two dots for the eyes and draw a small triangle for a nose in between. A sloth has great eyesight and a decent sense of smell but can’t hear very well.
Before moving on to the next step, draw a small curve for the smile! We want our sloth to look happy.
For more tutorials on drawing animal forms, try How to Draw a Turtle or How to Draw a Bunny.
Step 4 – Draw the sloth’s arm.
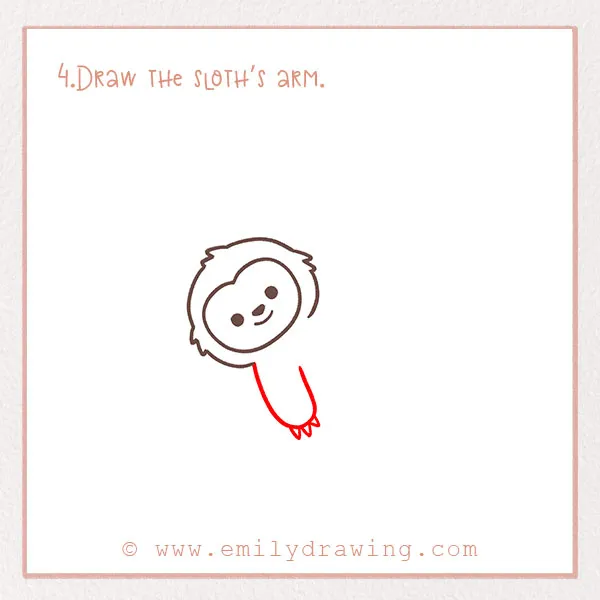
Let’s start to draw the sloth’s body now. In this step, we will draw the arm. From the left side of the head, draw a large curve going downward for the arm. Add some small triangles at the end for the sloth’s claw. Great job!
Step 5 – Draw the sloth’s leg.
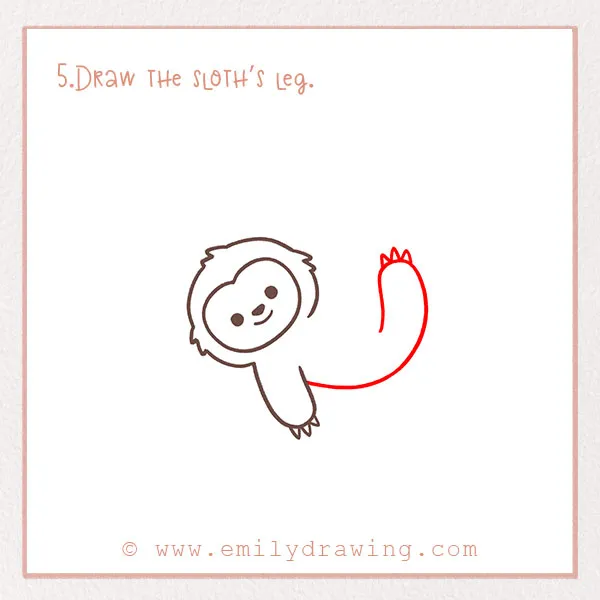
Let’s move on to the legs. Starting from the arm, draw a large sideways curve to the right. Make it extend upwards so that the foot is at the same height as the sloth’s head. Refer to the photo. Like the arm, draw three little triangles to represent its claws. It uses its claws to hang in trees all day!
If you enjoy adding detailed animal features, consider exploring How to Draw a Dog or How to Draw a Bird.
Step 6 – Start drawing the branch.
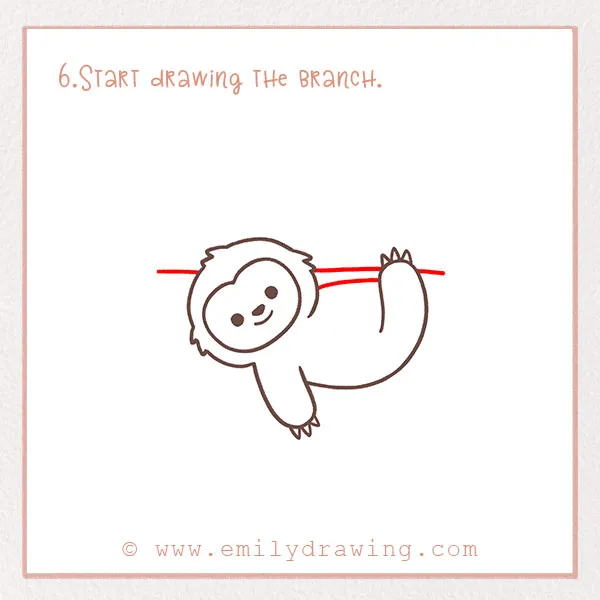
Sloths usually hang out in trees, as we mentioned earlier. They spend an astounding amount of time hanging! Of course, this sloth needs to be on a tree. To draw the branch, make a line that goes from the right side of the head to the foot. Continue it on the other side of the head and foot. Add another line below to make the branch thicker. Check out the photo. Great job!
Step 7 – Continue drawing the tree.
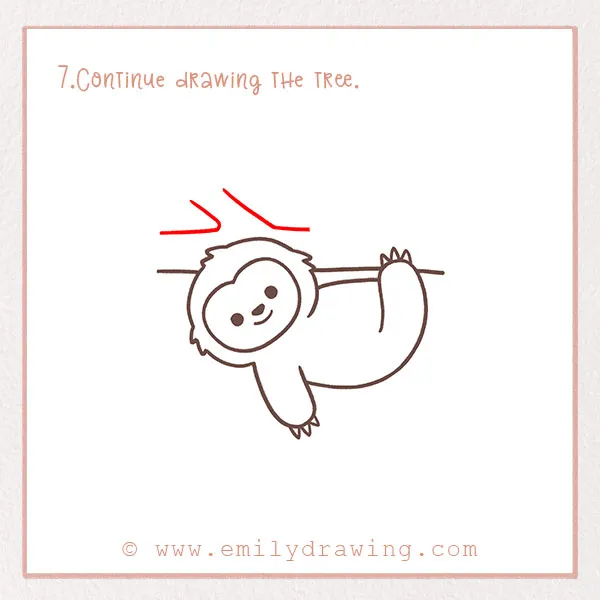
Let’s add more detail to the tree. Above the head, draw two short diagonal parallel lines to form the branch. Next, draw two lines extending out from the ones you just drew. Great job!
Step 8 – Draw the other claw.
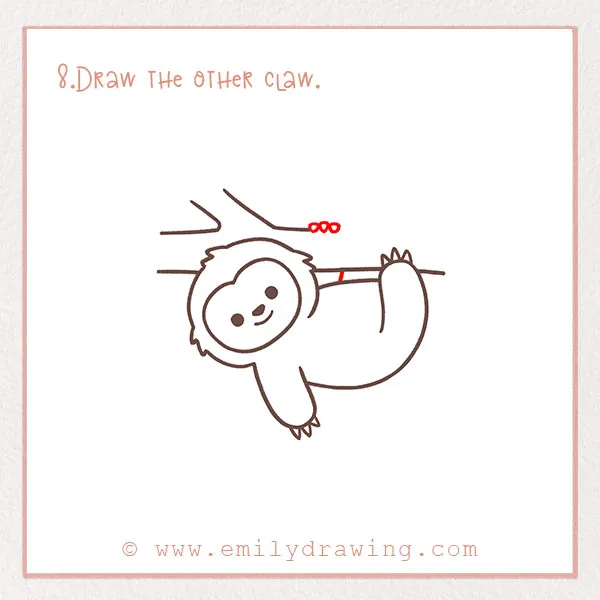
This is a quick step. On top of the branch, draw three small triangles. This represents the other arm and claw. You just can’t see the other arm because it is wrapped behind the branch.
Step 9 – Finish the branch.
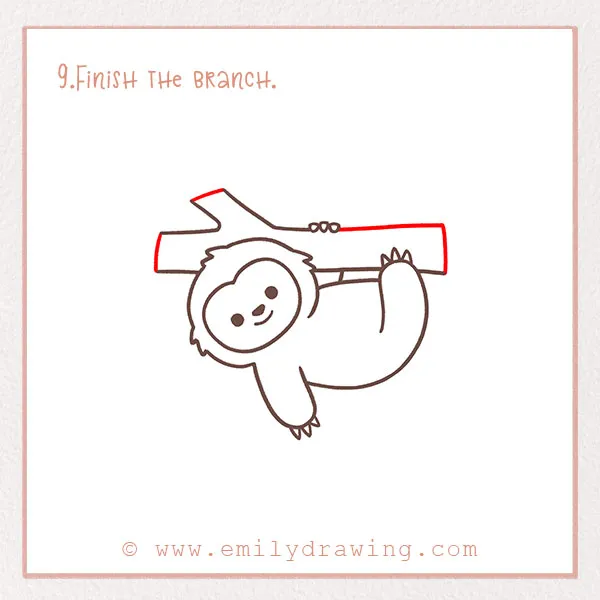
Let’s finish the tree. On the other side of the claw you just drew, draw another line. Add ends to the other branches you’ve drawn too. Refer to the photo.
Step 10 – Color in your new creation!
Good job! You’ve made it to the final and best step: coloring! Although sloths are normally grey, you should make yours any color you want! Add some style to your sloth.
Once you’ve finished your sloth, complete your animal collection with How to Draw a Squirrel or How to Draw a Kangaroo.
There you go! You’ve successfully completed our step-by-step drawing tutorial! Thanks for coming to our art website and following along.
We hope you also learned some cool sloth facts for kids in this tutorial. Hang it up so people can see! You can also share it by using the social icons on this page.
We hope to draw with you again…browse our site for tutorials on animals, food, plants, and more!
Pin it now, Draw later!
Get the FREE Printable Drawing Guide