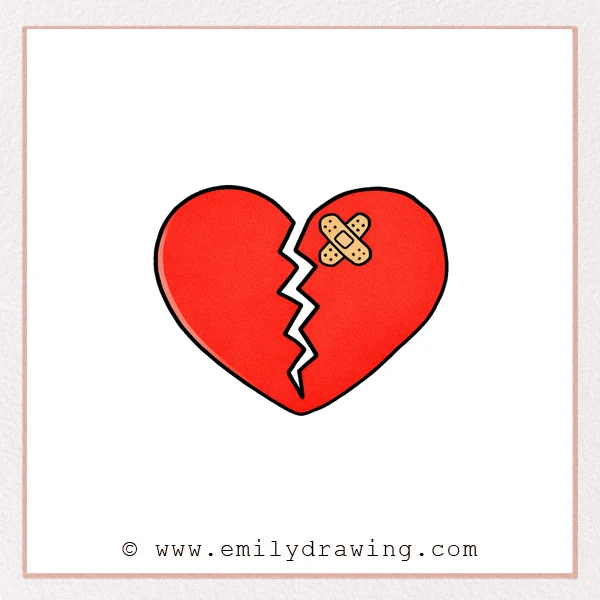
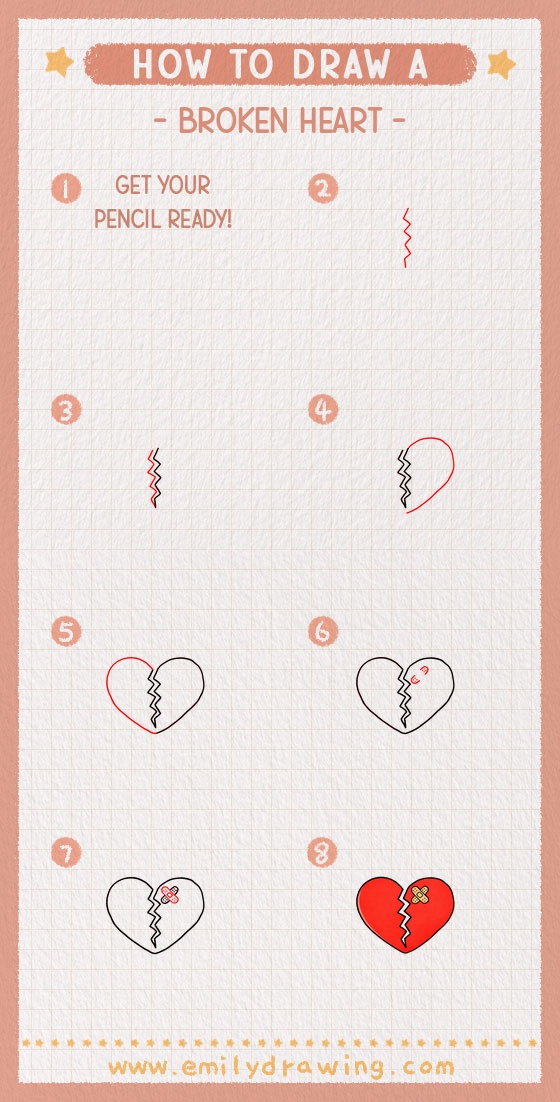
This easy drawing tutorial shows how to draw a broken heart step by step. You will build a clean heart shape, add a crack, and finish with a simple bandage detail. It is a calm drawing for beginners that looks expressive without being hard.
What You Will Need
- Pencil (HB is fine)
- Eraser
- Black pen or marker (optional for outlining)
- Paper
- Colored pencils or markers (optional)
Here are my RECOMMENDED Art Supplies!
- Crayola Coloring Set (140 Pieces – Mega Value!)
- 24 Colored Crayon Set
- A4 Printer Paper
- Crayola Coloring Pencils
- HP Home Printer with Instant Ink!
Time needed:
26 minutes.
Step-by-Step Drawing Guide
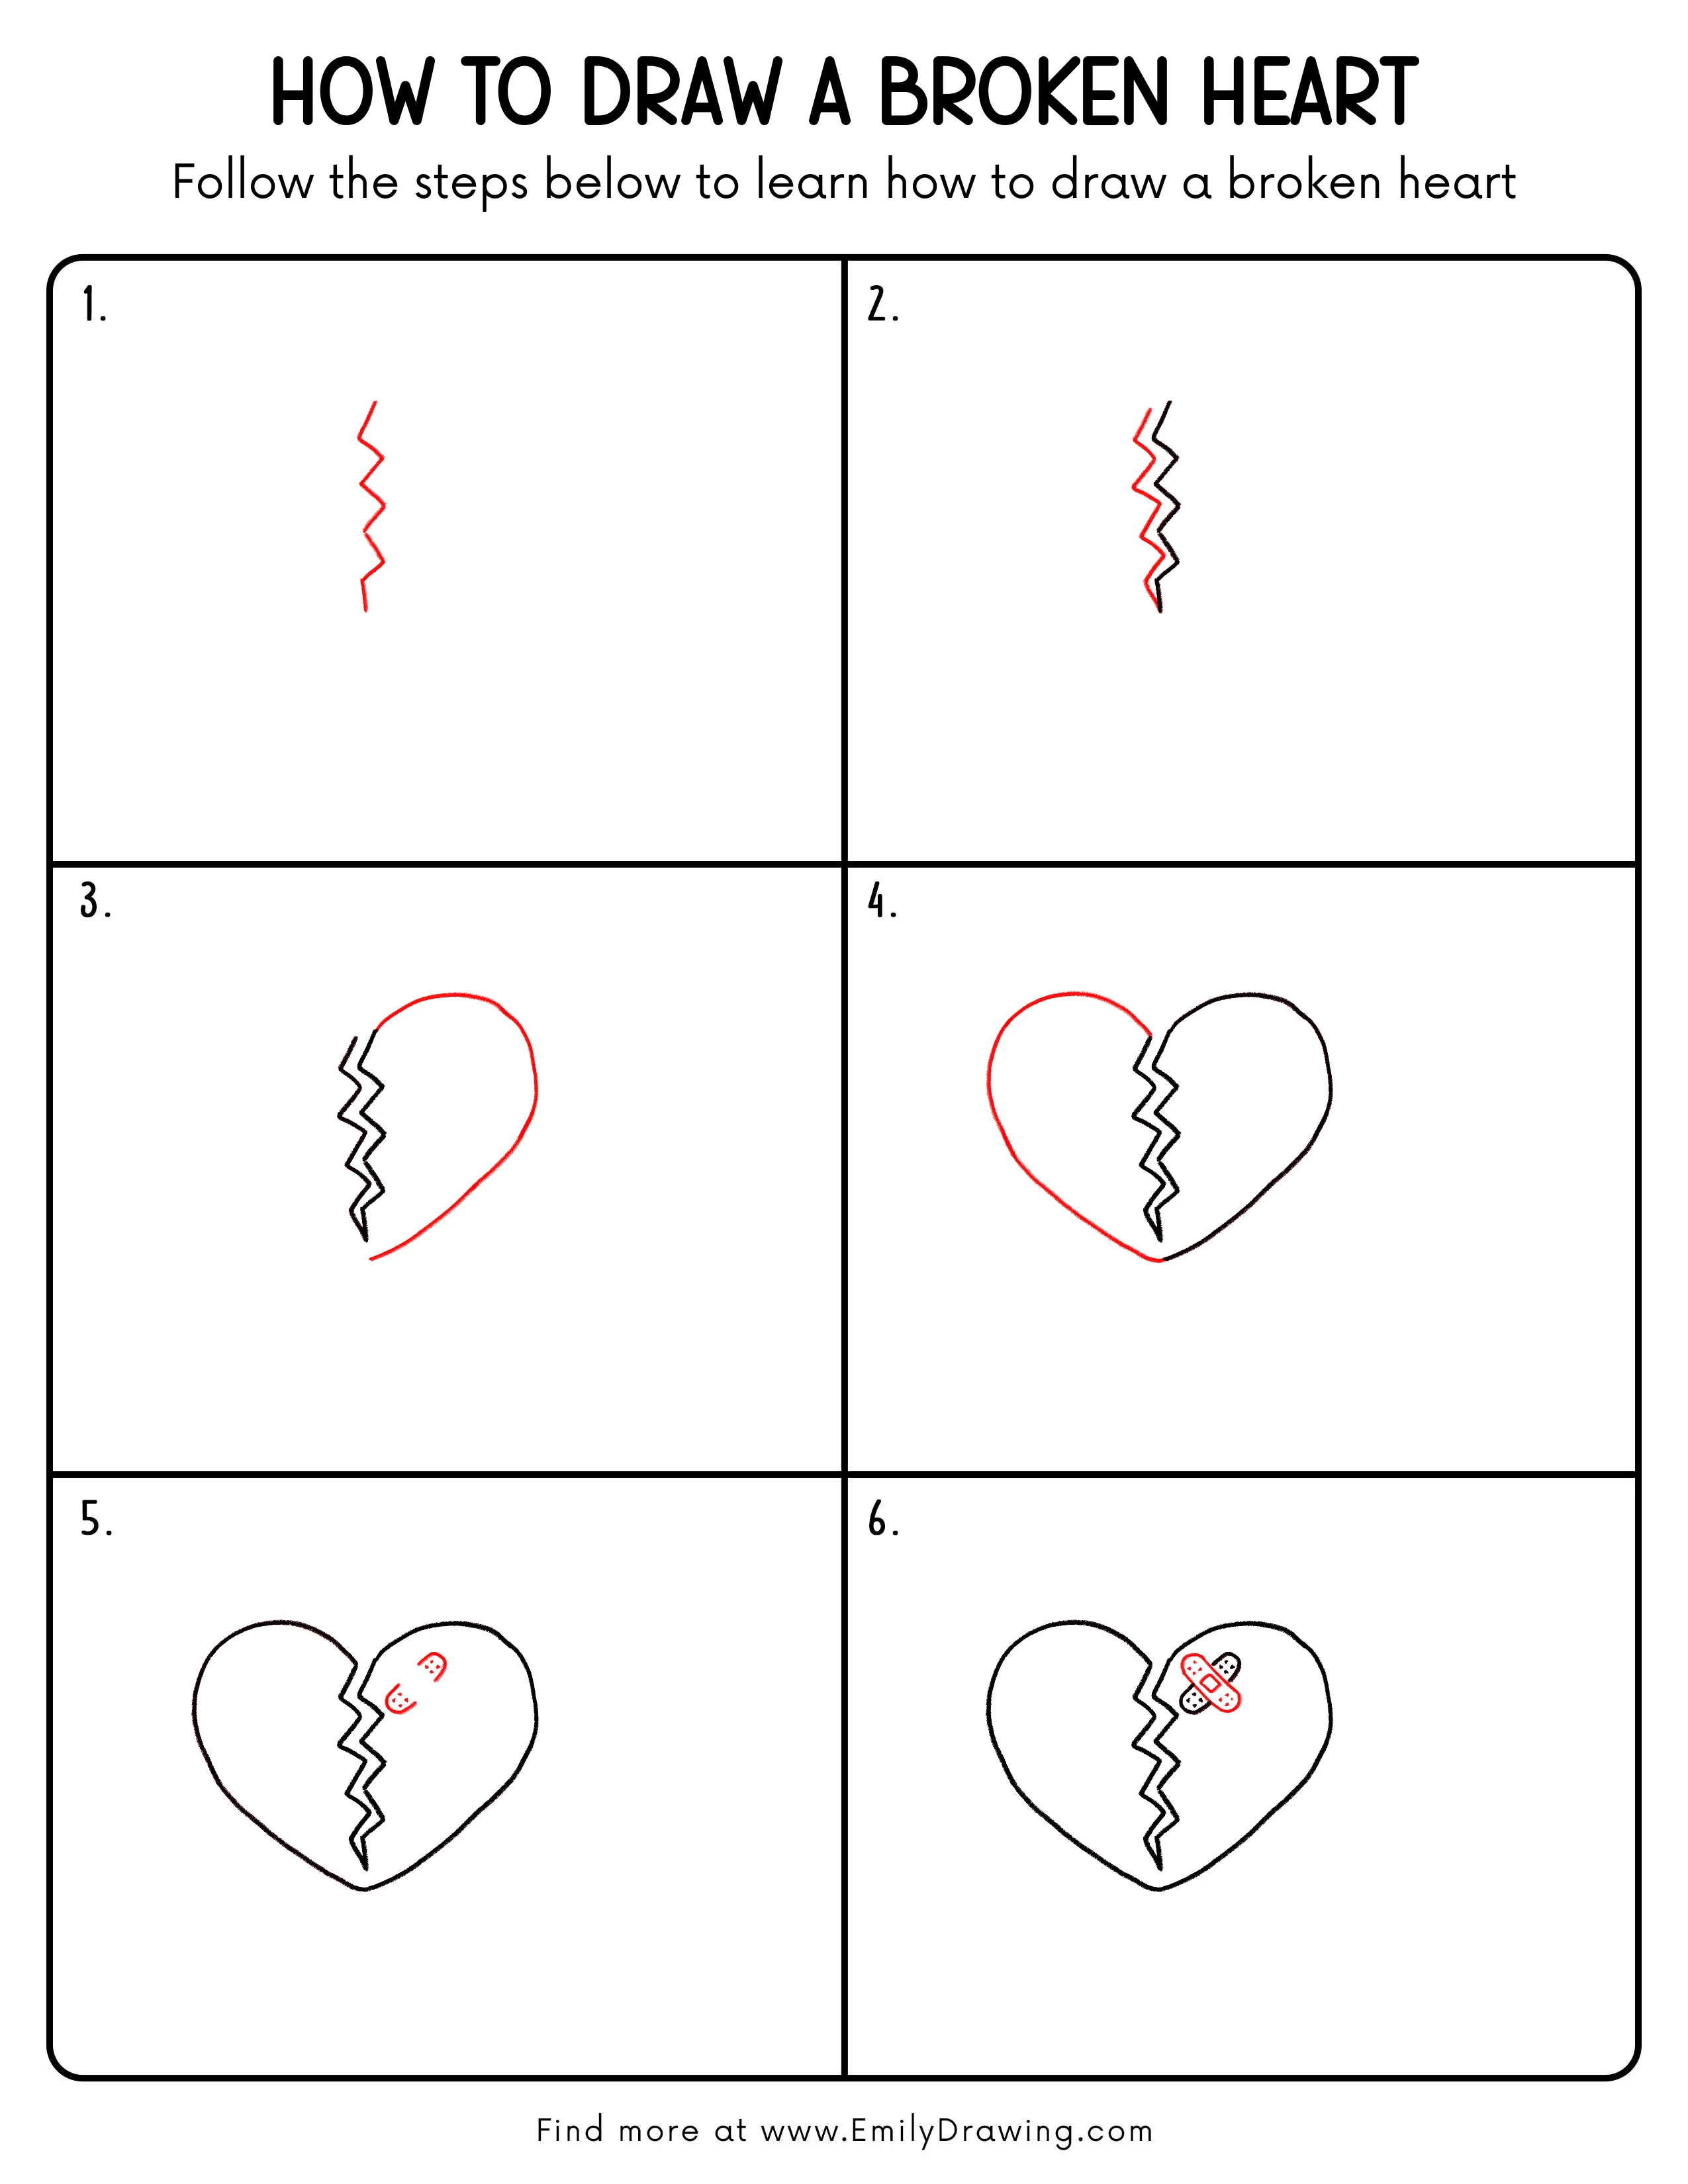
Step 1: Draw the Central Crack Line
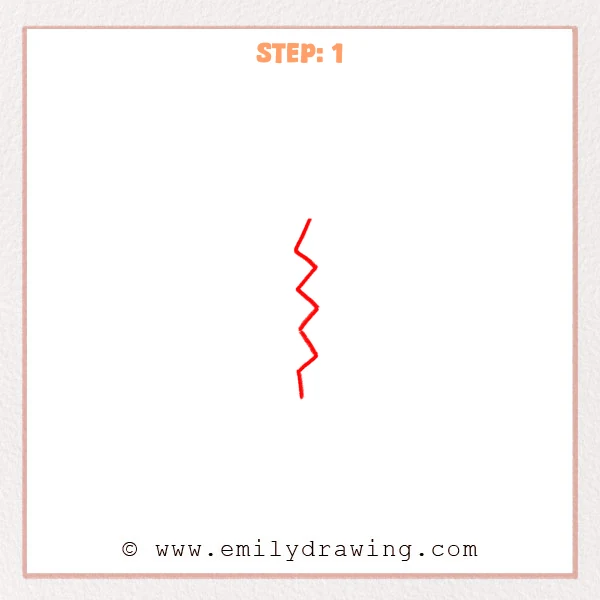
Start with a vertical zigzag line in the center, like a lightning bolt. Vary the angles a little so the crack feels natural. End the top and bottom with short, straight tips.
Pro Tip: Keep the zigzags uneven so the crack looks more realistic.
Alt Text: A simple broken heart drawing begins with a single vertical zigzag crack line in the center.
Step 2: Add the Second Edge of the Crack
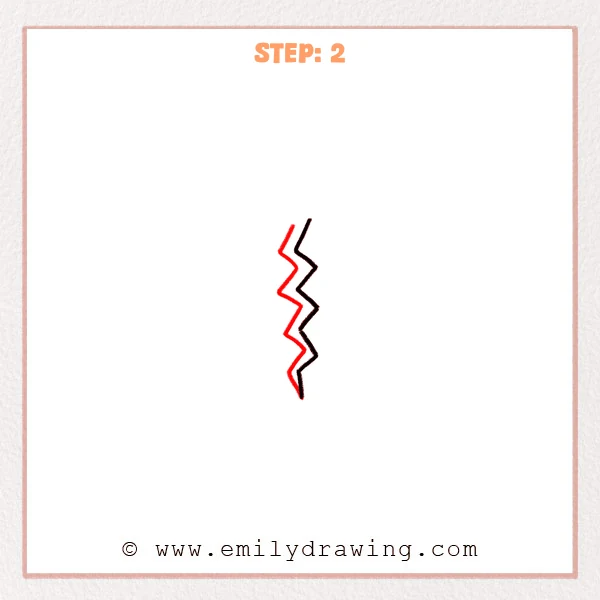
Draw a second zigzag line close to the first one, slightly to the right, leaving a narrow gap between them. Keep the spacing fairly even near the top. Let the gap taper to a sharp point at the bottom.
Pro Tip: The lines do not need to match exactly—small width changes add depth.
Alt Text: The broken heart crack now has two zigzag edges, creating a narrow split that tapers to a point at the bottom.
Step 3: Draw the Right Outer Half of the Heart
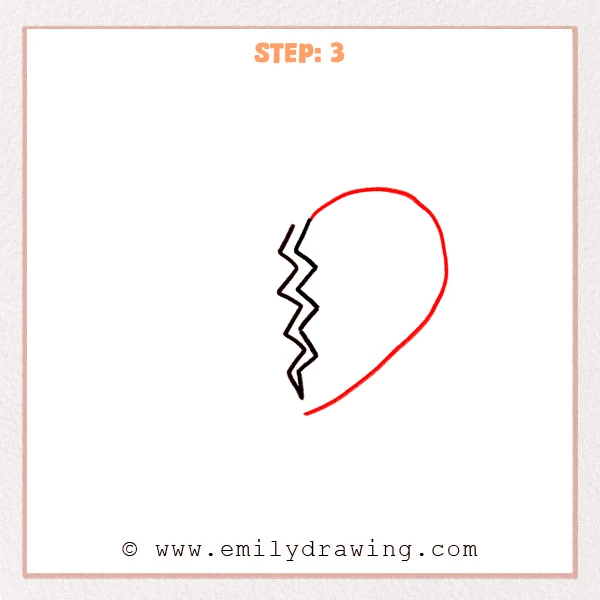
Starting near the top right of the crack, sketch a large, smooth curve to form the right rounded lobe. Continue the line downward along the outside, narrowing as it goes. Let it end near the bottom point without closing it yet.
Pro Tip: Keep the right curve smooth and continuous, using one steady stroke.
Alt Text: A broken heart drawing with a central crack and the right half of the heart outline added as a large curved lobe tapering toward the bottom point.
Step 4: Add the Left Half and Close the Bottom Point
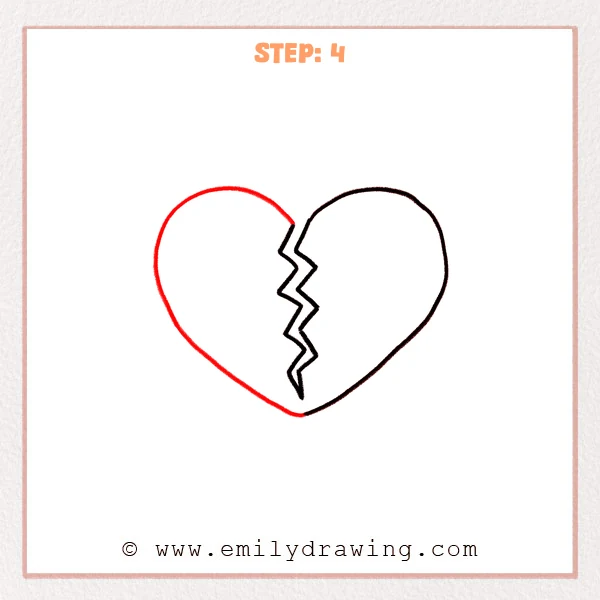
Start near the top left of the crack and sketch a rounded curve to form the left lobe, about the same height as the right one. Bring the line down the left side, narrowing as it goes. Join it to the right outline at the bottom to make a clean heart point.
Pro Tip: Keep the bottom point short and gently tapered for a heart shape.
Alt Text: A broken heart outline is complete, with both heart halves drawn around the central zigzag crack and meeting at a pointed bottom.
Step 5: Add Two Bandage Plasters
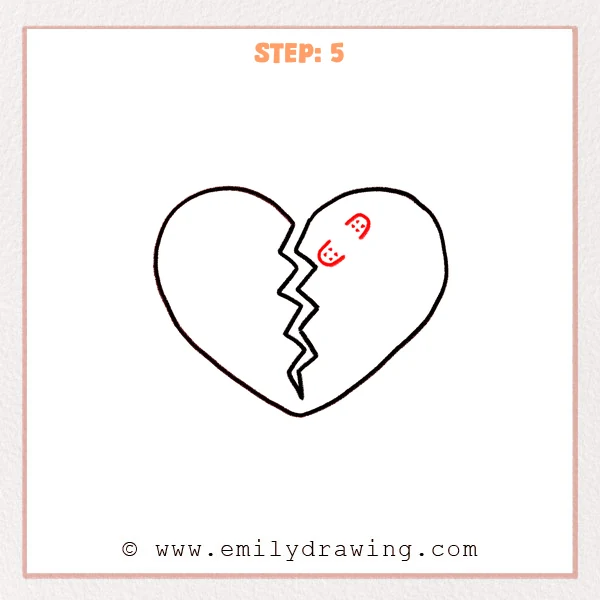
On the upper right half of the heart, add two small bandage plasters, slightly tilted. Use rounded, short rectangle shapes for each plaster. Dot a few tiny holes inside to suggest the fabric.
Pro Tip: Keep the plasters small so the heart still feels open and clear.
Alt Text: A broken heart outline with a central zigzag crack and two small bandage plasters added on the upper right side.
Step 6: Cross the Bandages and Add Details
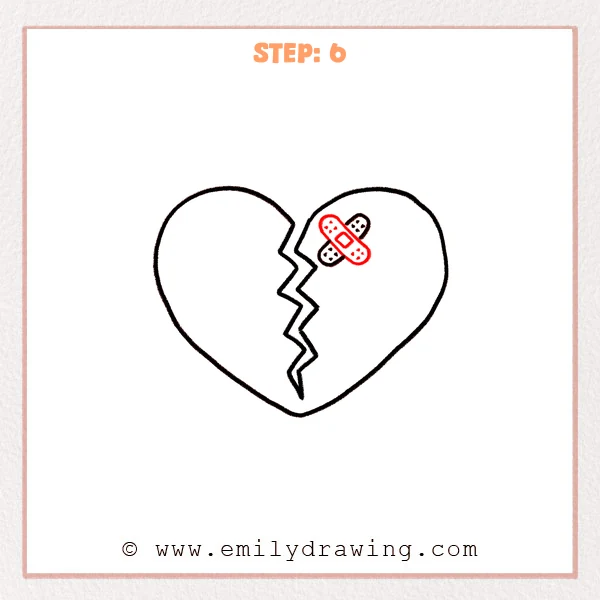
Turn the two plasters into an “X” shape where they overlap. Add a small square pad in the center where they cross. Round the edges neatly and add a few more tiny holes for texture.
Pro Tip: Keep the crossing centered, and make the pad small and tidy.
Alt Text: A broken heart outline with a central zigzag crack and a detailed X-shaped bandage on the upper right, including a small center pad and dotted holes.
Step 7: Color in your drawing!
Fun Facts
- The heart shape used in drawings is a symbol, not an exact real heart shape.
- Artists often use a jagged line for cracks because sharp angles feel “broken.”
- Adding a bandage is a simple way to show healing in a picture.
Pin it now, Draw later!
You now have a clear broken heart with a crack and a small bandage detail. If you want to color it, try a soft red for the heart and a light beige for the bandage. Add gentle shading along one side of the crack to make the split feel deeper.
A common beginner mistake is making the two top lobes very different sizes, which can tilt the heart. Take your time and adjust the curves with small changes.
Keep practicing this step by step drawing, and try drawing the broken heart in different sizes. When you feel ready, add your own details like stitches, sparkles, or a simple background.
Get the FREE Printable Drawing Guide
FREE Download Printable Broken Heart Drawing Tutorial
Frequently Asked Questions
How do I make both sides of the heart look even?
Lightly sketch the two top curves first, then adjust before outlining.
What if my crack looks too straight or too neat?
Change a few angles and vary the spacing so it feels more natural.
Can I draw this as an easy drawing tutorial without a pen?
Yes, a clean pencil outline works well, especially with gentle shading.