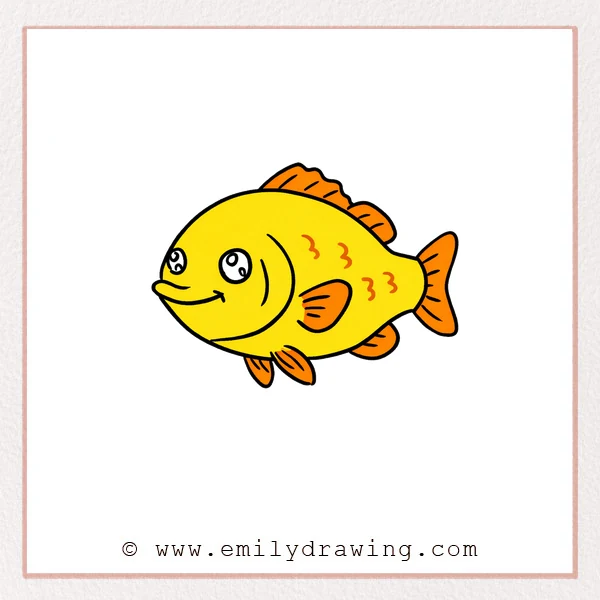
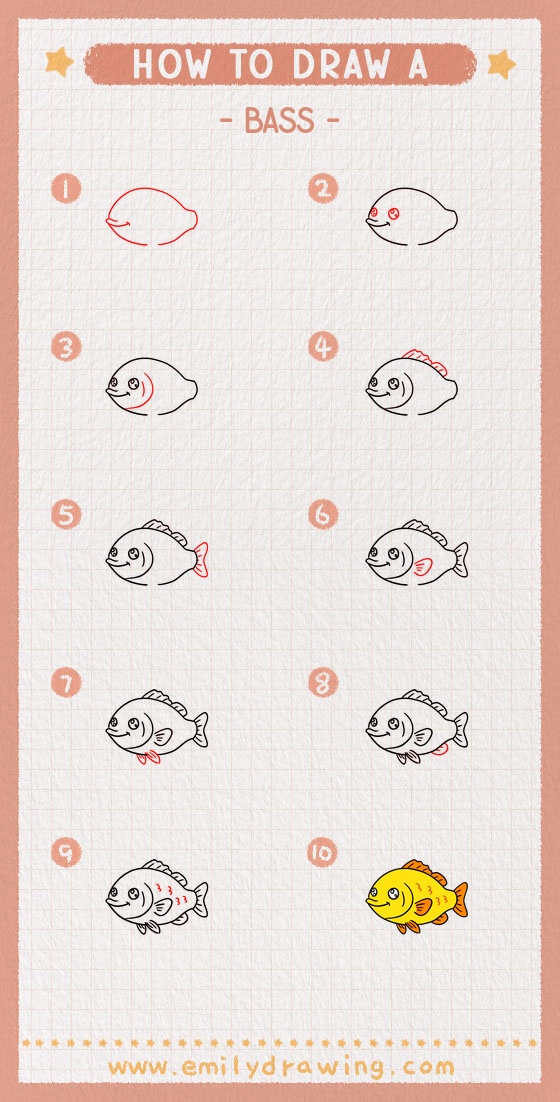
This easy drawing tutorial shows how to draw a bass step by step using smooth curves and simple fin shapes. You will sketch the body first, then add the eyes, fins, and easy markings. Take your time with symmetry, and this drawing for beginners will feel calm and clear.
What You Will Need
- Pencil
- Eraser
- Black marker or fineliner
- Plain drawing paper
- Colored pencils or crayons (optional)
Here are my RECOMMENDED Art Supplies!
- Crayola Coloring Set (140 Pieces – Mega Value!)
- 24 Colored Crayon Set
- A4 Printer Paper
- Crayola Coloring Pencils
- HP Home Printer with Instant Ink!
Time needed:
28 minutes.
Step-by-Step Drawing Guide
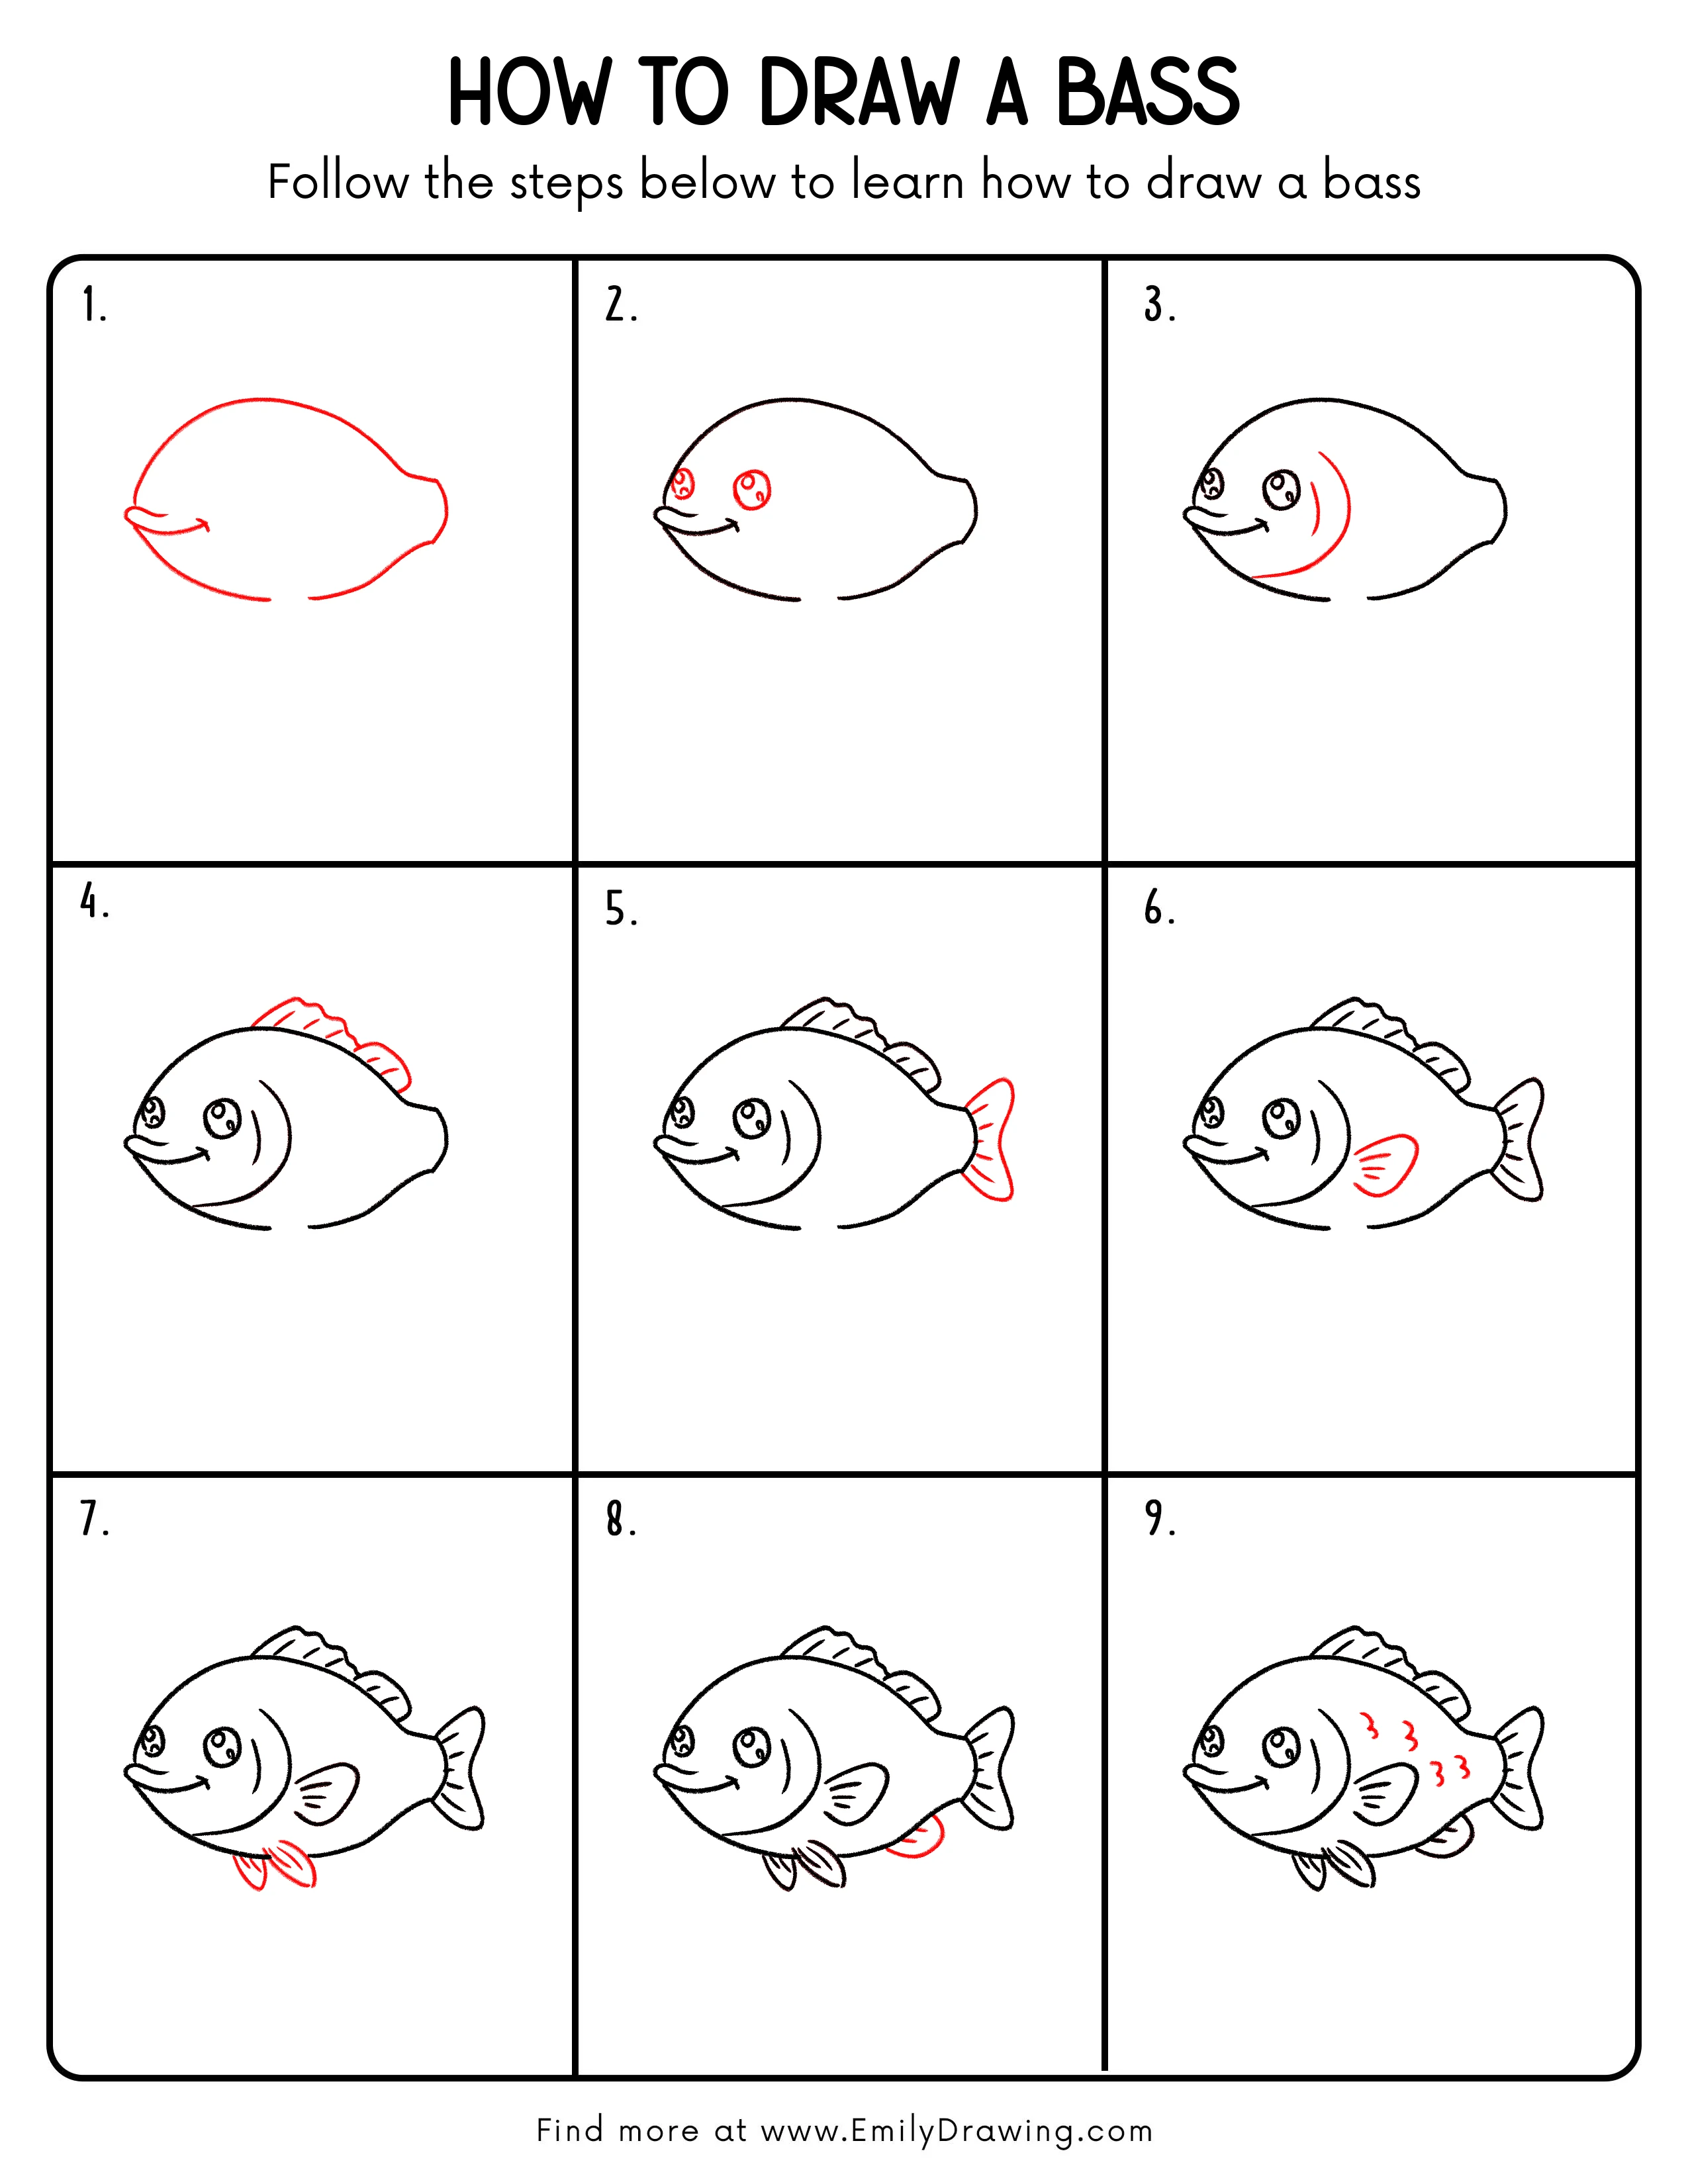
Step 1: Draw the Bass Body Outline
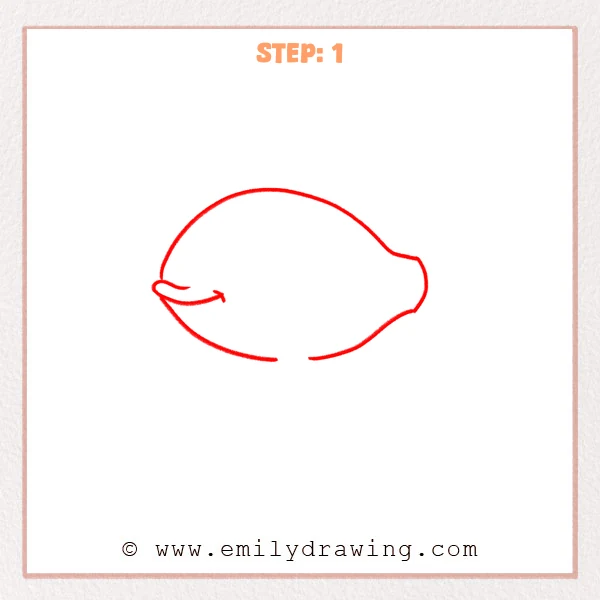
Start with a big curved line for the back, arching gently from left to right. Add a flatter belly curve, and include a small smiling mouth line at the front.
Pro Tip: Sketch lightly first and aim for a plump teardrop shape.
[Alt Text: Step 1: A simple bass body outline is drawn with a curved back, belly, and a small smile.]
Step 2: Add the Eyes

Draw two round eyes on the front half of the head, one slightly forward and one slightly back. Add pupils and tiny highlight dots to bring the face to life.
Pro Tip: Keep both eyes close in size so the face feels balanced.
[Alt Text: Step 2: Two round eyes with pupils and highlights are added to the bass.]
Step 3: Draw the Cheek Curve and Gill Line

Add a large curved line behind the eyes to show the cheek boundary. Draw a shorter curved line for the gill to give the head more depth.
Pro Tip: Let the cheek curve follow the outer shape, not the center.
[Alt Text: Step 3: Curved cheek and gill lines are added to the bass’s head.]
Step 4: Add the Dorsal Fins
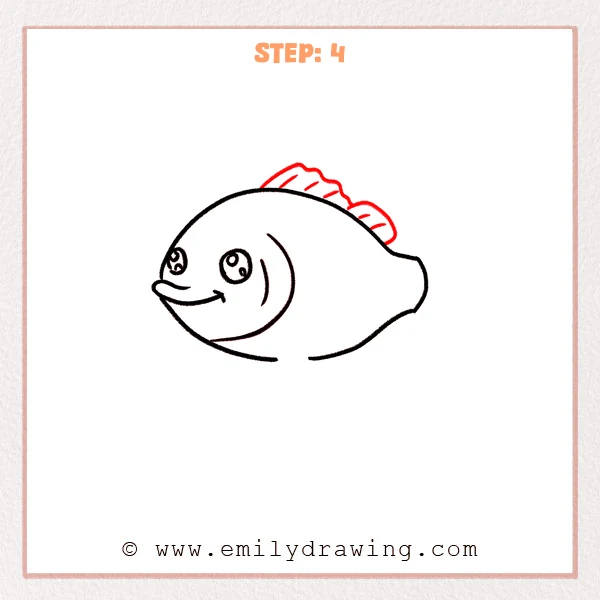
Draw the first dorsal fin on top with small wavy or spiky edges. Add a smaller second dorsal fin behind it so they form a pair.
Pro Tip: Start the fins right on the back line for a natural fit.
[Alt Text: Step 4: Two dorsal fins are added along the top of the bass.]
Step 5: Draw the Tail Fin
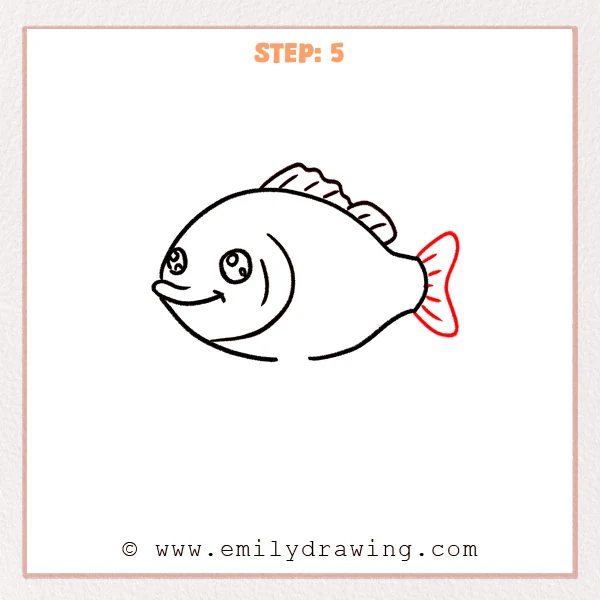
Draw a forked tail fin at the back, like two leaves spreading out. Keep the outer edge rounded, then add a few short texture lines inside.
Pro Tip: Keep both sides similar, and avoid an overly deep split.
[Alt Text: Step 5: A forked, rounded tail fin is added to the bass with simple fin lines.]
Step 6: Add the Side Fin and Fin Lines
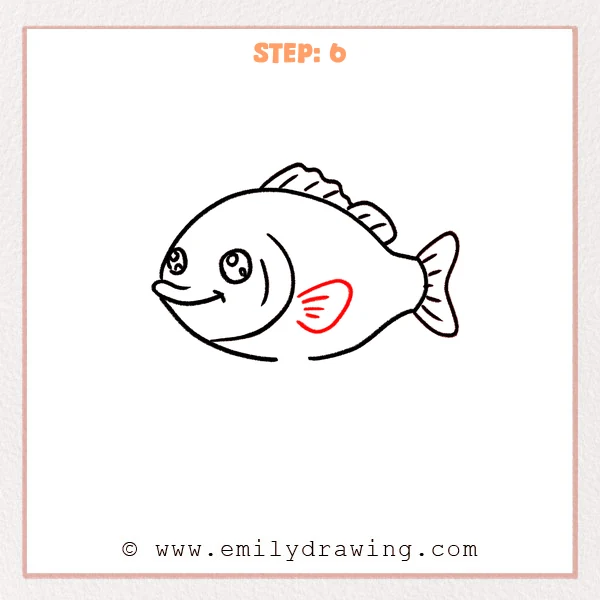
Draw a small fan-shaped side fin on the mid-back area of the body. Add a few short lines radiating outward to show fin texture.
Pro Tip: Use only a few short lines so the fin stays clean.
[Alt Text: Step 6: A rounded side fin is added to the bass with simple fin texture lines.]
Step 7: Draw the Bottom Fins

Add two small bottom fins under the belly, shaped like short leaves. Let them overlap slightly and place them a bit forward of center.
Pro Tip: Keep the bottom fins small so the body remains the focus.
[Alt Text: Step 7: Two small bottom fins are added beneath the bass’s belly.]
Step 8: Add the Small Rear Fin Detail
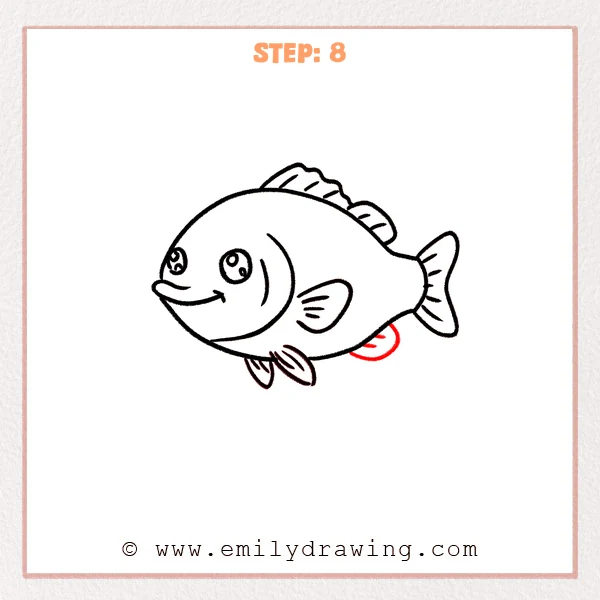
Add a small fin near the lower rear area to finish the back half. Use one or two short lines to suggest texture without crowding the space.
Pro Tip: Attach this fin right to the belly curve so it fits the form.
[Alt Text: Step 8: A small rear fin is added near the tail area of the bass.]
Step 9: Add Body Markings and Clean Lines
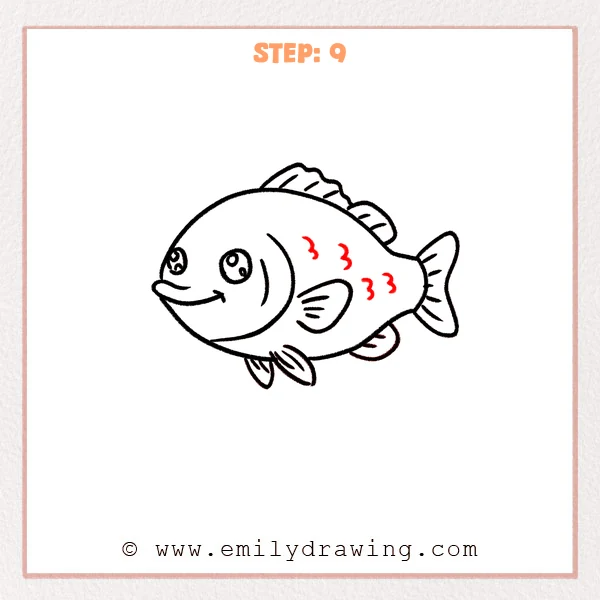
Add a few small “3”-shaped curves on the side to suggest scales or markings. Finish by smoothing the outline so the bass looks clean and finished.
Pro Tip: Scatter the markings lightly so they look natural.
[Alt Text: Step 9: Simple scale-like markings are added, completing the bass drawing.]
Step 10: Color in your drawing!
Fun Facts
- Bass have strong tails that help them burst forward quickly.
- A fish looks more lively when you add a tiny highlight in the eye.
- Simple fin lines can suggest texture without heavy detail.
Pin it now, Draw later!
You now know how to draw a bass step by step, from the body shape to fins and simple markings. Trace your final outline with a marker, then erase leftover pencil lines after the ink is dry.
For coloring, try a greenish body with a lighter belly, and add soft shading under the fins. Leave a small bright highlight near the head or back to suggest a shiny, wet surface.
One common beginner mistake is placing the tail too small, which makes the fish look unbalanced. Keep practicing this easy drawing tutorial, and try drawing the bass swimming in different directions to build confidence.
Get the FREE Printable Drawing Guide
FREE Download Printable Bass Drawing Tutorial
Frequently Asked Questions
How do I make the bass body look smooth and not bumpy?
Use light sketch lines first, then redraw one clean outline before you ink.
What if my fins look too sharp?
Round the fin tips slightly and keep the edges soft.
How can I make the fish look more three-dimensional?
Add gentle shading along one side and keep the other side lighter.