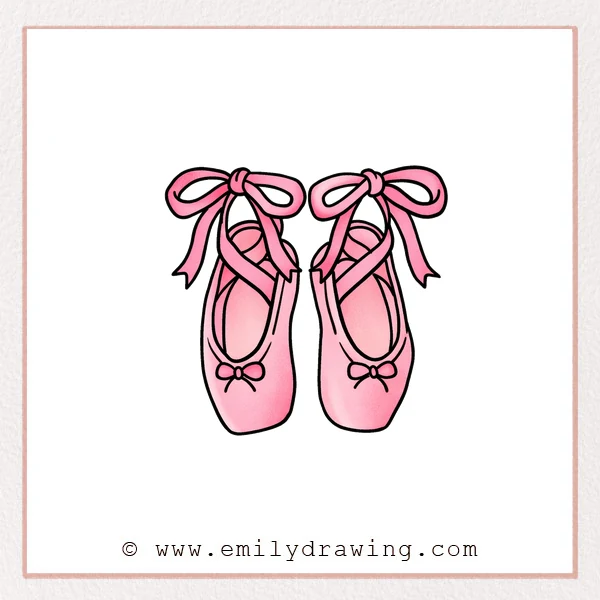
If you want to learn how to draw ballet shoes, this calm, step by step drawing tutorial will guide you through a pretty pair. We will build the shapes slowly, then add ribbons, bows, and simple details. Take your time and enjoy the gentle curves that make ballet shoes look soft and elegant.
What You Will Need
- Pencil
- Eraser
- Black pen or fine liner (optional)
- Paper
- Coloring tools (colored pencils, crayons, or markers)
Here are my RECOMMENDED Art Supplies!
- Crayola Coloring Set (140 Pieces – Mega Value!)
- 24 Colored Crayon Set
- A4 Printer Paper
- Crayola Coloring Pencils
- HP Home Printer with Instant Ink!
Time needed:
23 minutes.
Step-by-Step Drawing Guide
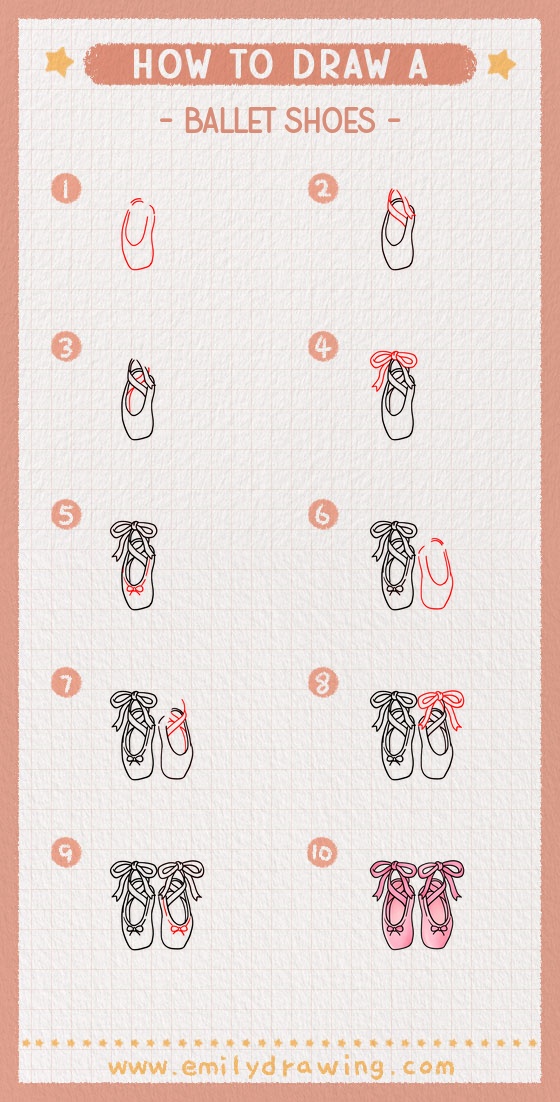
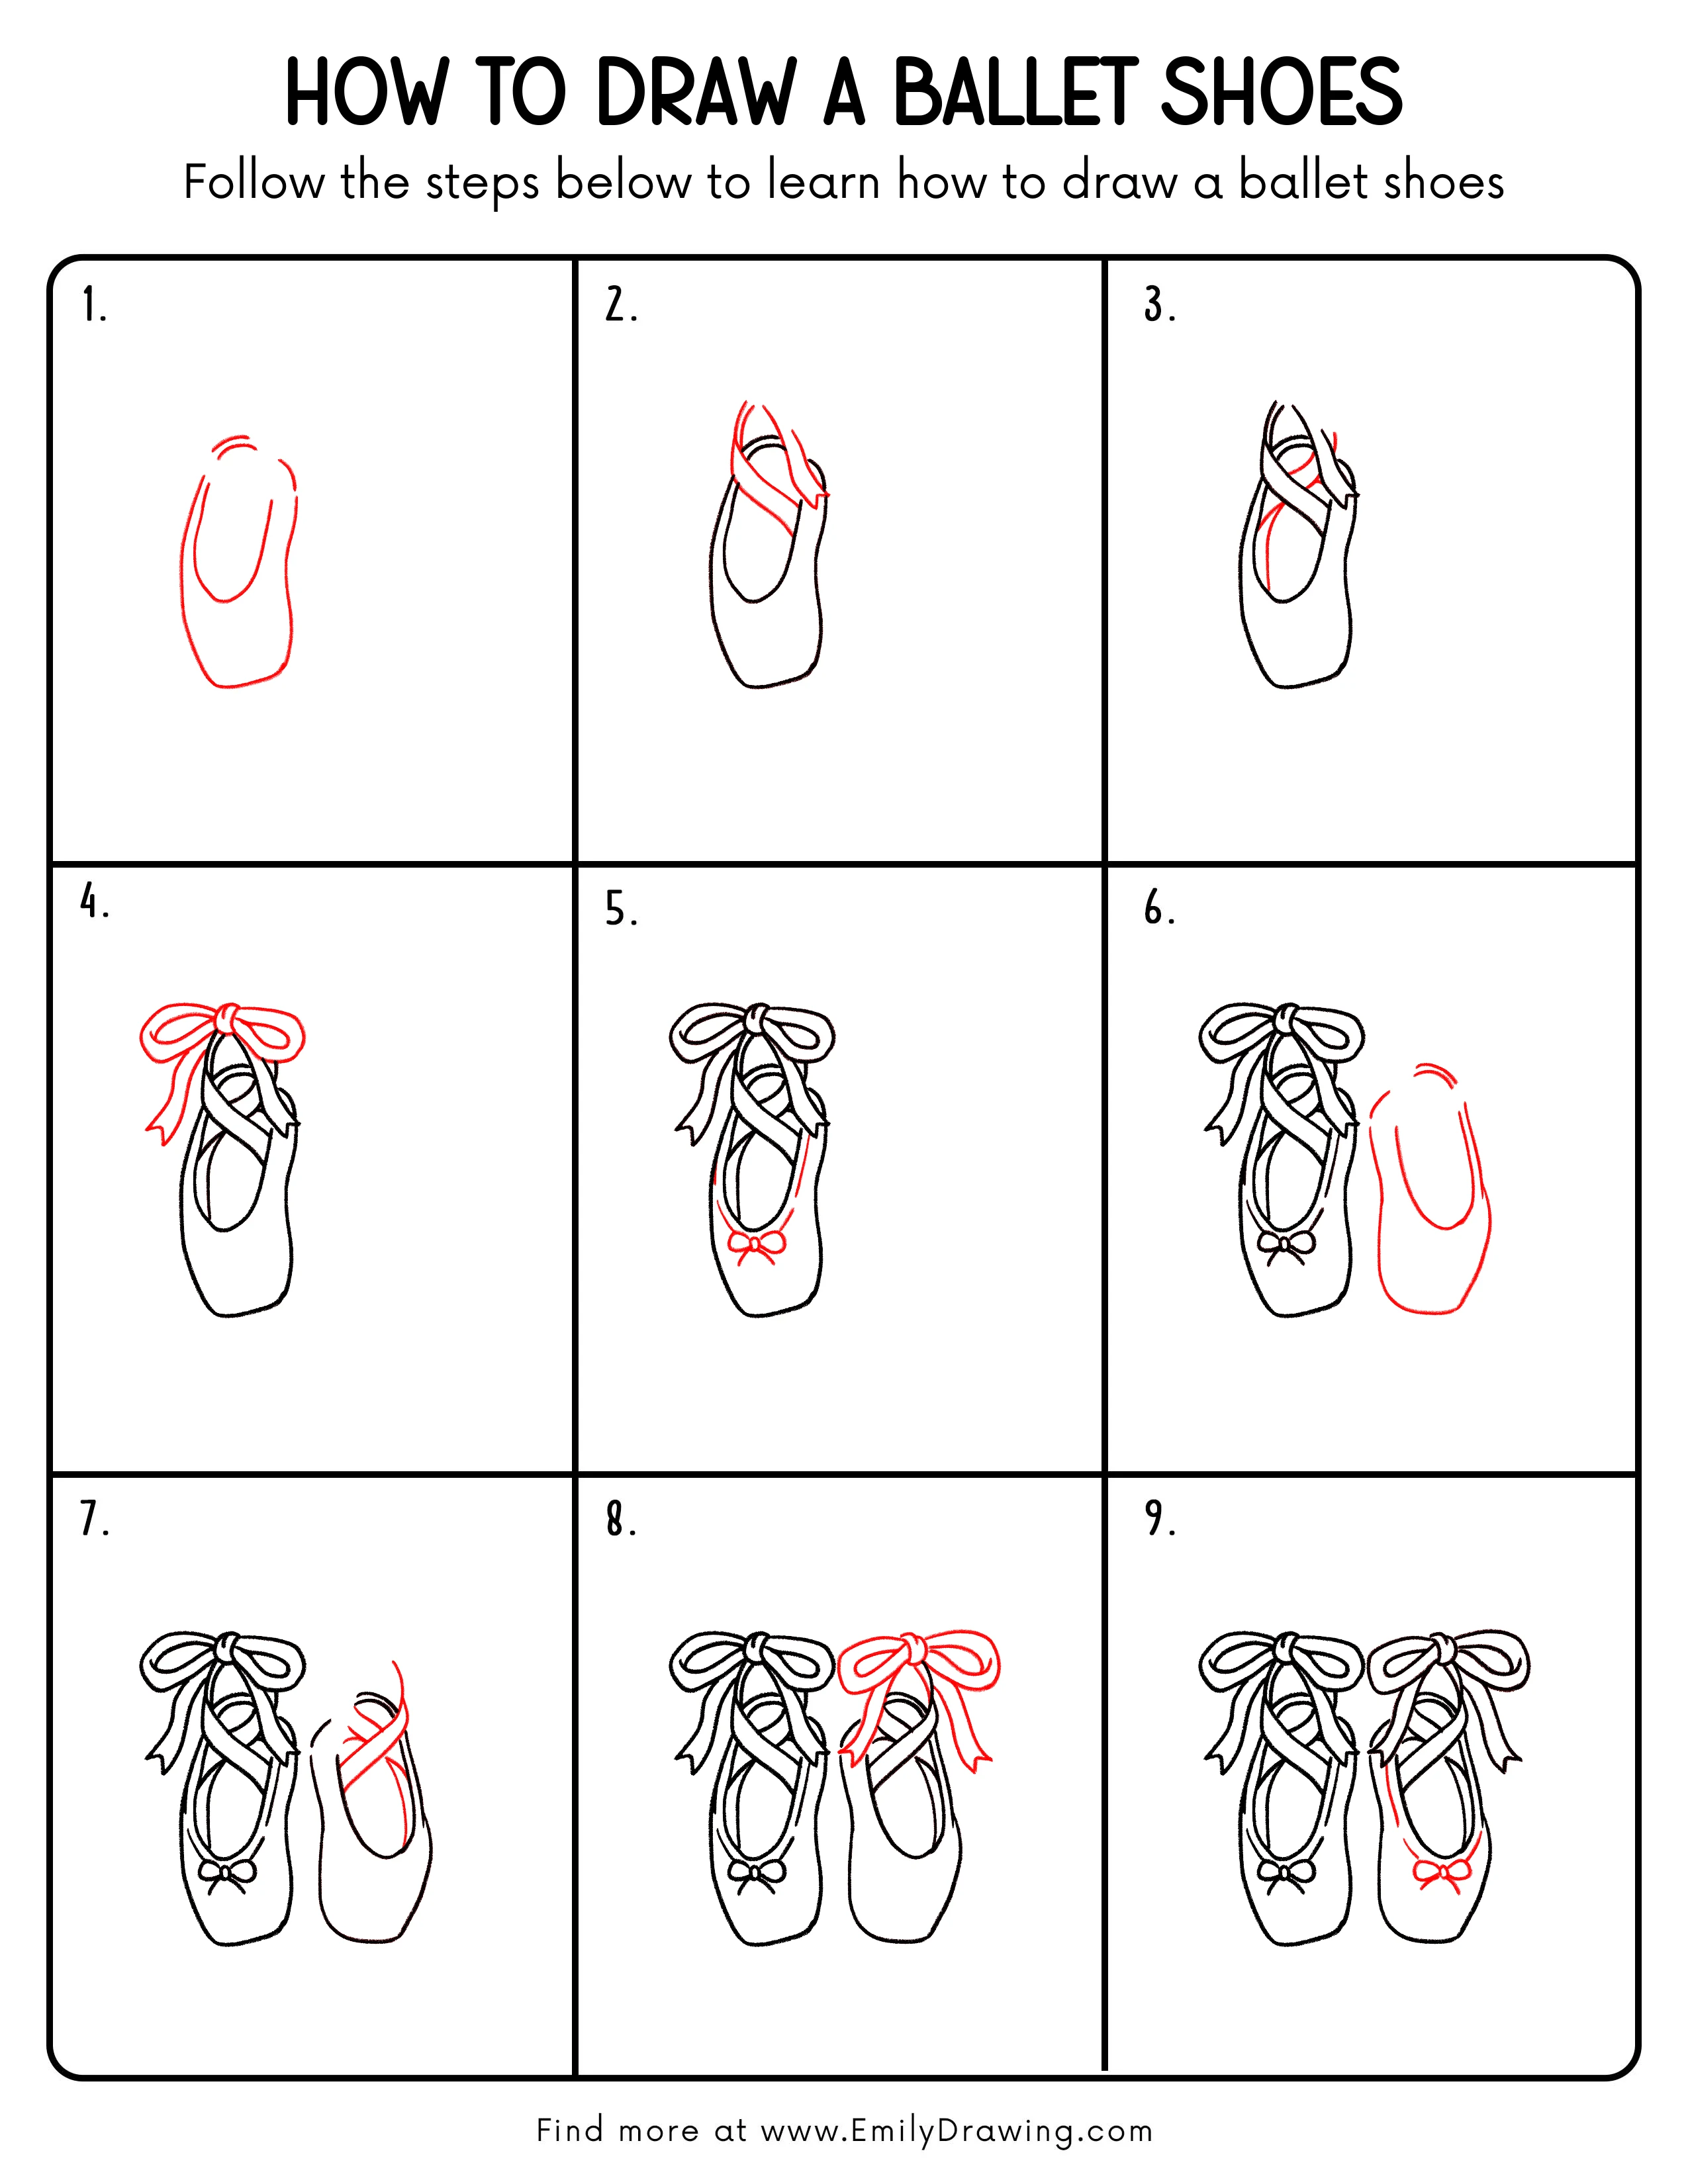
Step 1: Sketch the Basic Shoe Shape
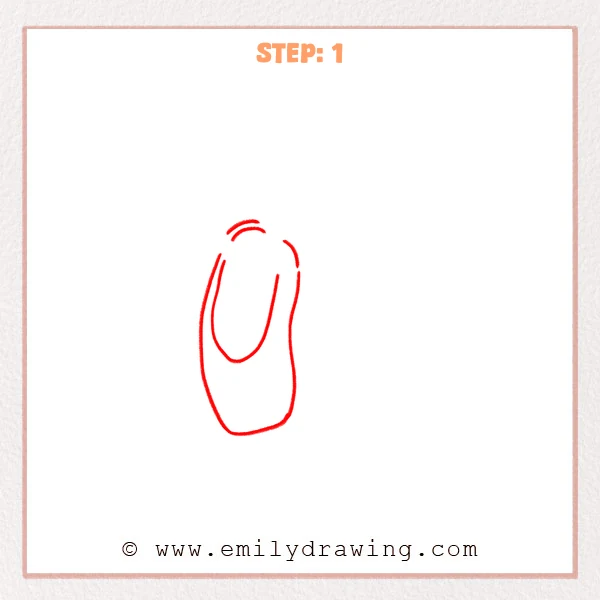
Start with a long, bean-like outline for the ballet shoe, with a softly rounded bottom. Add a large U-shaped opening inside to show where the foot goes. Then place two short curved lines above the opening to hint at the raised edge.
Pro Tip: Keep the outline light so you can adjust the curves later.
Alt Text: First step sketch of a ballet shoe with an outer outline, a U-shaped opening, and two small curved lines suggesting the top edge.
Step 2: Add the Crossed Straps and Top Details
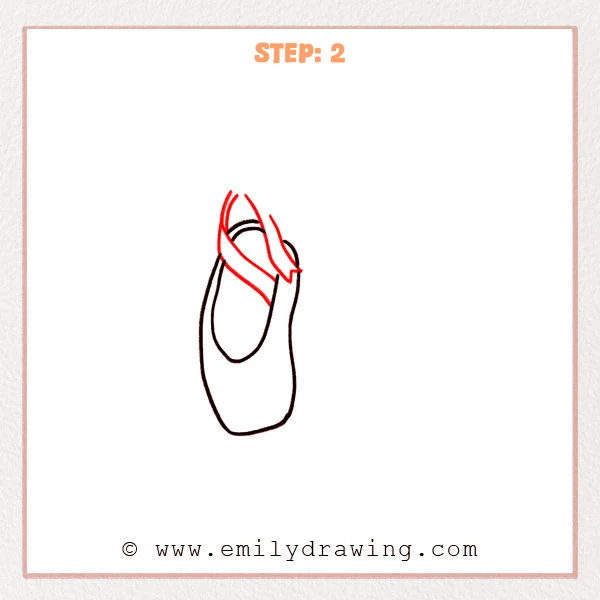
Add two straps at the top, letting them cross from side to side to form a clear layered “X.” Draw a curved line inside the opening to show the inner edge and thickness. Finish by shaping the strap ends with small pointed tips, like folded fabric.
Pro Tip: Place the crossing slightly above the opening for a natural fit.
Alt Text: Ballet shoe outline with added crossed straps at the top and an inner curved line showing the shoe opening thickness.
Step 3: Add the Inner Strap and Overlapping Layers
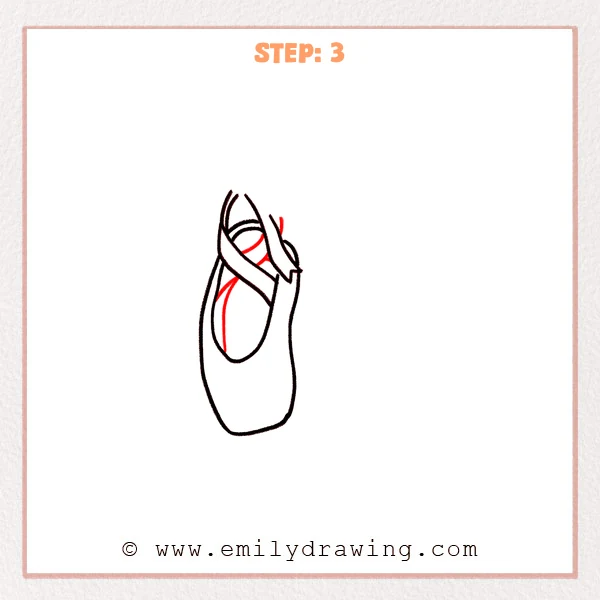
Draw another curved strap inside the opening, letting it pass from the left and tuck under the crossed strap to show overlap. Add a close inner line along the left side of the opening to suggest the shoe’s lining. Finish with two short lines beside the right strap to hint at a strap segment peeking from behind.
Pro Tip: Keep the underlapping lines shorter so they feel tucked in.
Alt Text: Ballet shoe drawing with an added inner strap curve, a lining line along the opening, and small behind-strap lines showing layered overlap.
Step 4: Add the Big Bow and Ribbon Tails
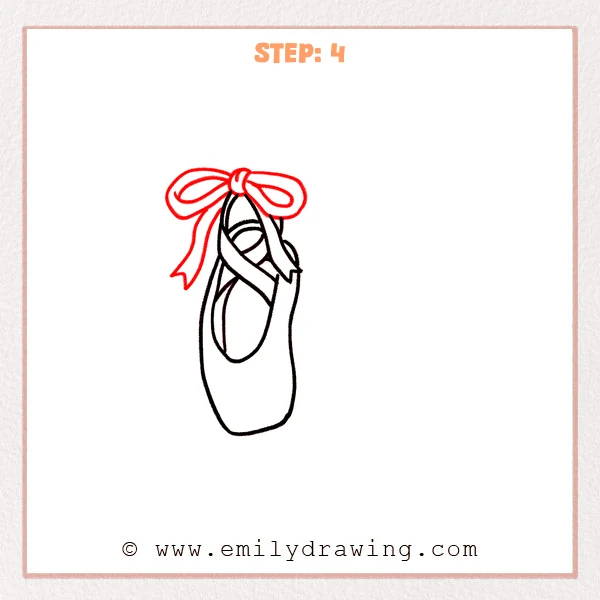
Add a small knot at the very top of the shoe opening, then draw two large oval loops on each side to form the bow. Pull two ribbon tails down from the knot, one drifting left and one dropping toward the center, and cut each end into a small V-shape. Refine the outer lines a bit bolder so the bow stands out.
Pro Tip: Keep both bow loops close in size for a neat look.
Alt Text: Ballet shoe drawing with a large bow added on top, including two loops, a central knot, and ribbon tails hanging down.
Step 5: Add the Small Toe Bow and Surface Curves
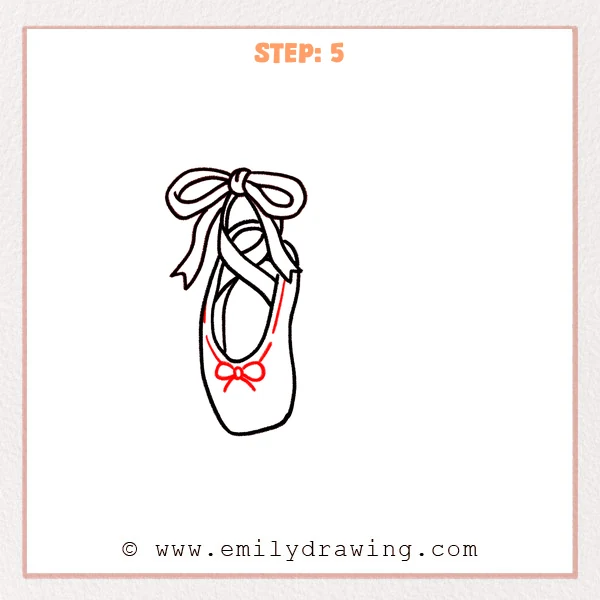
Add a tiny bow near the front: draw a small knot, two small oval loops, and two short ribbon tails. Then place a few gentle curved lines along the inside of the shoe to suggest the fabric’s form and depth. Keep these curves flowing with the shoe, not straight.
Pro Tip: Keep the toe bow small and close to the center line for balance.
Alt Text: Ballet shoe drawing with a small bow added near the toe and a few curved contour lines on the shoe surface for depth.
Step 6: Sketch the Second Shoe’s Basic Shape
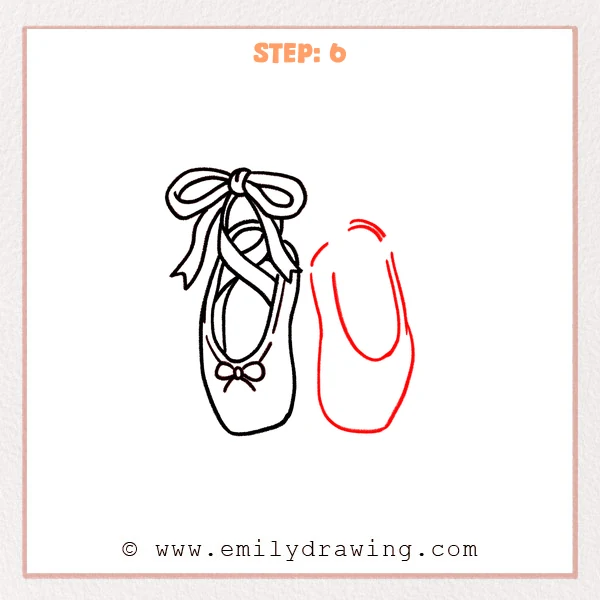
Leave a small gap to the right, then sketch a similar long shoe outline, tilting it slightly outward. Add a large U-shaped opening, with the bottom of the U sitting in the lower middle area. Finish with two short curved lines above the opening to suggest the top edge.
Pro Tip: Match the second shoe’s size to the first so they feel like a pair.
Alt Text: Two ballet shoes side by side, with the second shoe newly sketched as a simple outline and U-shaped opening.
Step 7: Add the Crossed Strap on the Second Shoe
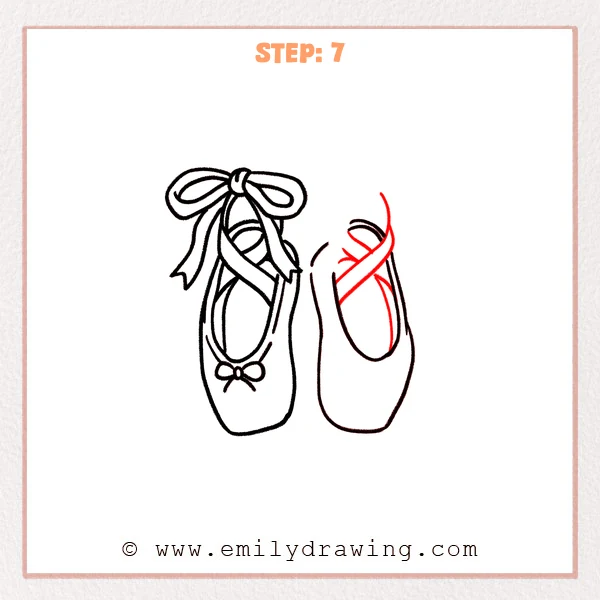
Draw a diagonal strap across the top of the second shoe, running from the right side toward the left. Add a few short curved lines inside the opening to show the strap wrapping over the foot. Finish with a slim line along the right edge to hint the strap continues around the side.
Pro Tip: Keep the strap close to the opening, and leave a tiny gap at overlaps.
Alt Text: Two ballet shoes, with the second shoe now showing a diagonal crossed strap and small inner curved lines indicating wrap-around ribbons.
Step 8: Add the Bow and Ribbon Tails to the Second Shoe

Draw a small knot at the top of the second shoe, then add two large oval loops to match the first bow. Pull down two ribbon tails, one falling along the right side and one curving inward, and cut each end into a small V. Slightly bold the bow outline so it stands out.
Pro Tip: Align both bows at a similar height for a tidy pair.
Alt Text: Two ballet shoes with matching large bows; the second shoe now includes bow loops, a knot, and ribbon tails hanging down.
Step 9: Add the Small Toe Bow and Curved Details on the Second Shoe
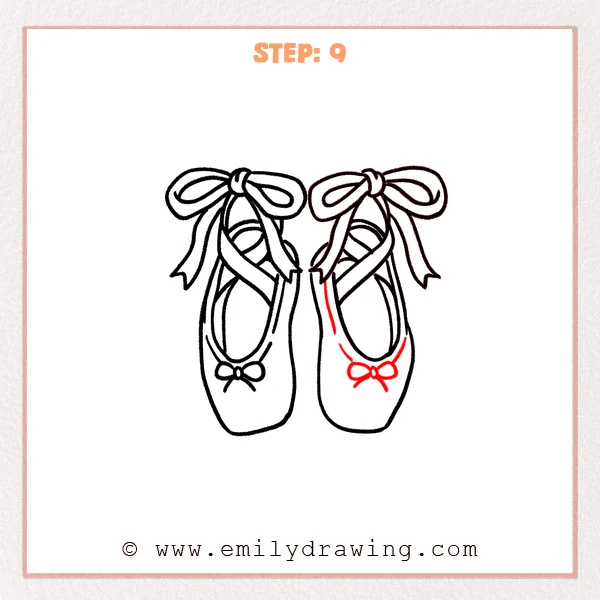
Add a tiny bow near the front of the second shoe: draw a small knot, two small oval loops, and two short ribbon tails. Then place a few gentle curved lines along the inside of the shoe to match the fabric depth of the first one. Keep the curves soft and light.
Pro Tip: Keep both toe bows similar in size so they match well.
Alt Text: Two ballet shoes with matching toe bows added; the second shoe now includes a small bow and subtle curved contour lines for depth.
Step 10: Color in your drawing!
Fun Facts
- Ballet slippers are designed to fit closely so dancers can feel the floor.
- Ribbons help support the foot and keep the shoe snug during movement.
- Many ballet shoes are made from satin or canvas, which creates soft folds and gentle shine.
Pin it now, Draw later!
You have drawn a pair of ballet shoes by building simple shapes, then adding straps, bows, and small fabric curves. For coloring, try pale pink or cream, then add a slightly darker shade along the sides and under the ribbons for soft shadows. A common beginner mistake is making the openings too small, so the shoes look stiff; keeping the U-shapes roomy makes them feel more real. Keep practicing this easy drawing tutorial, and try drawing the shoes at different angles to grow your confidence.
Get the FREE Printable Drawing Guide
FREE Download Printable Ballet Shoes Drawing Tutorial
Frequently Asked Questions
How do I make my ballet shoes look softer?
Use curved contour lines and light shading along the edges. Keep sharp corners to a minimum.
What if my two shoes do not match?
Compare height and width, then gently erase and adjust the outline. Small changes can make them feel like a pair.
Can I draw pointe shoes instead of ballet slippers?
Yes, start with the same basic shape, then square off the toe box. Add stronger straps and more structured lines.