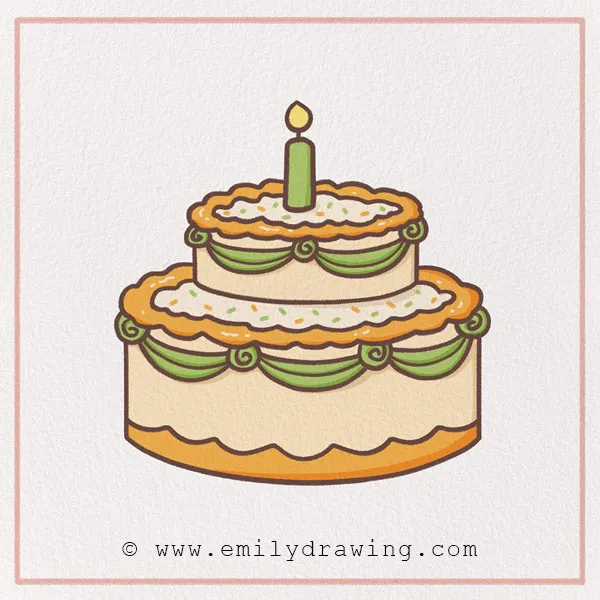
Hi! Welcome to another fun tutorial! In ten easy steps, we are going to learn how to draw a birthday cake illustration, a super yummy dessert!
Birthday cakes are really recognizable for their candles—the birthday person typically has the number of candles according to what age they are turning. Apparently, this tradition of putting candles on cakes goes all the way back to the ancient Greeks to symbolize the moon’s glowing light! In modern times, the legend is that if you are able to blow out all of the candles, your wish will come true.
Another tradition in many cultures is to sing a song to the birthday person as they are blowing the candles. In English speaking countries, it is most often “Happy Birthday to You.” Have you ever sung it?
Now that you’ve learned some fun facts about birthday cakes, let’s move on to the fun part: creating your easy birthday cake sketch! Find some drawing materials and let’s get started.
If you love drawing items for special occasions, you might also enjoy How to Draw Balloons or How to Draw a Cupcake.
Materials:
- a piece of paper
- a pencil for the guiding lines and sketching
- an eraser
- a black sharpie or a pen for the outlines
- markers or colored pencils for coloring
- our printable drawing guide (Join my Email List below to get this Tutorial)
Here are my RECOMMENDED Art Supplies!
- Crayola Coloring Set (140 Pieces – Mega Value!)
- 24 Colored Crayon Set
- A4 Printer Paper
- Crayola Coloring Pencils
- HP Home Printer with Instant Ink!
Time needed:
15 minutes.
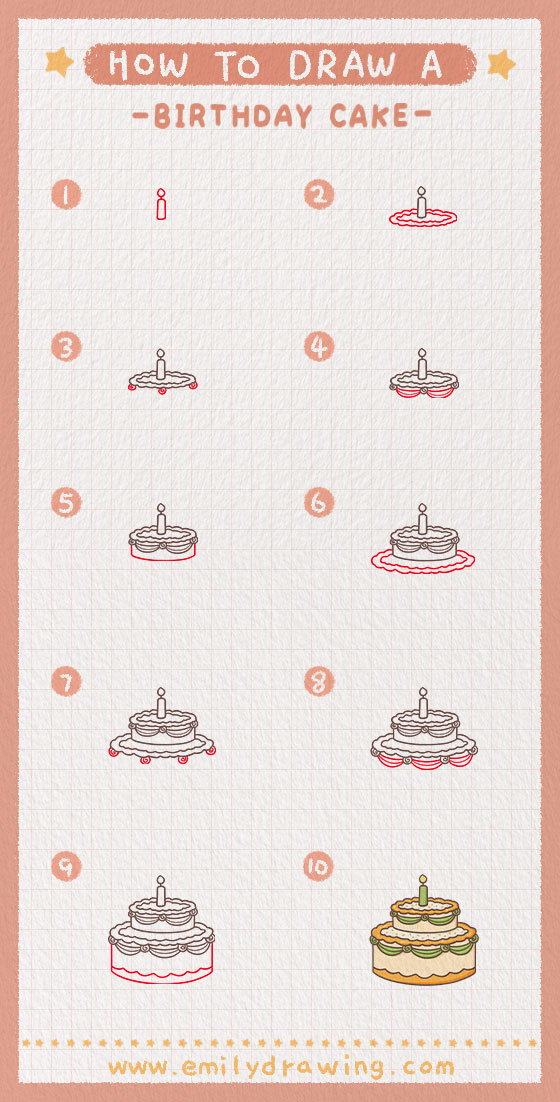
How to Draw a Birthday Cake — Let’s get started!
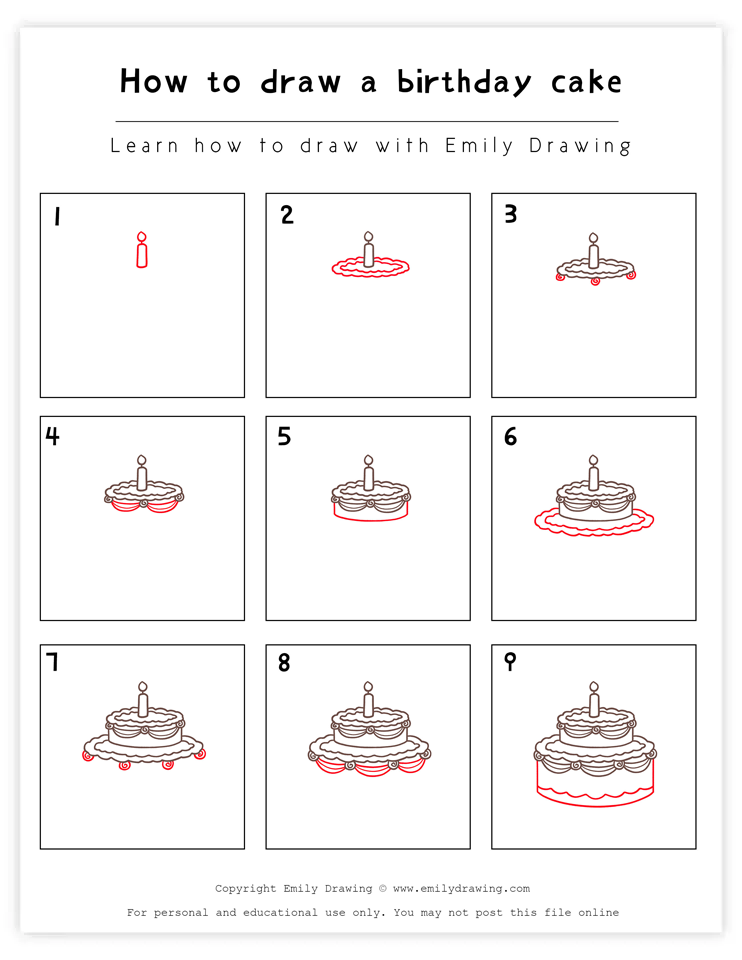
Step 1 – Draw the candle on top.
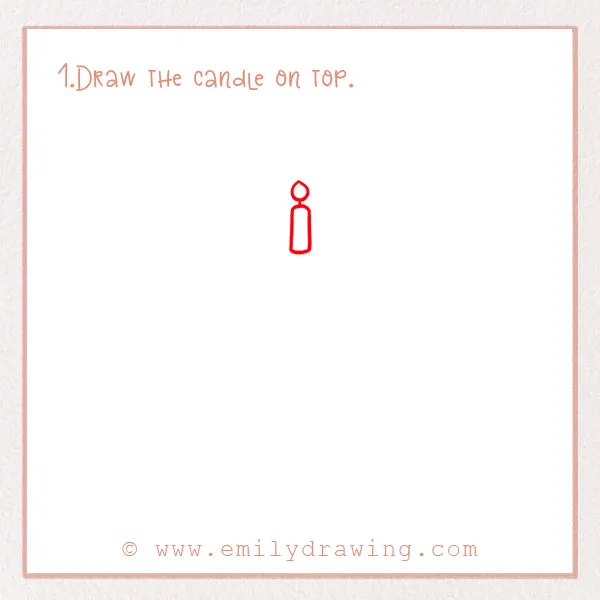
As we mentioned, traditionally, birthday cakes have candles on them, and the birthday person will blow them out and make a wish. Let’s start this tutorial by drawing the birthday candle!
About three-quarters to the top of the page, draw a small, skinny rectangle. There should be plenty of room for the rest of the cake below! At the very top of the rectangle, draw a tiny oval. This is the candlestick and the flame. Check out the photo. Good job!
Step 2 – Draw the top tier of the cake.
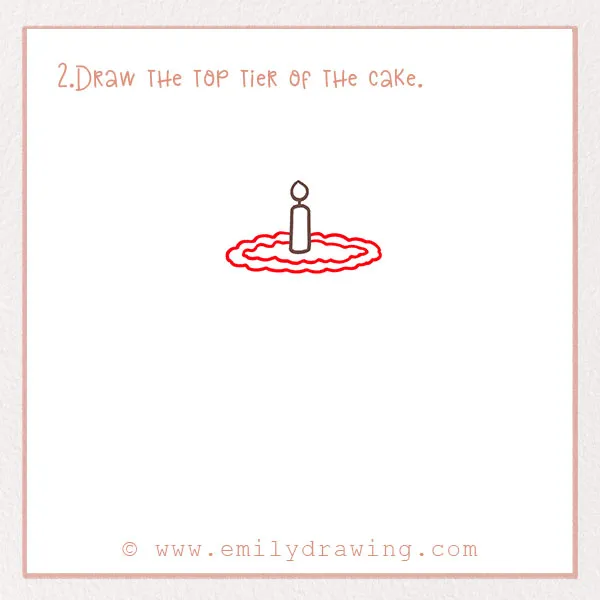
Now let’s get started on the actual cake. Right beneath the candle, draw a skinny oval with squiggly lines. Let the oval be cut off by the candle—this shows perspective, as you can see in the reference photo. Draw another oval right outside it. Good job!
For more tutorials on structured designs, check out How to Draw a Christmas Tree or How to Draw a Popsicle.
Step 3 – Add some detail to the tier.
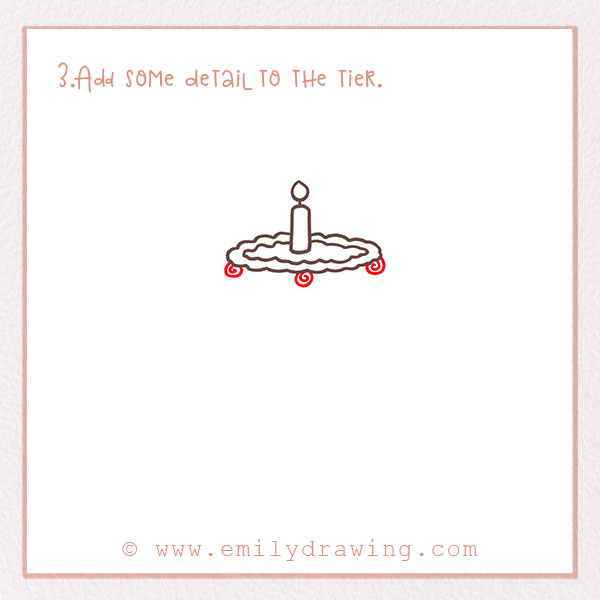
Oftentimes, birthday cakes are tiered, meaning they have many layers stacked on top of each other. Have you ever seen a tiered cake? They’re very impressive bakery feats! They are much bigger than a cupcake.
So, let’s start on the second layer from the top. To do this, draw three tiny swirls, almost like little dots, evenly spaced apart from each other. We’ll add more to them in the next step.
Step 4 – Add more detail to the tier.
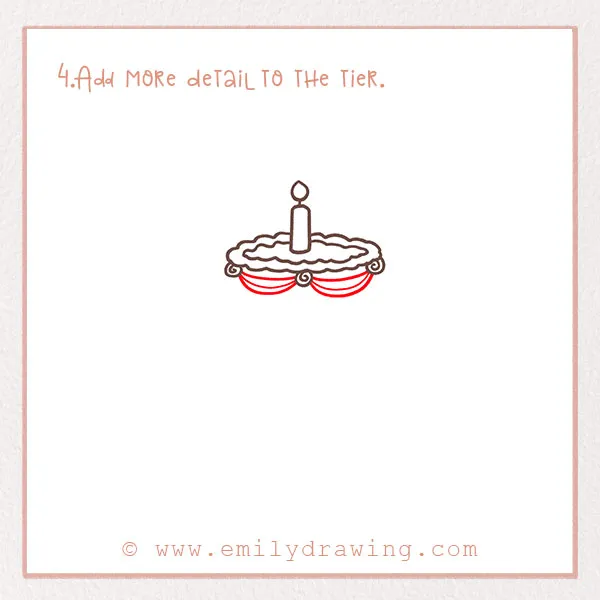
Let’s add more decoration to the tier. You’ll want to check out the photo for this step. In between each dot, draw a slightly curved line. Then, add a few more underneath. You should have three curved lines stacked on top of each other. Good job!
If you enjoy adding decorative details, you might like How to Draw a Crown or How to Draw a Sunflower.
Step 5 – Complete the first tier.
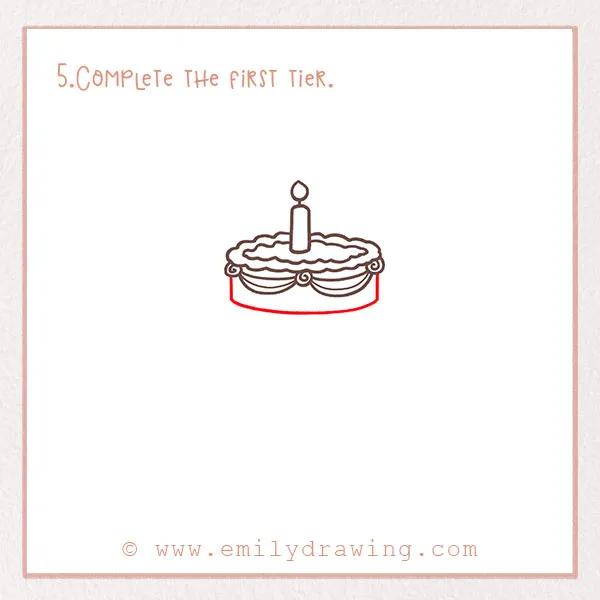
Right beneath the detail you just drew, draw a slightly curved line. Connect it to the shapes above. Refer to the photo.
Step 6 – Add another layer.
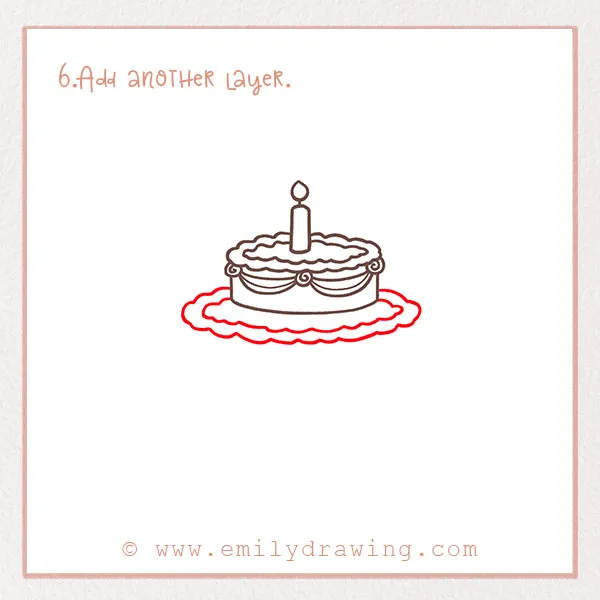
This is very similar to Step 2. Draw two round shapes, using slightly squiggly lines. They should each be a little bigger than the ones in Step 2. This shows the cake getting bigger towards the bottom. Good job!
Step 7 – Draw more details.
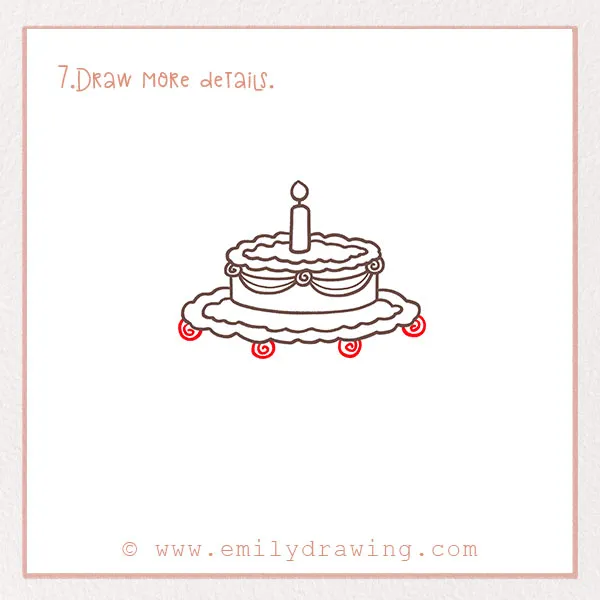
This step will be basically the same as Step 3.
Create the same little swirly shapes—these will look like little frosting decorations. This time, add four little swirls.
Step 8 – Draw more curvy details.
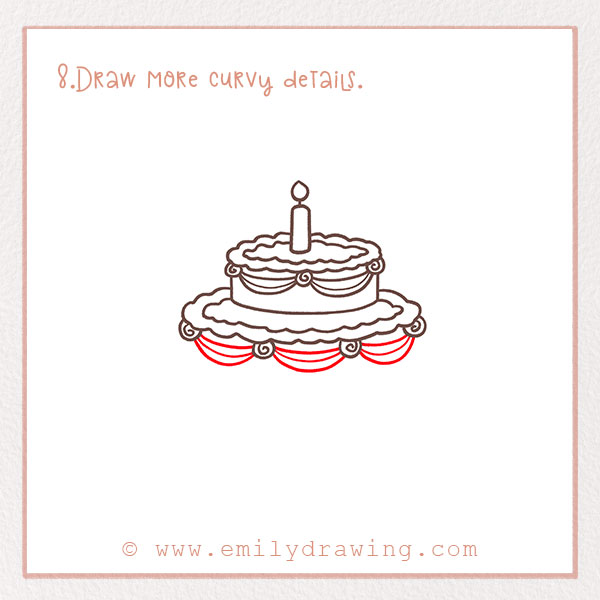
So, we’re going to continue down the cake. This is going to be very similar to Step 4. In between all the little swirly dots, draw slightly curved lines stacked on top of each other. They almost look like little smiles! Good job.
Step 9 – Add more detail to the markings.
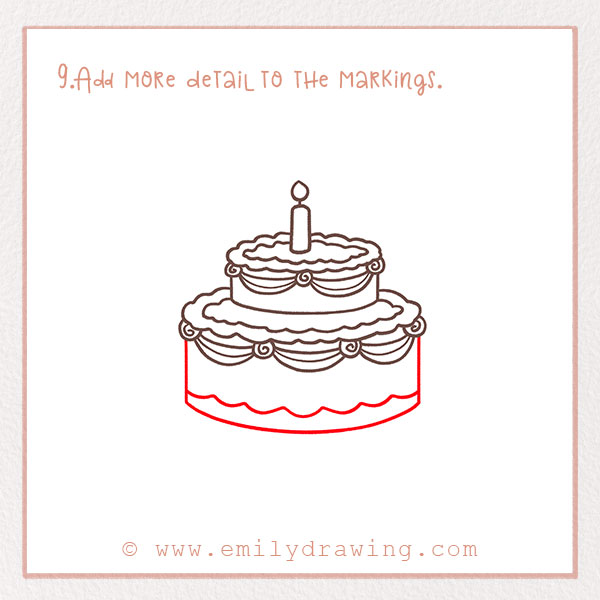
Let’s add the bottom and biggest tier of the cake. Draw two vertical lines, a few inches long each, to form the bottom of the cake. Connect them with another slightly curved horizontal line. Just barely above, draw a squiggly line to add some detail. Check out the photo if you need help, but don’t be afraid to have some fun and do your own thing!
Good job! You’re almost done—just one more easy (but fun!) step.
Step 10 – Color in your beautiful cake!
Last but not least, color in your cake! Cakes can be a bunch of different colors, so don’t limit yourself! Common flavors are vanilla and chocolate, but your cake could also be flavors like strawberry. Have fun coloring it in!
You’re all done! Thanks for following along with our cartoon birthday cake tutorial. Maybe your birthday cake drawing will become a reality on your next birthday! We had a good time and we hope you did too! Browse the site for more 10-step drawing projects, and let us know in the comments if you have any more you’d like to see on our site.
Once you’ve completed your birthday cake, celebrate by trying How to Draw an Ice Cream Cone or How to Draw a Watermelon.
Pin it now, Draw later!
Get the FREE Printable Drawing Guide