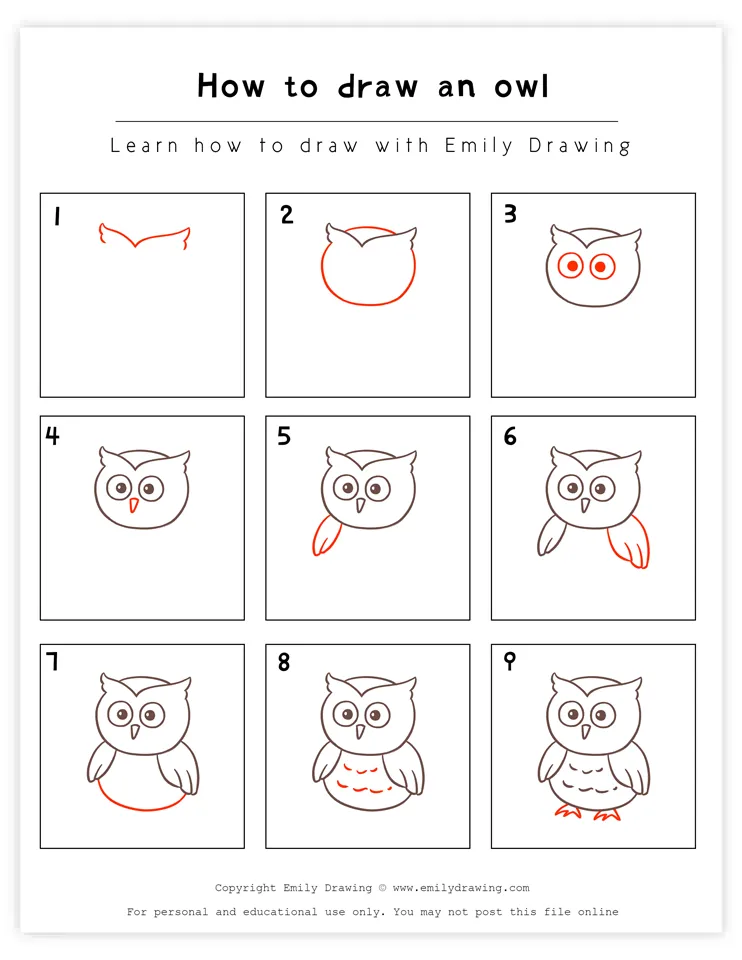
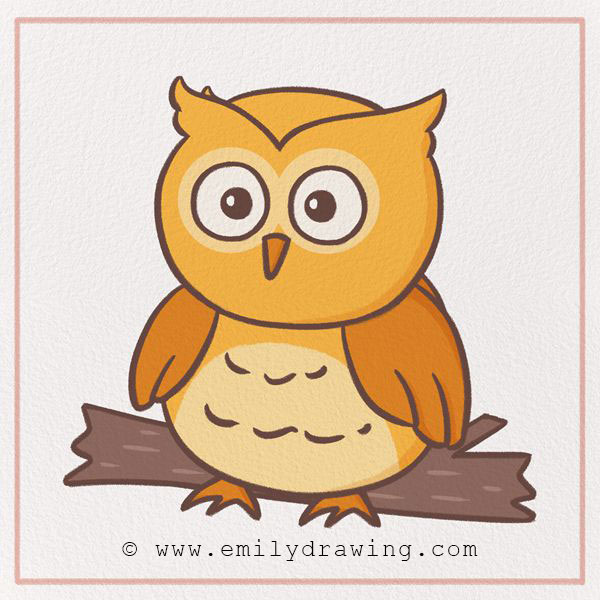
Hello and welcome to another fun step-by-step owl drawing tutorial! You’ve found our tutorial on How to Draw an Owl!
Owls are unique birds. You might know that they can almost turn their heads completely around! They can’t actually move their eyes, so they must turn their heads.
Did you know that there are 200 species of owls on Earth? They communicate with each other through calls and hoots. They are also nocturnal, meaning they are mostly active at night.
Owls are also common animals in literature and movies, making them a fun subject when you want to draw a cartoon owl. They symbolize wisdom and learning. This is why you might see owls in bookstores and libraries: to represent reading and knowledge!
Are you ready? Collect your art materials and keep on reading to get started with this easy owl drawing for beginners. Happy drawing!
Materials:
- a piece of paper
- a pencil for the guiding lines and sketching
- an eraser
- a black sharpie or a pen for the outlines
- markers or colored pencils for coloring
- our printable drawing guide (Join my Email List below to get this Tutorial)
Here are my RECOMMENDED Art Supplies!
- Crayola Coloring Set (140 Pieces – Mega Value!)
- 24 Colored Crayon Set
- A4 Printer Paper
- Crayola Coloring Pencils
- HP Home Printer with Instant Ink!
Time needed:
12 minutes.
How to Draw an owl — Let’s get started!
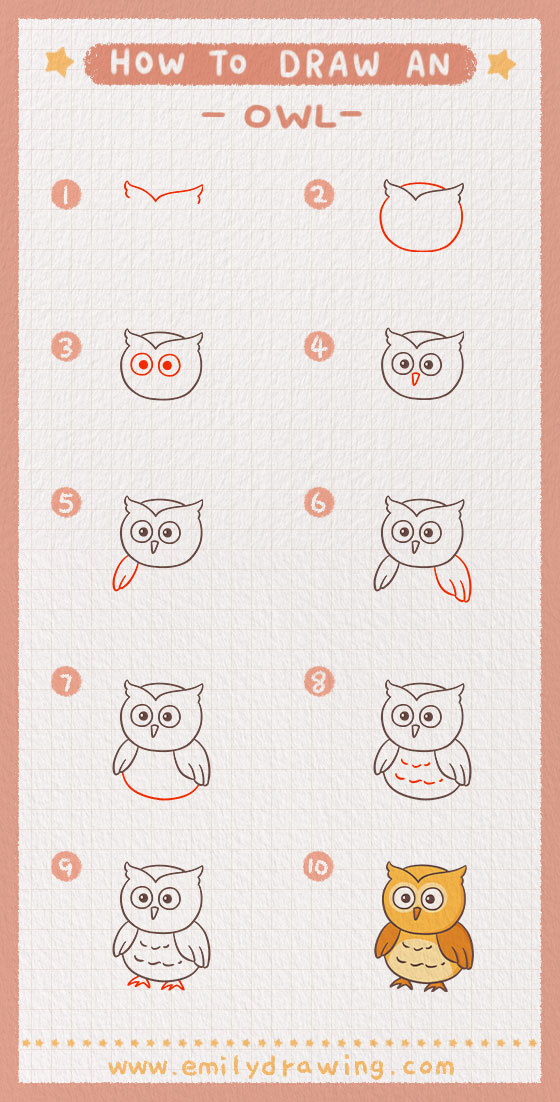
Step 1 – Start drawing the head.
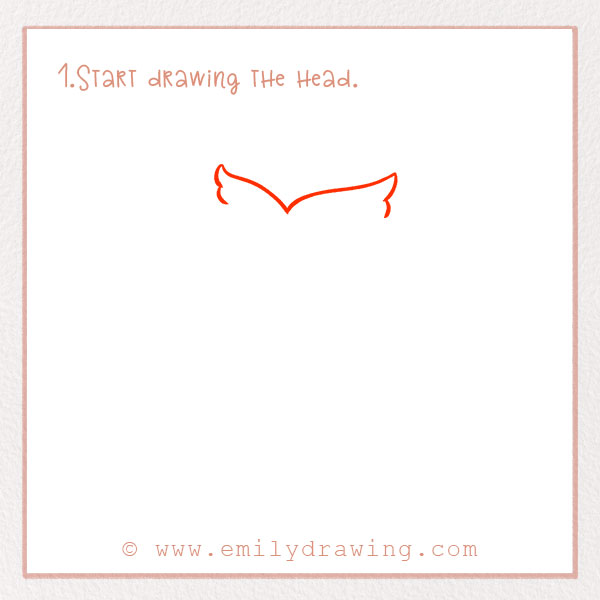
Let’s get started by drawing the feathers on top of the head! These might look like ears, but they are actually just feather tufts.
About an inch below the top of the page, draw a wide V-shape. The lines shouldn’t be completely straight.
Then, on both outside points, draw a few curved lines going downwards. Check out the photo to see what we mean!
Step 2 – Draw the shape of the head.
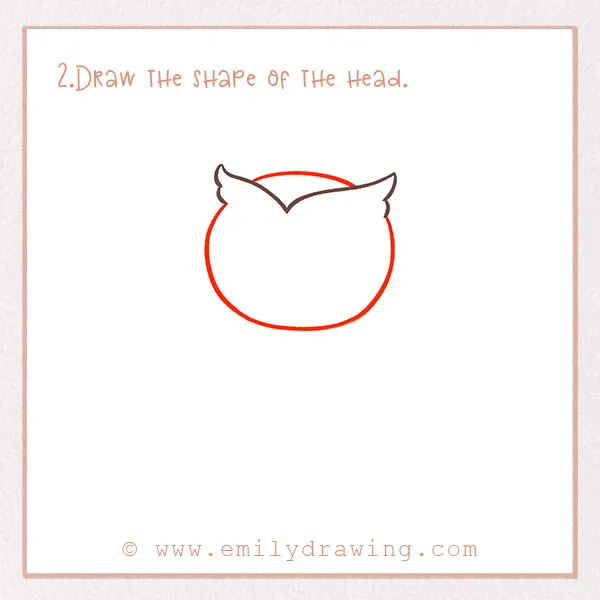
Let’s form the shape of the head but drawing a wide circle.
In between the top feathers, draw a curved line. Then, underneath, complete the head by forming the rest of the circle. Make sure to leave about half the page empty below for the rest of the body!
Step 3 – Add the owl’s eyes!
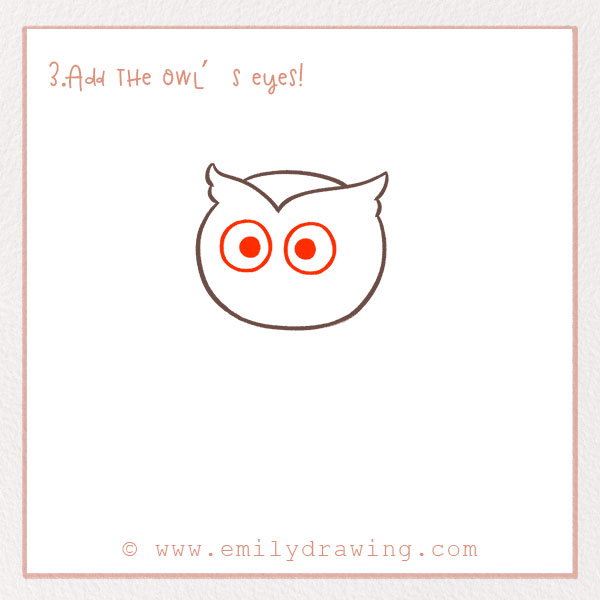
One of the most unique features of owls is their big, round eyes! That’s partly why they are thought to be so observant, or watchful. Let’s add the eyes now.
First, draw two circles, each about an inch wide. Put them right next to each other in the middle of the head.
Then, draw two smaller circles inside to form the pupils. Fill them in almost entirely, but leave a tiny bit unfilled to show texture. Refer to the photo. Good job!
Step 4 – Draw its beak.
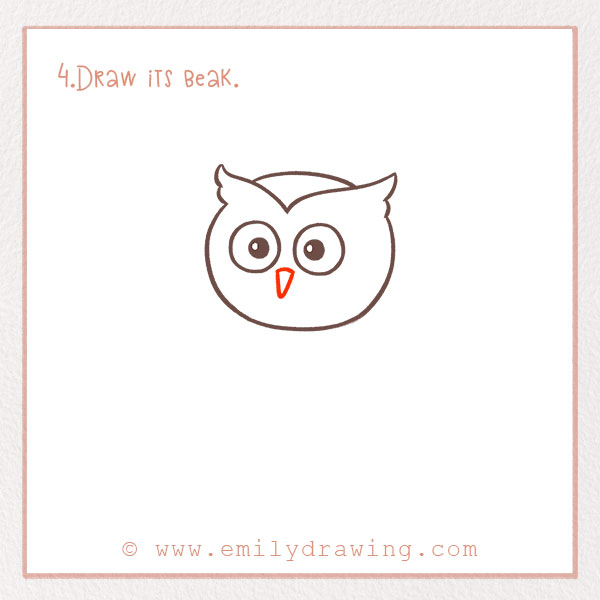
Like all birds, birds have beaks! Owls have fairly small and short beaks.
So, centered below the eyes, draw a small upside-down triangle.
We’re all drawing the face of the owl now. Let’s move on to the rest!
Step 5 – Add a wing on the left!
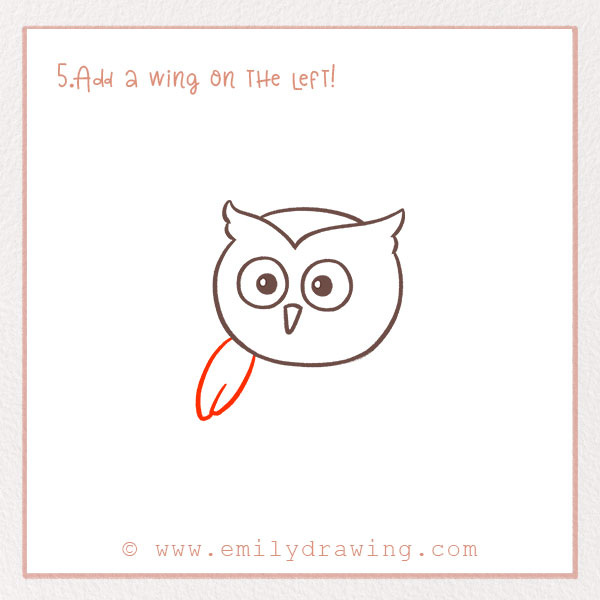
Of course, our owl has to fly! Did you know owls don’t make any noise when they fly? We need to add wings!
Look at the photo for this step because it’s an interesting shape. You’re going to draw two curved lines that form into a point. They should be extending diagonally outwards and down. Then, add a small line in the middle to show a feather.
Step 6 – Add another wing on the right.
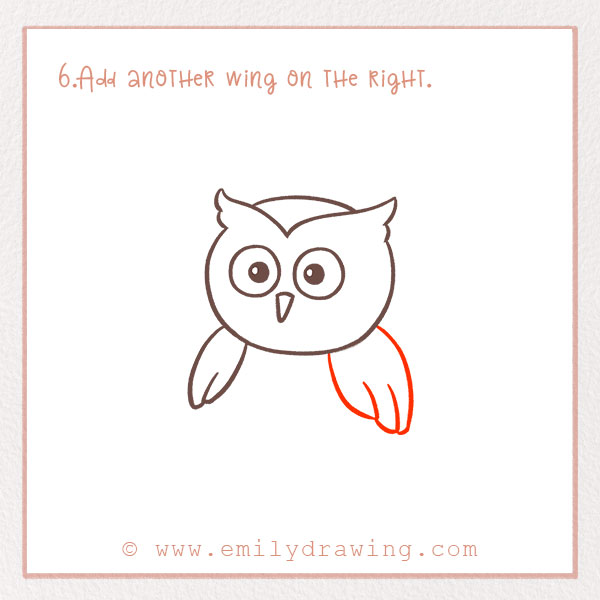
The right wing is going to be pretty similar to the first one, but a bit bigger.
Draw two curved lines on the right side of the body. Make them a little bit further apart, and make them a bit longer, too. Then, draw a few lines in between to show feathers. Check out the photo!
Step 7 – Form the rest of the body shape.
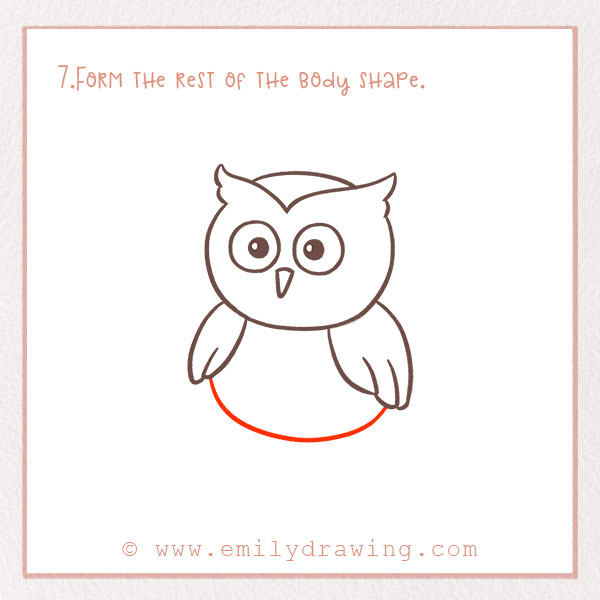
Draw a wide curved line below the wings, connecting them together at the bottom of each. This forms the shape of the owl’s belly!
There should still be a bit of space below to add the feet.
Step 8 – Add details to the belly.
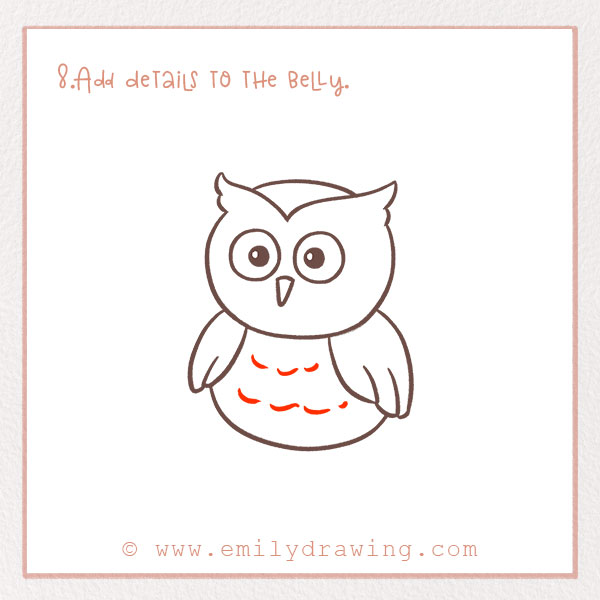
On the owl’s belly, draw small curved lines scattered throughout to show a feather texture.
They don’t have to all look the same—draw them at slightly different sizes to add some visual variety.
Good job!
Step 9 – Draw the owl’s feet!
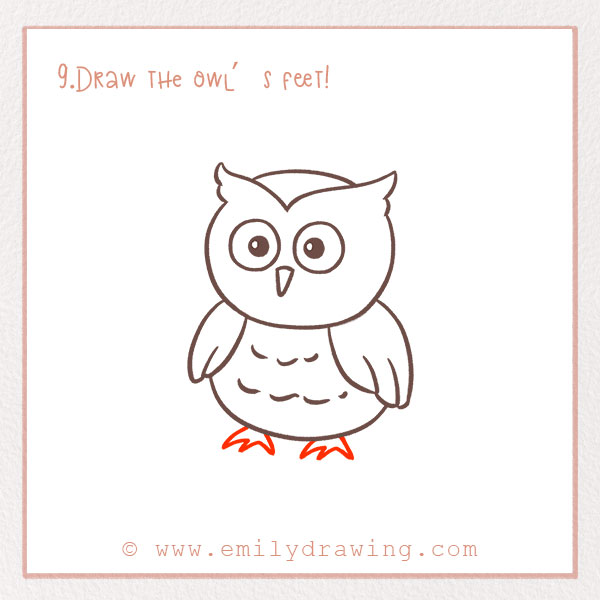
Let’s finish off drawing the owl by adding two little feet at the bottom. Draw zig-zag lines for the talons—owls sit on trees, and their talons help them have a grip. Look at the photo!
Step 10 – Color!
Last but definitely not least, let’s color in our creation.
Owls can be lots of different colors—brown, tan, gray, white, and more. Have fun with it! Color in the background too!
We hope you have enjoyed this step-by-step owl sketch project. Thanks for following along!
Give your little buddy a name, and share your artwork with your friends and family.
If you enjoyed this animal-themed tutorial, check out the “animal” tab on this site to learn how to draw a fox, bat, and more! Comment what you thought about this tutorial or any suggestions you have for additional ones, and make sure to check back here for more!
If you’re interested in drawing more birds, you might also enjoy our tutorials on How to Draw a Bird and How to Draw a Turkey.
Pin it now, Draw later!
Get the FREE Printable Drawing Guide