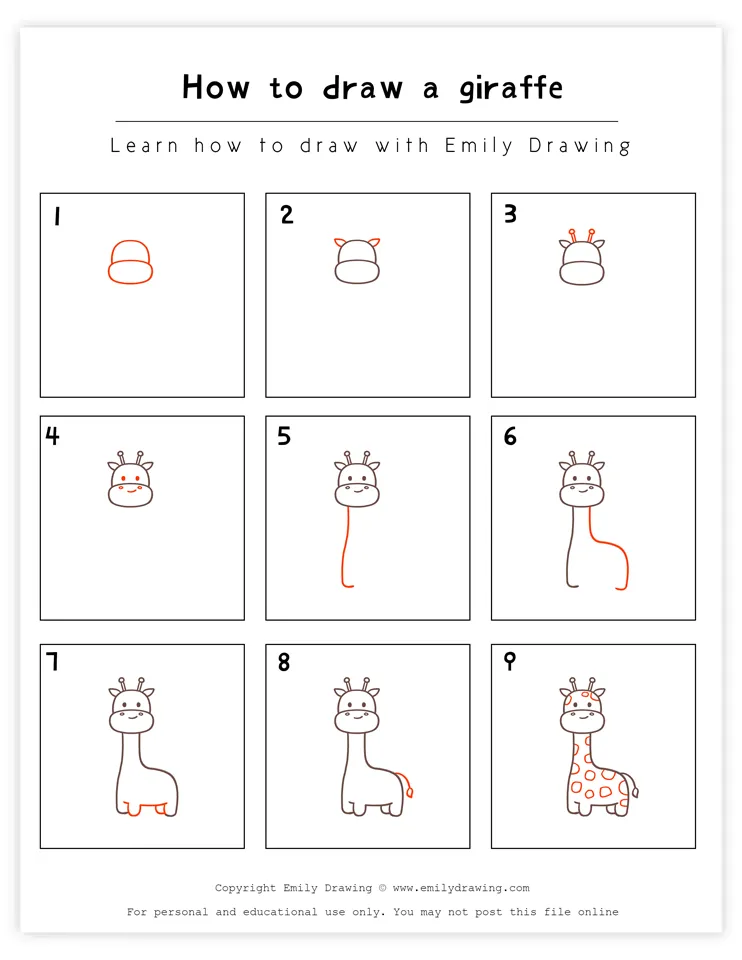
Hello, and welcome to our step-by-step giraffe drawing tutorial on how to draw a giraffe!
Giraffes are among the most recognizable animals due to their long necks and unique patterns. Let’s learn a bit about giraffes before we move on to the tutorial! First off, did you know that giraffes (maybe unsurprisingly) are the tallest land animals on the planet? Even their legs are taller than the vast majority of humans, as they can be six feet by themselves! They are also very fast runners despite being so large—in short bursts, they can reach up to 35 miles per hour. That’s pretty fast!
We’ll learn more about giraffes as we go through this tutorial. Let’s begin—get some art materials and keep reading for Step 1.
If you enjoy drawing animals, you might also like How to Draw a Fox or How to Draw a Kangaroo.
Materials:
- a piece of paper
- a pencil for the guiding lines and sketching
- an eraser
- a black sharpie or a pen for the outlines
- markers or colored pencils for coloring
- our printable drawing guide (Join my Email List below to get this Tutorial)
Here are my RECOMMENDED Art Supplies!
- Crayola Coloring Set (140 Pieces – Mega Value!)
- 24 Colored Crayon Set
- A4 Printer Paper
- Crayola Coloring Pencils
- HP Home Printer with Instant Ink!
Time needed:
11 minutes.
How to Draw a Giraffe — Let’s get started!
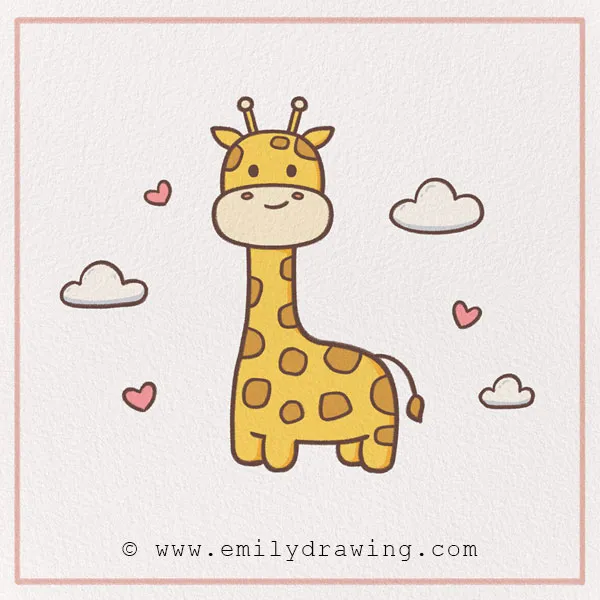
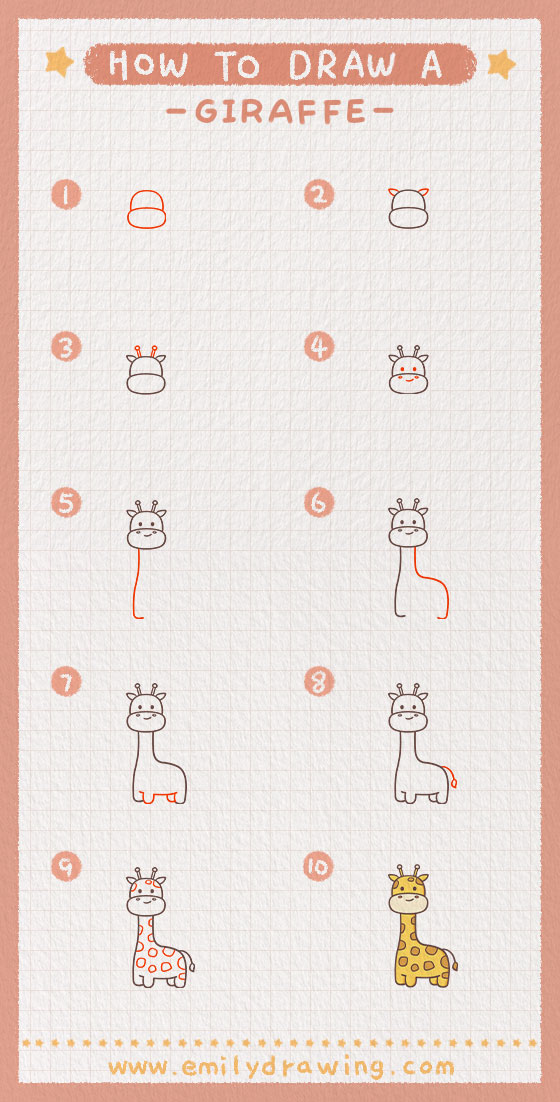
Step 1 – Draw the giraffe’s head.
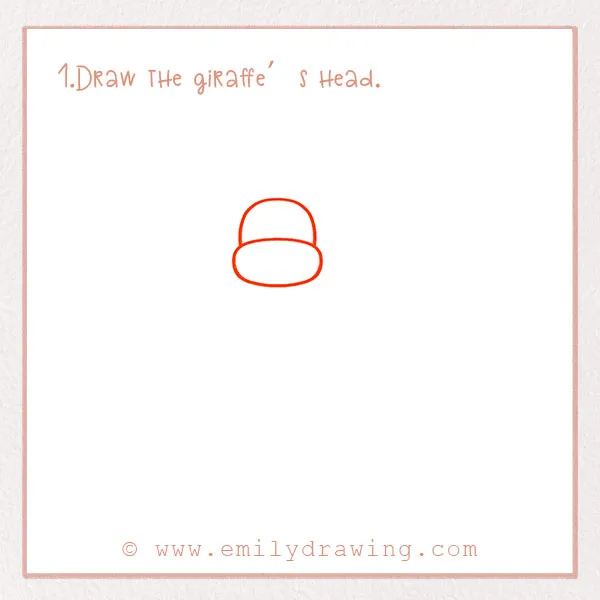
Let’s start with the giraffe’s head in this easy giraffe sketch for beginners. In the top two-thirds of the page and slightly to the left, draw a small but wide oval. It should be wider lengthwise. On top of it, draw a curved line for the top of the head. Refer to the photo!
Step 2 – Draw the giraffe’s ears.
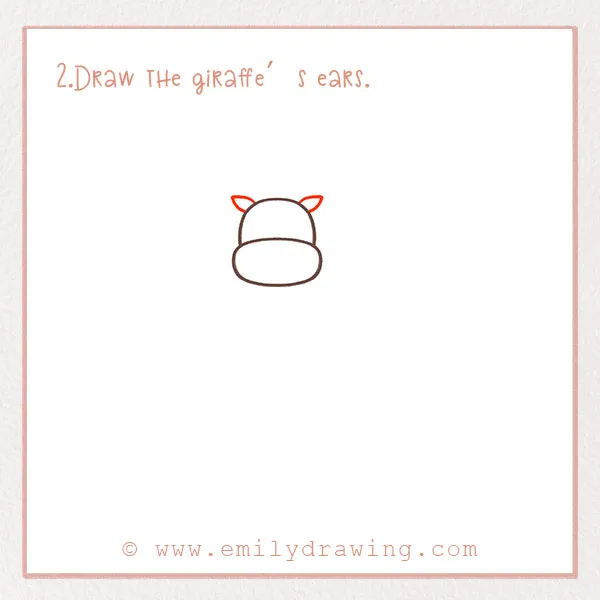
Next, let’s add the giraffe’s ears. Did you know that giraffes have great hearing? Interestingly, despite their long necks, giraffes have small vocal cords and make low-pitched sounds, often described as bleating, which helps them communicate.
On top of the head, draw two small triangles for the ears.
Step 3 – Draw the giraffe’s horns.
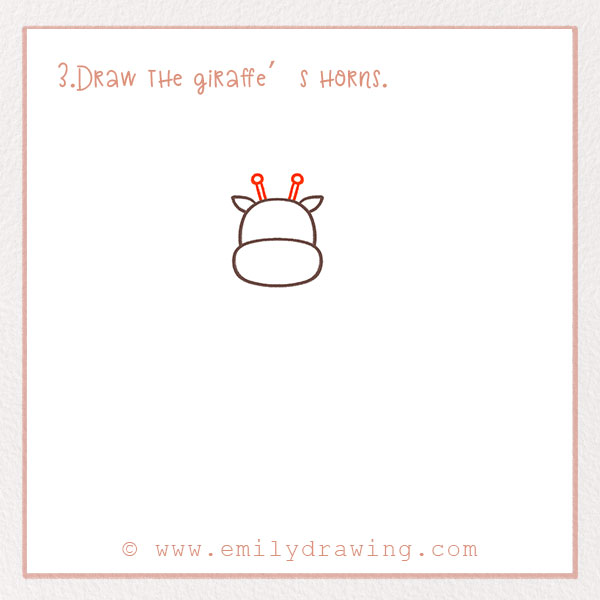
These are actually called ossicones, which are bony projections covered in fur, but we often hear them simply called horns. They are one of the more unique features of giraffes. Let’s add them now!
In between the ears, draw two skinny rectangles. At the top of each, draw a very small circle. These are the horns. They should extend just a little bit taller than the ears. Good job!
For tutorials involving distinctive animal shapes, check out How to Draw a Snake or How to Draw a Baby Deer.
Step 4 – Add the giraffe’s face!
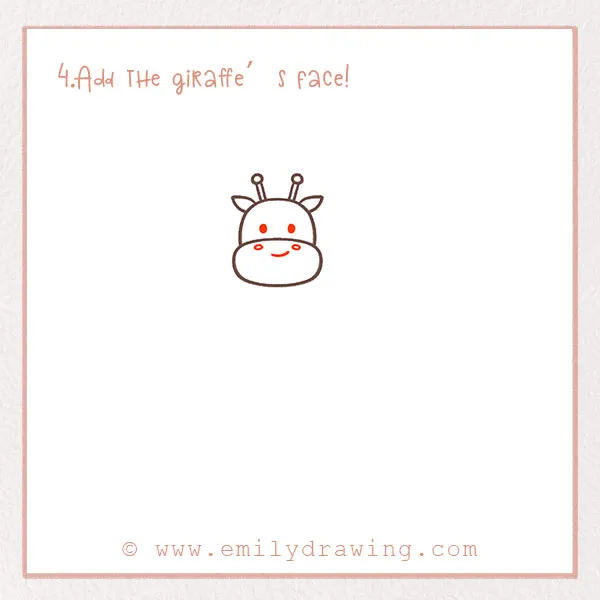
Let’s wrap up the head of the giraffe by adding its face! In the top portion of the head, draw two dots for eyes. Fun fact: did you know giraffes only need to sleep about 30 minutes in a 24-hour period?
Below, in the wider oval, draw two more open circles for its cheeks. Lastly, draw a small smile! We want our giraffe to look friendly.
Step 5 – Add the front leg.
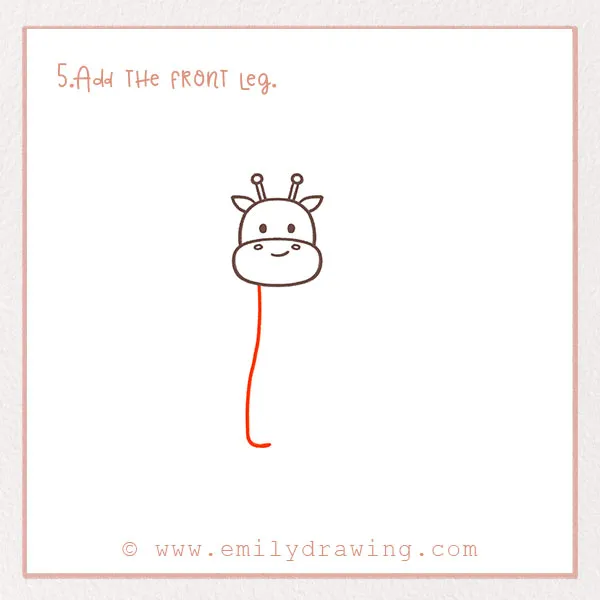
Now, we are going to move on to the tall form of the giraffe. Draw a long line extending from the head to just a few inches above the bottom of the page. This is the neck and the front leg of the giraffe.
If you enjoy adding patterns and fine details, consider exploring How to Draw a Turtle or How to Draw a Butterfly.
Step 6 – Add the back leg.
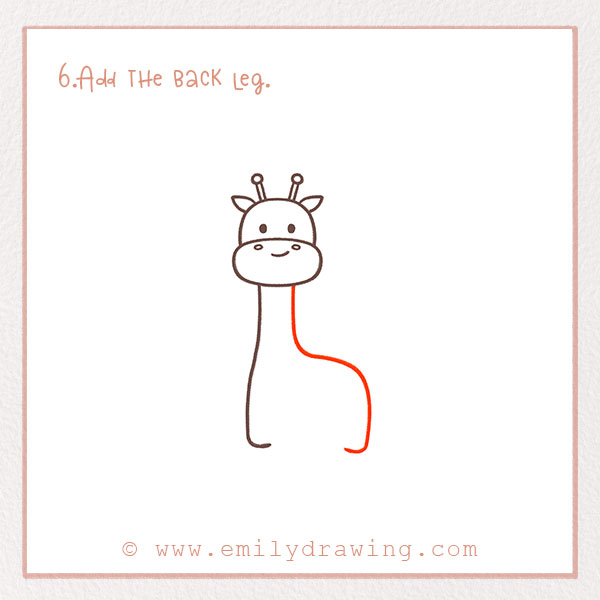
Let’s continue drawing the body. To the right of the line you drew in Step 5, draw another one. Now you have the neck. Continue the line curving down to the right to create the back and the back leg. Refer to the photo!
Step 7 – Complete the legs.
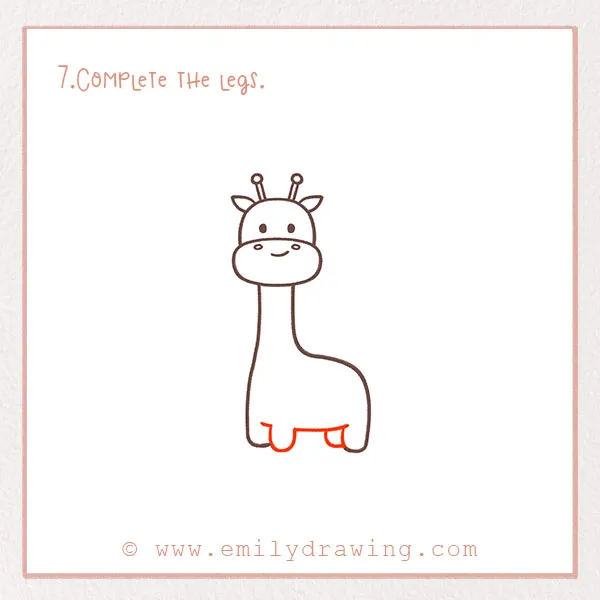
Let’s finish off the shape of the legs. Draw one more front and back leg and connect them with a short line to indicate its belly. Great job!
Step 8 – Add the tail!
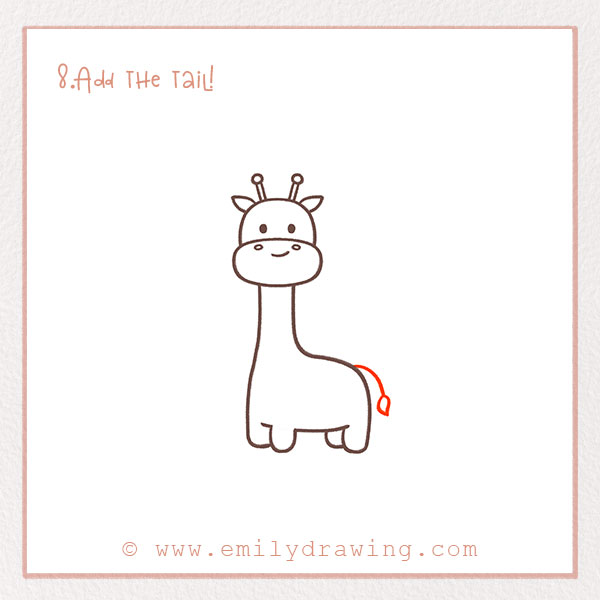
Now, it’s time to add the tail. Draw a line curving downwards with a small tuft at the end of it.
Step 9 – Fill in the giraffe with spots!
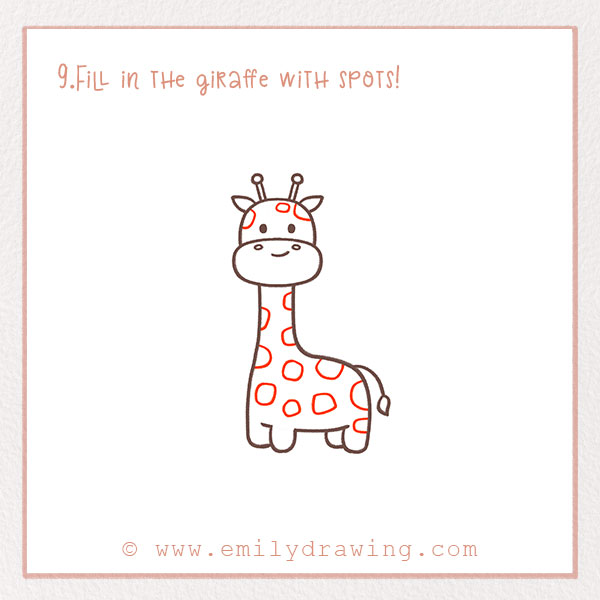
Finally, let’s add the spots! Because of their distinct patterns, no two giraffes are exactly the same! Have fun filling in the pattern. It doesn’t need to be perfect because all spots appear different in real life anyway. Throughout the head, neck, belly, and legs, add blobs that are all a little bit differently shaped. Make some of them cut off at the edges, too, to make your drawing more realistic.
Step 10 – Color in your drawing!
Fantastic job so far following these easy giraffe drawing steps—one more to go! Find some colored pencils or markers and fill in both the giraffe and the space around it. Often giraffes are tan with brown spots but be creative with it!
All done. What did you think? We had a great time and hope you did too. We’ve got tons more tutorials just like this one if you want to do another! Whether it’s plants, animals, food, or characters, there’s something for everyone. You can also use the search feature to find a specific tutorial you have in mind!
Expand your animal collection with How to Draw a Bird or How to Draw a Panda.
Pin it now, Draw later!
Get the FREE Printable Drawing Guide