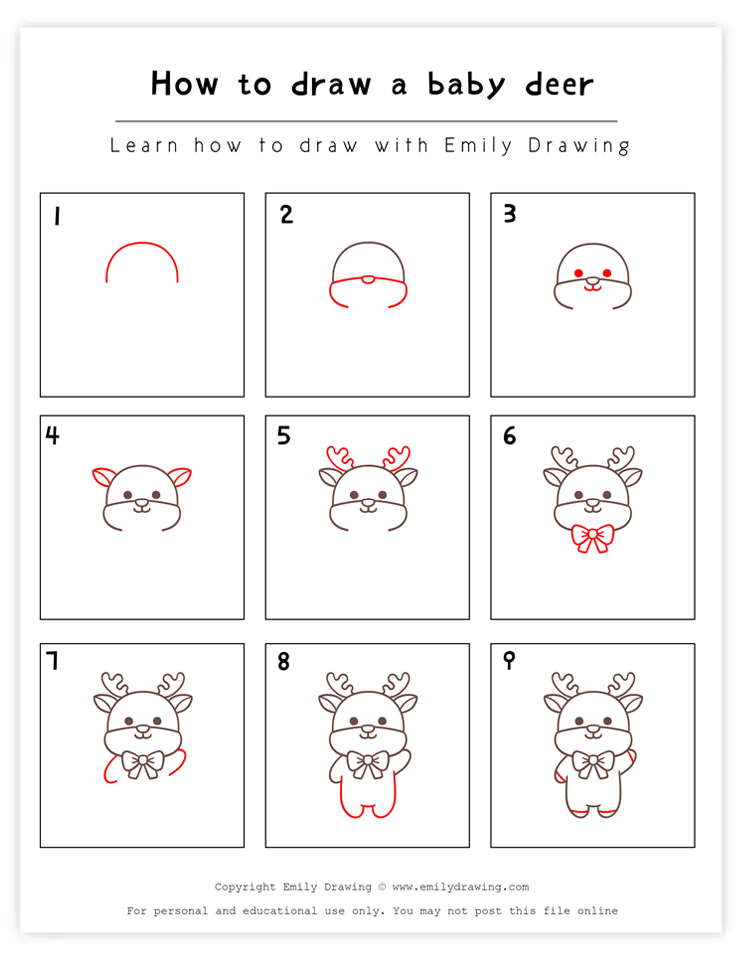
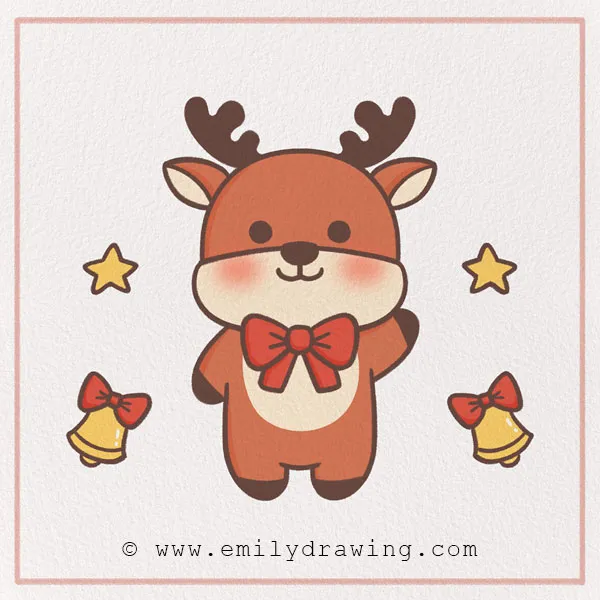
Hi! Today’s tutorial is going to be animal-themed. We are going to learn how to draw a baby deer! Like all tutorials on emilydrawing.com, this drawing animals step by step guide includes ten steps with both written descriptions and photo references.
Deer are very pretty animals, and as babies, they are even cuter. Have you ever seen a deer in person? Chances are you have because they live all over the Earth in different environments. In fact, they are native to several different continents. Here are a few more facts about deer: they are herbivores, they travel in groups, they range in color from light brown to dark brown, and a baby deer is called a calf or fawn.
Alright, enough talking—let’s get to drawing our baby deer! Are you ready to get started? Grab some art materials, and let’s go. Keep reading for the first step!
If you enjoy drawing animals, you might also like How to Draw a Bunny or How to Draw a Fox.
Materials:
- a piece of paper
- a pencil for the guiding lines and sketching
- an eraser
- a black sharpie or a pen for the outlines
- markers or colored pencils for coloring
- our printable drawing guide (Join my Email List below to get this Tutorial)
Here are my RECOMMENDED Art Supplies!
- Crayola Coloring Set (140 Pieces – Mega Value!)
- 24 Colored Crayon Set
- A4 Printer Paper
- Crayola Coloring Pencils
- HP Home Printer with Instant Ink!
Time needed:
14 minutes.
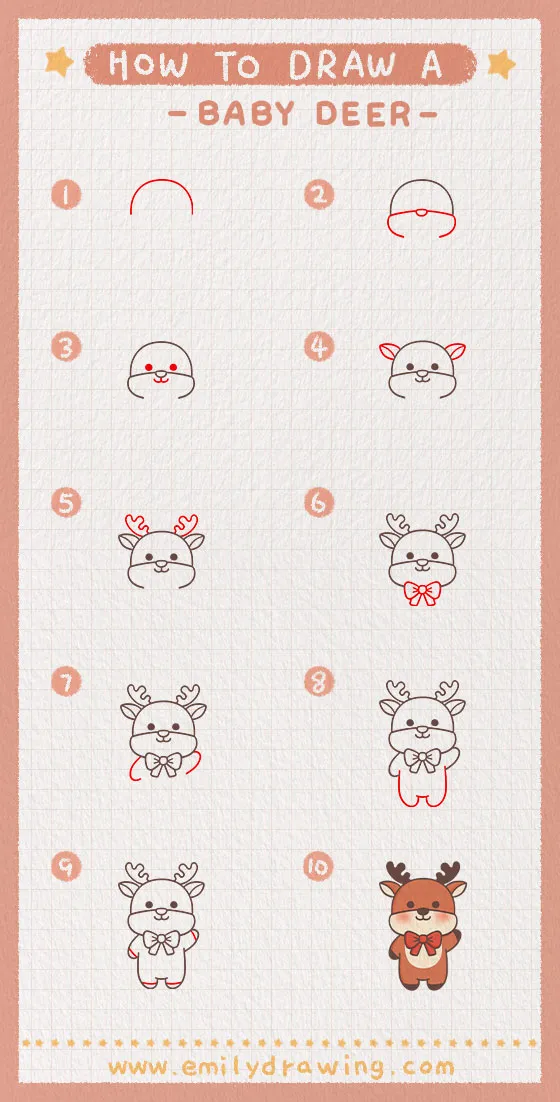
How to Draw a Baby Deer — Let’s get started!
Step 1 – Draw part of its head.
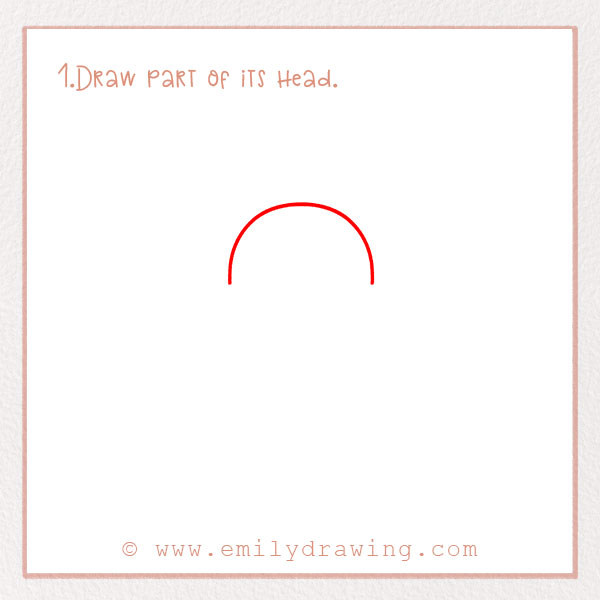
Two-thirds up the page, draw a large semi-circle. This is the top of the deer’s head. Leave plenty of room below for the rest of the drawing!
Step 2 – Draw the bottom of the head.
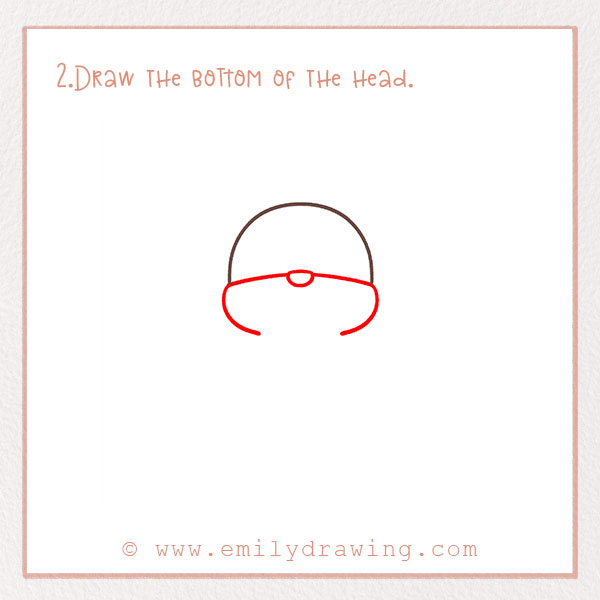
Let’s add the bottom portion of the deer’s head. We will also draw the nose. Did you know that deer have an amazing smell?
For this step, draw an oval centered below the semi-circle you just drew. Next, draw lines extending out from the nose and then wrap them around below. Don’t connect the ends of the line. It should look like an incomplete oval. Check out the photo!
Step 3 – Add the baby deer’s face.
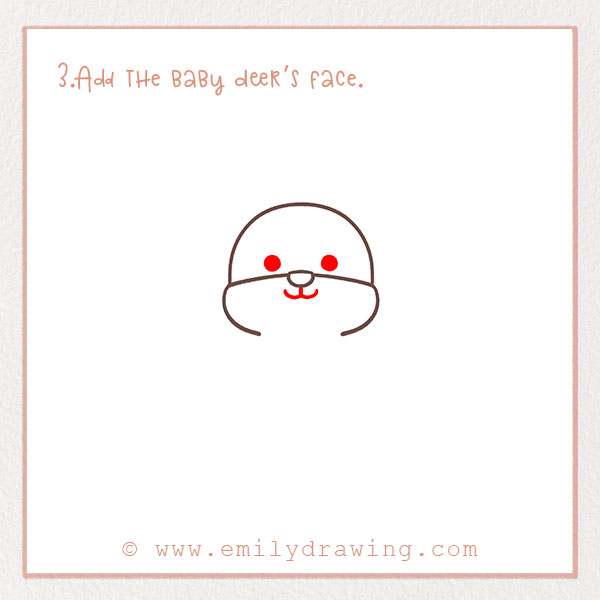
Let’s add the eyes and mouth now. Above the nose, add two dots for the eyes. Next, draw two curves underneath the nose for the mouth. Awesome!
For more tutorials featuring gentle animal shapes, consider How to Draw a Giraffe or How to Draw a Kangaroo.
Step 4 – Add the baby deer’s ears!
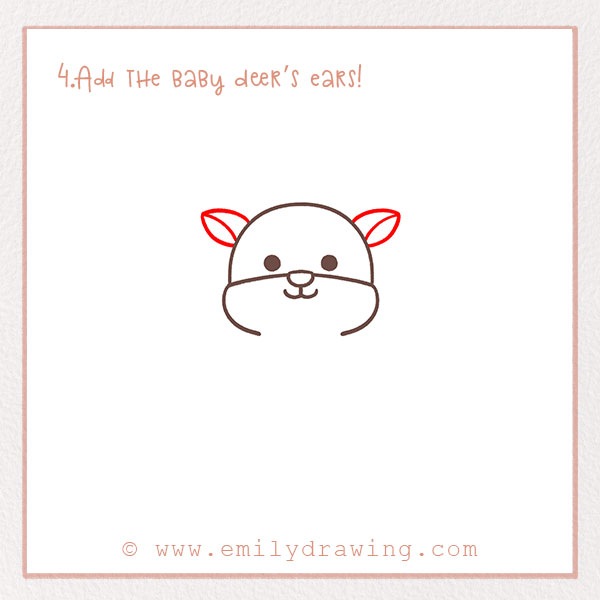
Let’s add the deer’s ears. Deer have great hearing, which makes up for their less-than-amazing eyesight. So, for this step, draw two leaf-life shapes on either side of the head. Draw another line inside each of them to show more definition. Refer to the photo.
Step 5 – Draw the antlers!
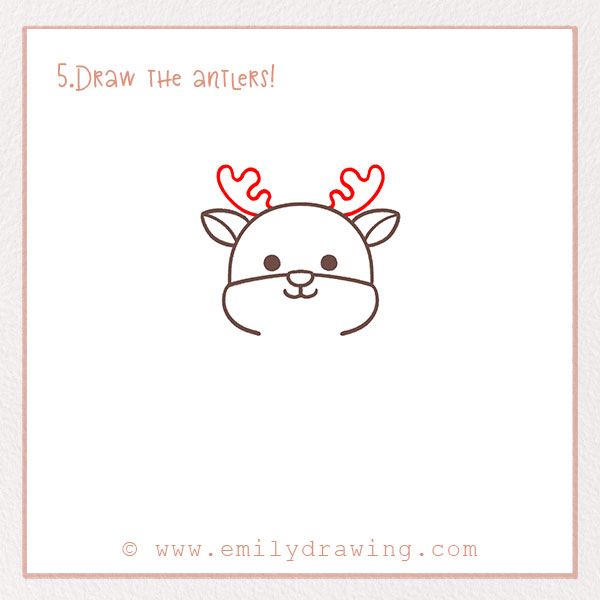
One of the most recognizable aspects of deer is their antlers. Only male deer, also called bucks, have antlers.
Let’s add some to our baby deer now. You’ll want to check out the photo for this step because it is a little funky! Basically, for each antler, draw a curvy line that shows its interesting shape. There should be one antler next to each ear. Awesome job!
If you enjoy adding fine details, try How to Draw a Panda or How to Draw a Bird.
Step 6 – Draw a bow.
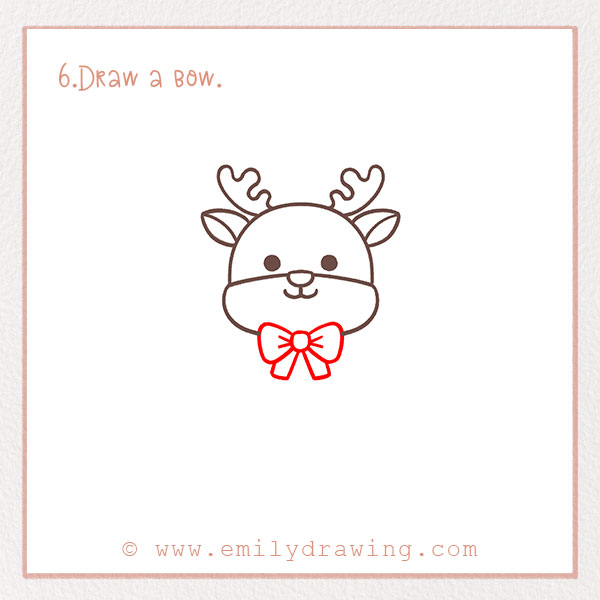
We want our baby deer to look cute and festive. Below its head, let’s add a bow! The bow will go in the gap from Step 3. So, draw a small circle for the center of the bow. Add two rounded triangles coming out to the sides. Next, draw two rectangles emerging from the bottom—these represent the ends of the ribbons.
Step 7 – Draw the deer’s arms.
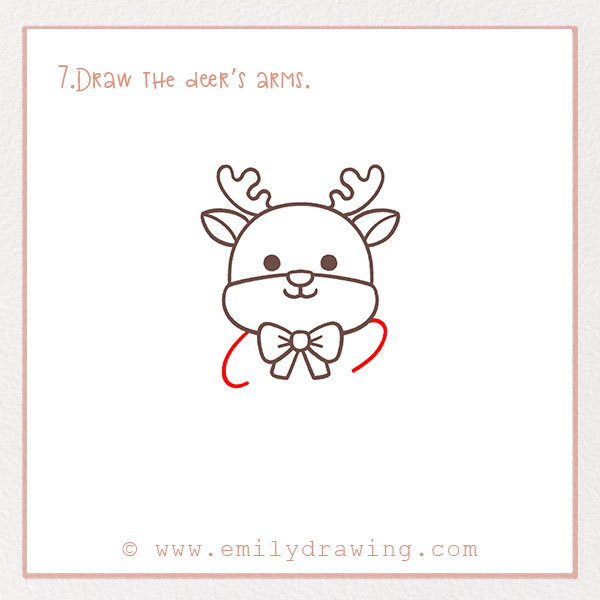
Our cartoon baby deer is, of course, in a cute style, kind of like a teddy bear. The arms and legs aren’t necessarily realistic, but they are cute! Draw two side U shapes for each arm. Draw one going up and one going down. Check out the photo. Great job!
Step 8 – Add the rest of the body.
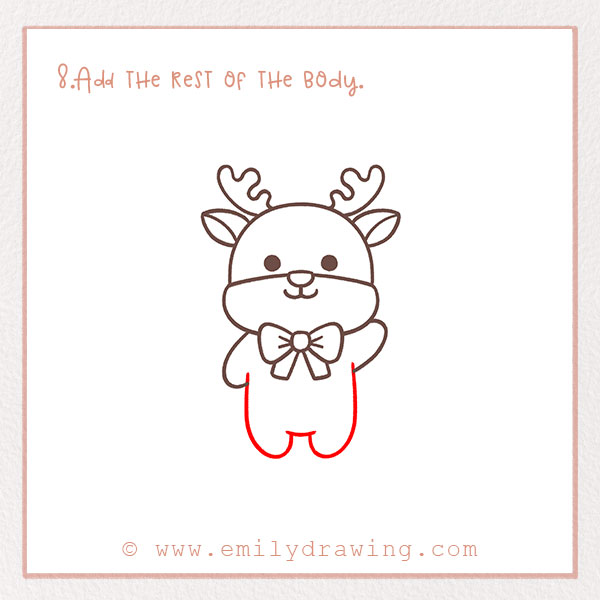
Let’s draw the legs and belly now. From the bottom of the arms, draw two long lines that each curve into a U shape. These are the legs. Connect the legs with a short line—now the outline of the baby deer’s body is complete.
Step 9 – Draw the baby deer’s clothes!
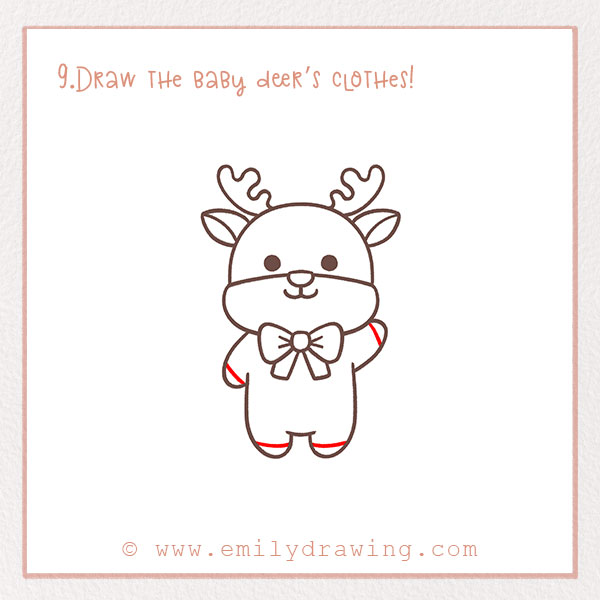
We are drawing the deer as a cute baby. Let’s add a onesie, like all babies wear, to our baby deer. At the end of the arms and legs, draw lines to show the edge of the pants and sleeves.
Step 10 – Color in your drawing.
Last but certainly not least, fill in your drawing with vibrant colors! Use any colors you want. Fill in the background, too. And, as always, don’t forget to have fun with it!
Good job! We hope you had an amazing time following along with our easy drawing tutorial on how to draw a cute baby deer. Share this tutorial with friends so they can make their own drawing!
Complete your collection of animal drawings with How to Draw a Squirrel or How to Draw a Hedgehog.
Do you have another idea for a tutorial you’d like to see? Let us know in the comments below! And if you enjoyed this format for learning how to draw, browse the rest of our site for more just like this!
Pin it now, Draw later!
Get the FREE Printable Drawing Guide